Do it yourself without asking for help: 12 yuan to repair the faulty axis of the mechanical keyboard
The AKKO 3108s red-axis mechanical keyboard that has been used for two years was incorrectly changed. Under the guidance of a miracle, the right win key was successfully scrapped. The symptom was that the key could not be pressed.

In order to uphold the concept of being diligent and thrifty, I decided to change the switch by myself to extend the life of the keyboard. I bought two Akko mechanical keyboards, one with black switches and the other with red switches. They were all Cherry switches at the time. Now I can’t see Cherry switches in JD.com, so just insert a link to Akko’s own switches. The large model has not changed, it seems that there are many. Got a V2.
If you buy a few replacement shafts from a certain treasure, just search for the cherry shaft body directly. You can buy any shaft you want to install. Here I bought 4 red shafts that are the same as the factory, plus a shaft puller, which costs 12 yuan.

One electric soldering iron, if you don’t have one, you can buy a temperature-adjustable one. It will be less used for minor repairs and repairs in the future. I bought it for 40 yuan. Solder and rosin will be sent when you buy the soldering iron.
A card similar to a bank card, used to pry up the buckle.
It is best to prepare a tin absorber, or a tin absorber, or a piece of pure copper multi-strand flexible wire. If these are not available, the following steps can also be carried out, but it is a little difficult. At the same time, it is recommended that friends who want to repair electronic products often buy a small fan to absorb the smoke generated after the solder is heated. After all, the lead content of solder is relatively high.
The first step is to use a card such as a bank card to pry up the buckles along the keyboard around the keyboard shell.

The second step is to remove the two screws on the upper front of the keyboard.
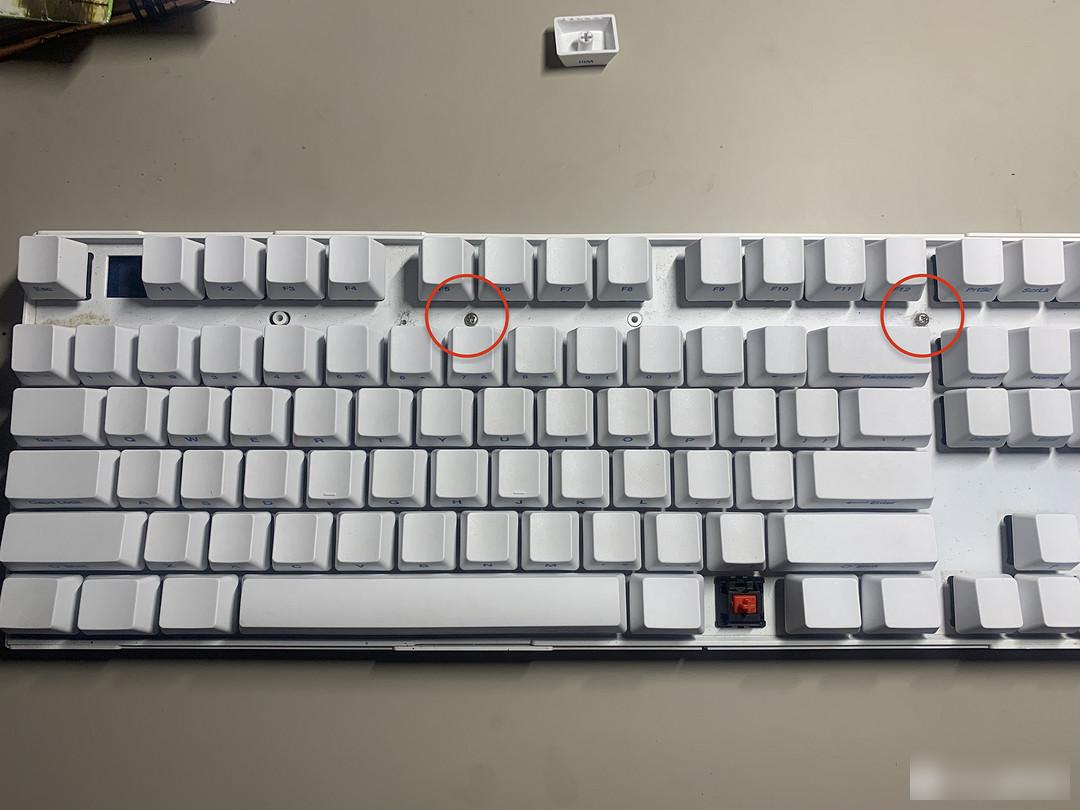
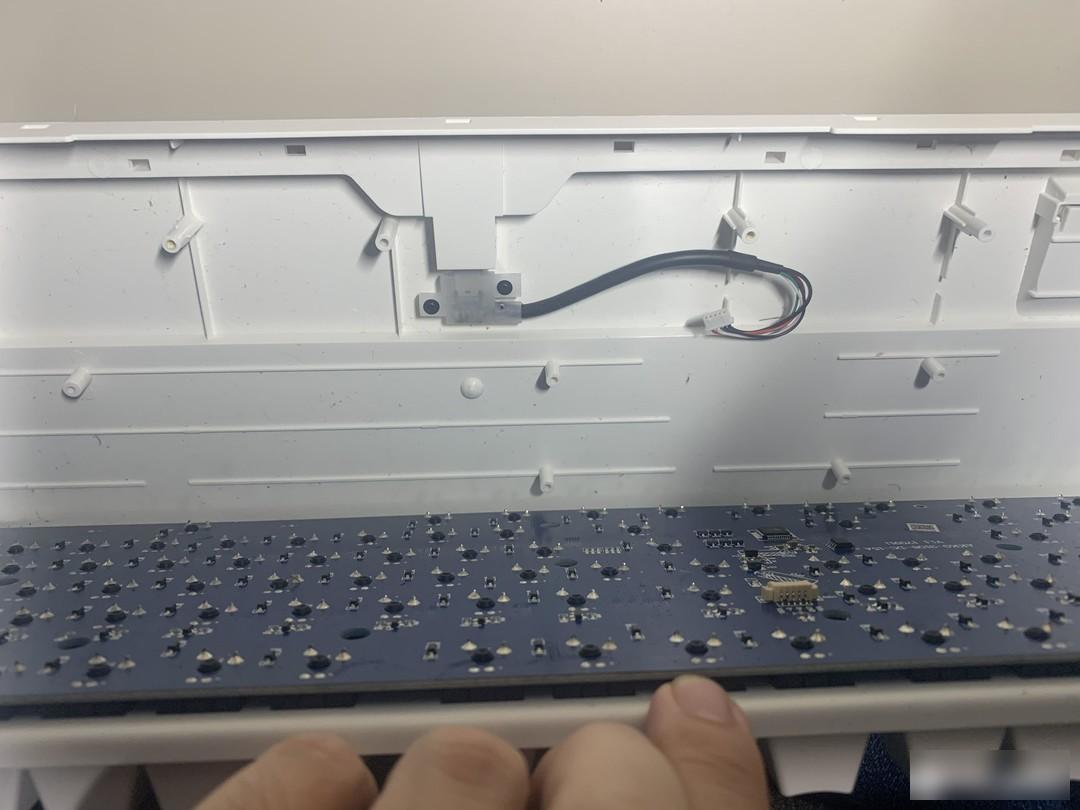
The third step is to lift up the buckles on the bottom and the upper part with a card along the circle of the keyboard. Do not separate the two parts after lifting up, but first find the connection line between the circuit board on the back of the keyboard and the bottom of the keyboard, and pull out the line first. , and then separate the keyboard.
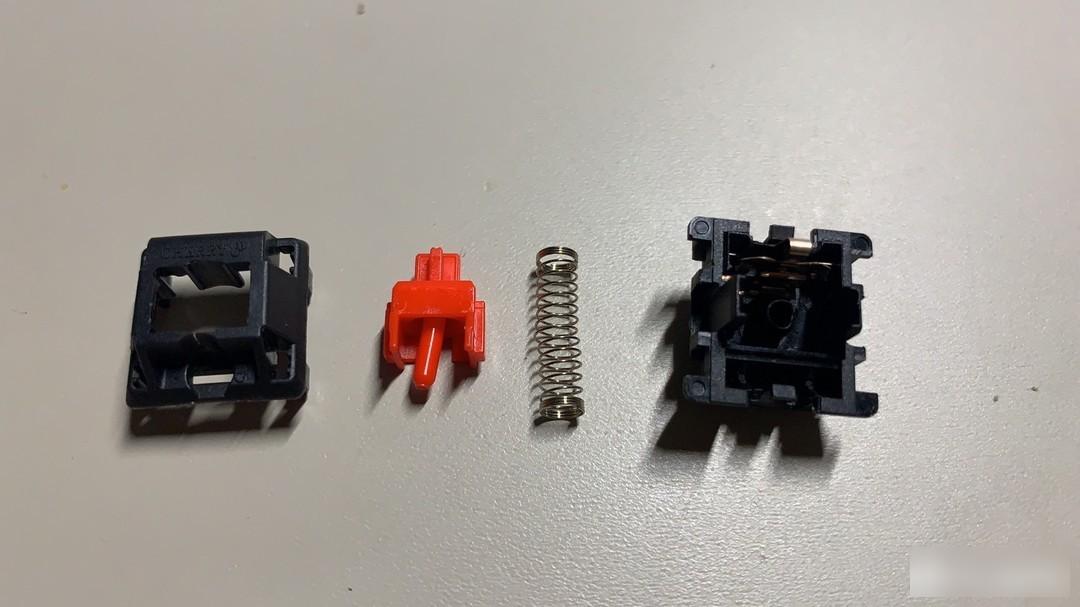
The fourth step is to pull out the keycap on the faulty switch body, turn over the keyboard, and confirm the position of the solder joint of the faulty switch body. Here, it is necessary to distinguish between the solder joints of the switch body and the solder joints of the LED light, and do not make mistakes when melting the tin.
 Note that the corresponding buttons are printed on the bottom of each shaft base
The fifth step is to use a shaft puller to clamp the faulty shaft on the front, apply a little force, and put the keyboard in a vertical position with the front facing down slightly. At the same time, pull out the shaft body by shaking it outwards forcefully. During this process, the solder joints should be heated repeatedly and evenly. At the same time, pay attention to observe that once the solder joints melt, the shaft puller will force outward. If there is no tin suction device but the electric soldering iron is a classmate with a cutter head, you can directly use the cutter head to heat two solder joints at the same time, so that the shaft can be pulled out faster. The whole process took me about five minutes to successfully remove the faulty shaft.

Step 6: Align the pin position of the new shaft, and apply a little rosin on the pins of the new shaft, turn the keyboard over, push the new shaft into the pinhole on the keyboard, and heat the board with a soldering iron I tin, so that the new shaft is fixed first. Then apply new solder to the back solder joints. After pointing in the new solder, use an electric soldering iron to evenly heat the new solder at the two pins, and melt the solder in the cavity of the circuit board in the way that the new solder heats the old solder. While heating the solder, make sure to push the new shaft firmly with the other hand towards the board until the solder has melted enough to push the new shaft, then firmly seat the new shaft in place.

Finally, add a certain amount of solder to the two pins to ensure that the solder joints are full. Plug in the connecting cable between the bottom of the keyboard and the bottom case of the keyboard, and connect it to the computer to test whether the triggering of each key is normal. After the test is correct, re-fasten the bottom case, tighten the screws, and fasten the case, and the maintenance is over.
1. If there is no tin suction device, it is recommended to use a knife head. If there is neither of them, if there is no tin suction tape, it is also possible to find waste wires. If there are no waste wires, be sure to continue to heat evenly and continue to pull out the shaft vigorously. There must be a miracle. But the disadvantage of this operation is that the circuit board will be ugly like the picture above.
2. Friends who are nearsighted should remember to wear glasses, and friends who are not nearsighted should wear goggles. In case the solder collapses into the eyes, it is not a joke.
3. All friends should follow the anti-oxidation maintenance and use precautions of the electric soldering iron to avoid the phenomenon that the soldering iron tip cannot reach the temperature due to excessive oxidation and cannot melt the solder.
Disassemble the disassembled shaft body, analyze the reason why the shaft body cannot be pressed, and find that a stick inserted into the spring by the shaft core is bent, which makes the shaft core unable to apply pressure to the spring in the vertical direction, and thus cannot trigger the button. If you can remove a shaft core from other waste keyboards, this shaft can still be used.
This maintenance is now over, and it will cost 12 yuan in total if the necessary tools for maintenance are not included. The Akko 3108 mechanical keyboard is my first keyboard, and I bought the second one for the convenience of work. It feels thick, and the side-engraved keycaps have not been greasy after long-term use. It is highly recommended for those who have a small budget but want to try a mechanical keyboard. Friends come in and play with it. The circuit board has reserved light holes to change the lights by yourself. The playability is also very high. It can provide a practice platform for yourself to buy better mechanical keyboards or customized keyboards in the future.
Factory Adress: No.11,FengpingRoad