Hands-on teaching: only 39 yuan, a wired keyboard becomes a Bluetooth keyboard in seconds
The thing is like this, last year I came across such an article on Auntie, it was very popular, so I saved it.
According to the article, it only costs 39 yuan to change any wired keyboard to a Bluetooth keyboard. I also bought this module and successfully changed my keyboard to a Bluetooth keyboard.
It's a pity that the article over there is written too minimally, which caused many value friends in the comment area to say they couldn't understand it.
And in fact, the module also needs 12 yuan for shipping, which is actually 51 yuan.
Of course, in the end these problems were all solved by me one by one.

Therefore, based on the principle of being happy alone is worse than being happy with others, I plan to bring you an article today:
Without further ado, let's get started.
First of all, the freight is settled. The module itself is 39 yuan, but in the Taobao store of this brand, it needs to pay an additional 12 yuan for freight. After consulting customer service, I learned that they also have a store in the Huawei Eco Market, and there is no need to pay for shipping when buying there.
Taobao store: Runhe Hongmeng Neptune (W800) development board OpenHarmony wireless Bluetooth set keyboard and mouse - Taobao (taobao.com)
Huawei Eco Market: Runhe Neptune Series Neptune Bluetooth Keyboard DIY Kit-Huawei Developer Alliance (huawei.com)
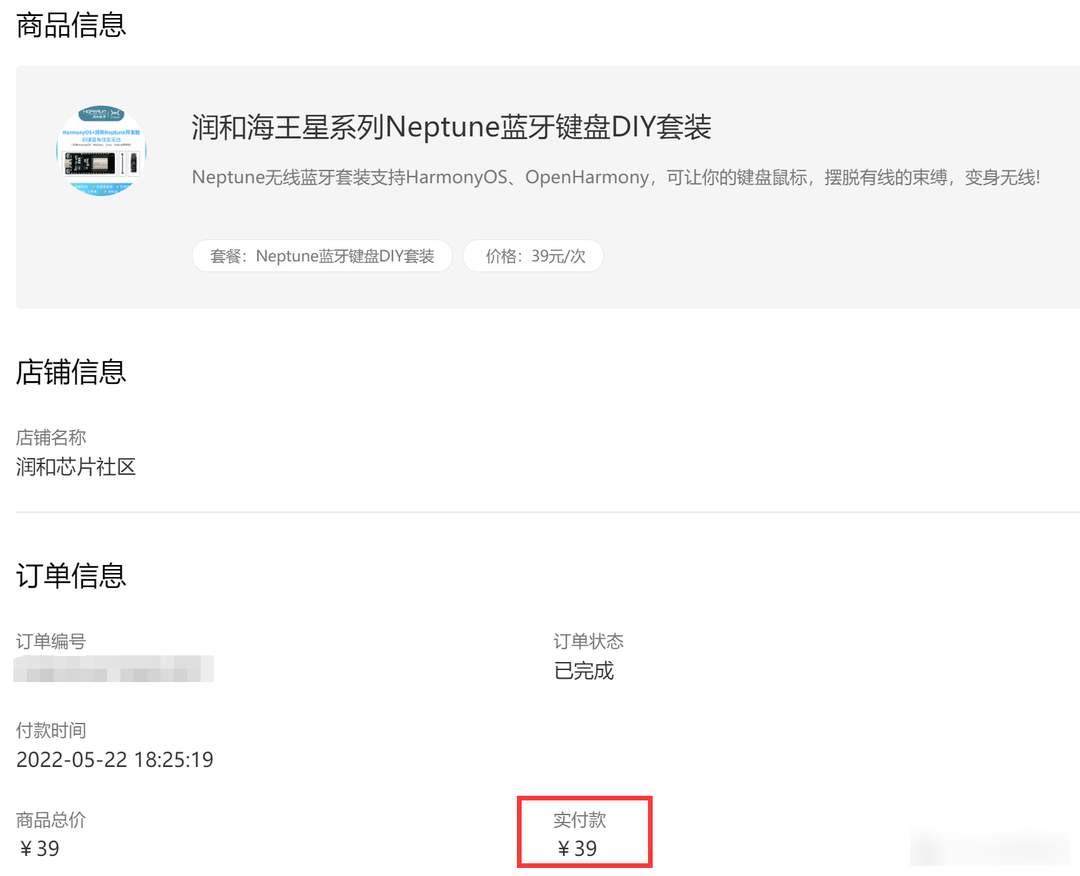 Screenshot of the order, the actual payment is 39 yuan
In this way, I successfully purchased the module for 39 yuan.
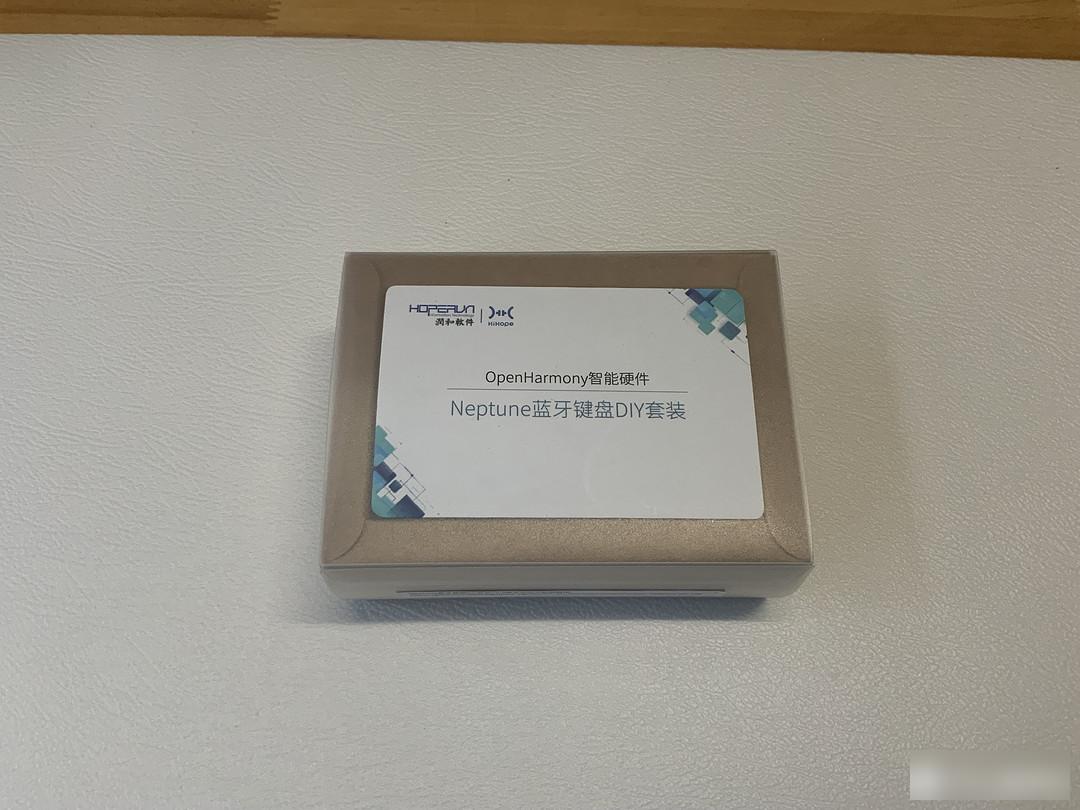
The outer packaging is very simple, but it is very practical and can be used as a storage box.
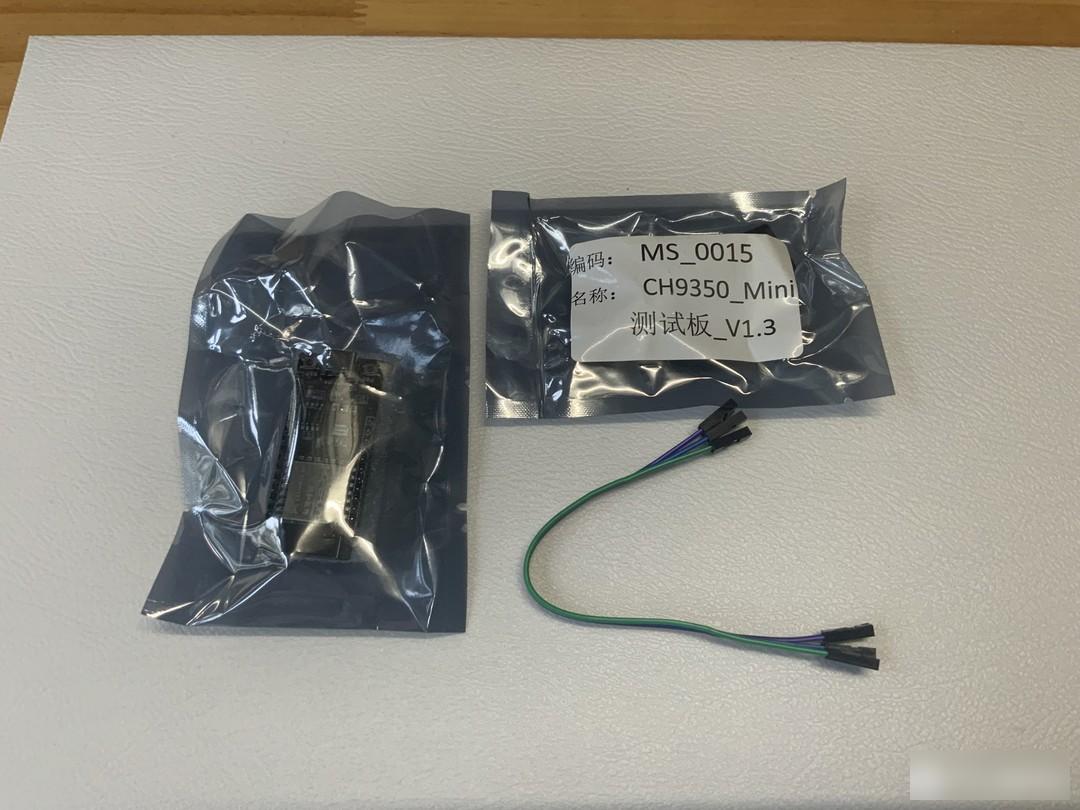
There are three things in total: Bluetooth main control module, CH9350 test board, and four DuPont lines.
There is a small episode here. I thought the module had already written the program at the factory, and it can be used after plugging in the line. In fact, the program needs to be burned by myself. I was stupid and went to ask the customer service hahahaha.

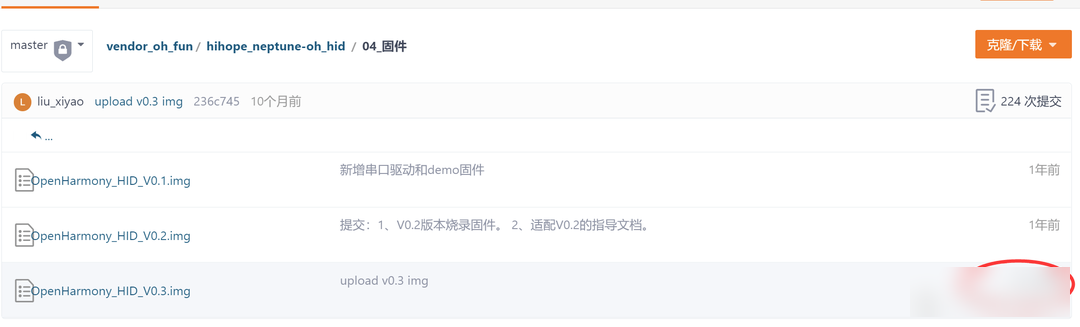
First, we open the firmware download URL: neptune-oh_hid firmware - Code Cloud - Open Source China (gitee.com)
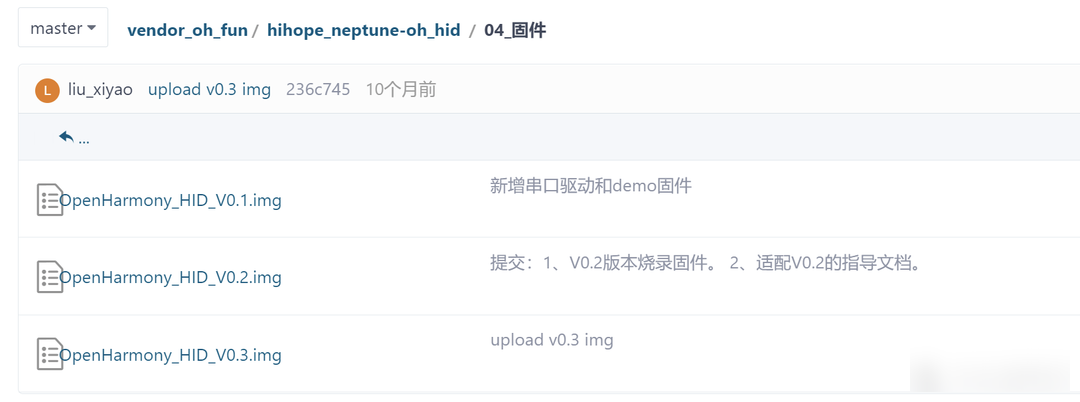
There are three versions in total, and the newer the version, the more functions, I personally recommend all three.
After downloading the firmware, we need to install the firmware into the Bluetooth module, but before that, we need two small things.
CH340 driver
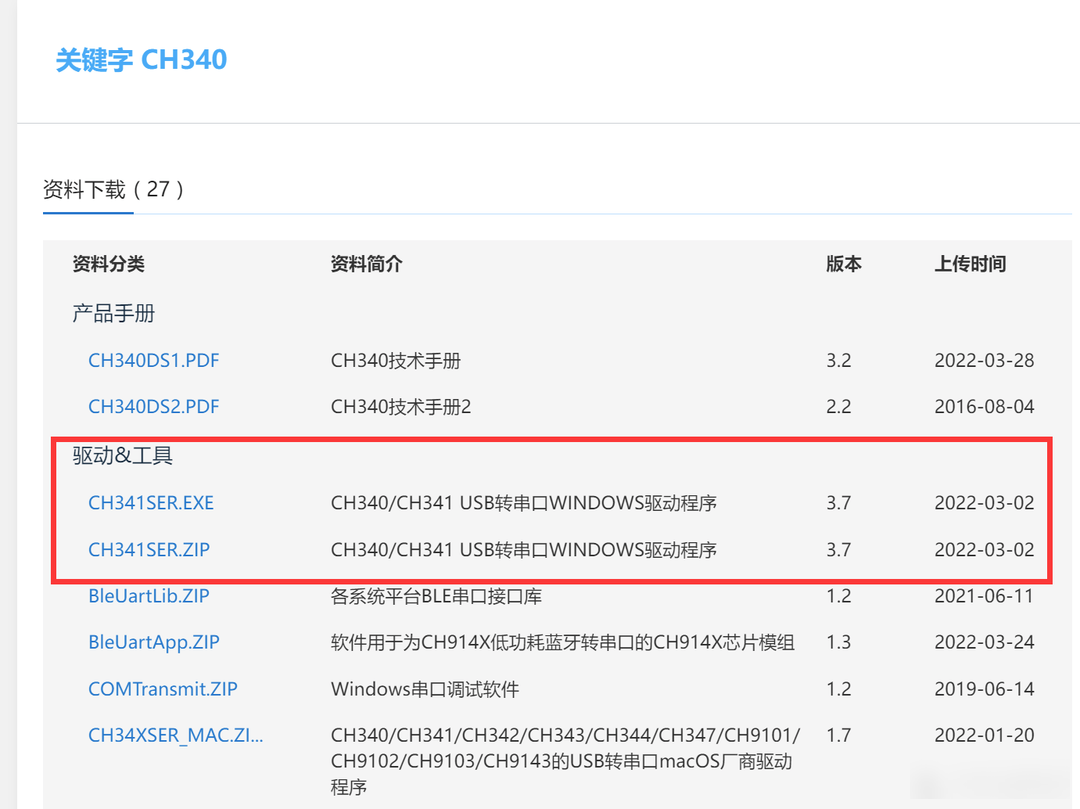
Because the USB-to-serial chip used by the Bluetooth module is CH340, we must first download the driver of CH340: CH340 - Nanjing Qinheng Micro
The process of installing the driver is very simple, so I won't go into details.
PS: It should be noted that if the prompt is "driver pre-installed successfully" instead of the expected "driver installed successfully", then the installation has failed and needs to be reinstalled.
Tera Term
The firmware is installed by Xmodem protocol installation ( It doesn't matter if Xiaobai doesn't understand, anyway, just treat it as an installer )。
I am using the open source software "Tera Term" here: Tera Term Download (2022 Latest).
The installation process is omitted this time (because the installation process is basically the same as you installed QQ, Netease Cloud, etc.), the only thing to pay attention to is not to install it on the C drive, and this software supports Simplified Chinese, so you can in Choose during installation Chinese (simplified) 。
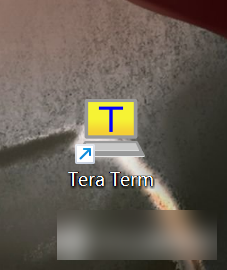
After the installation is successful, the shortcut of the software is as shown in the figure.
firmware installation
After everything is ready, we can officially start installing the firmware.
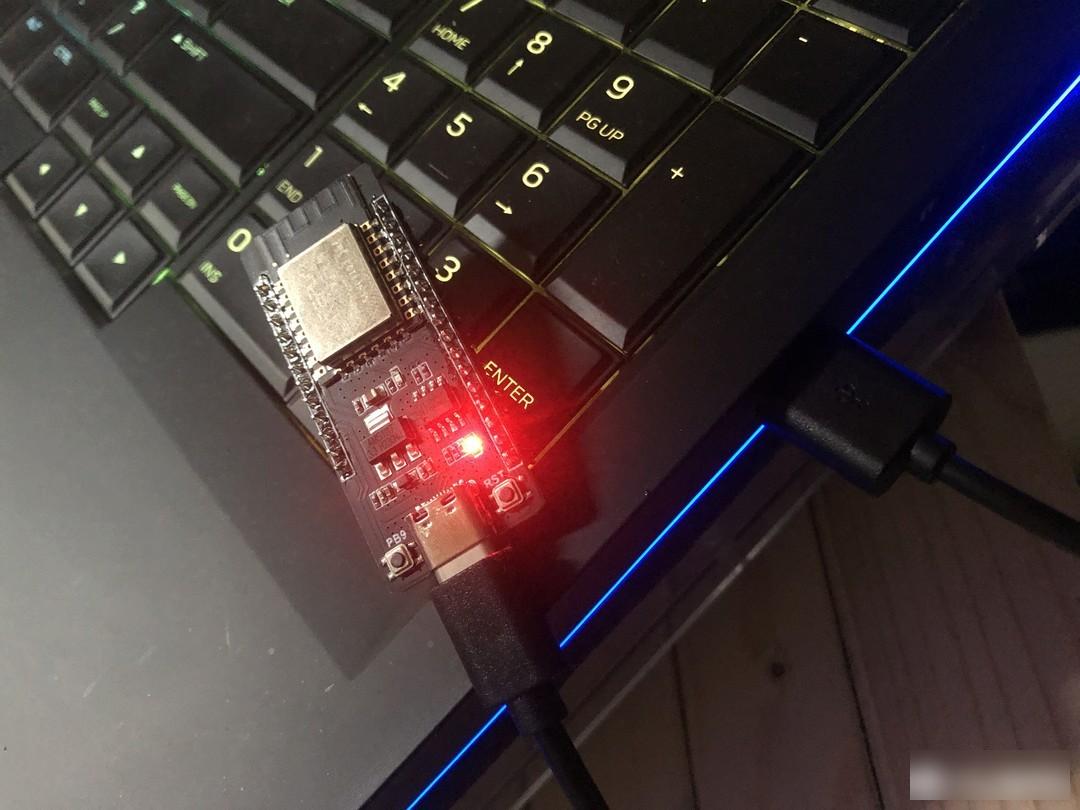
First, use a typec cable (with data function) to plug the module into the usb port of the computer.
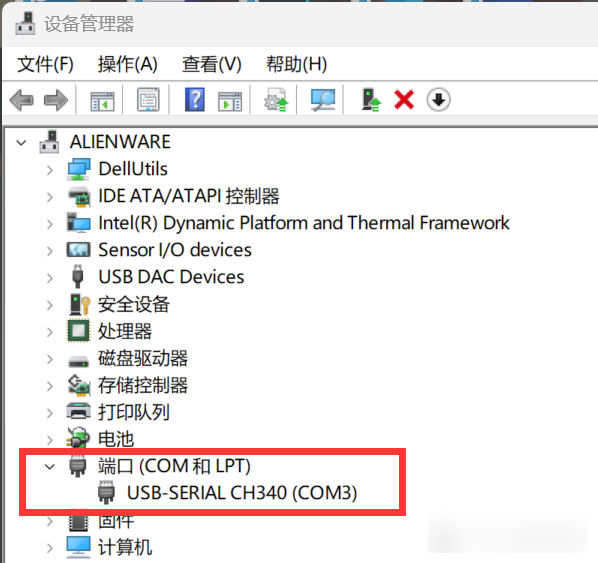
If everything is normal, you can see this CH340 in the port of the device manager.
Then we open Tera Term.
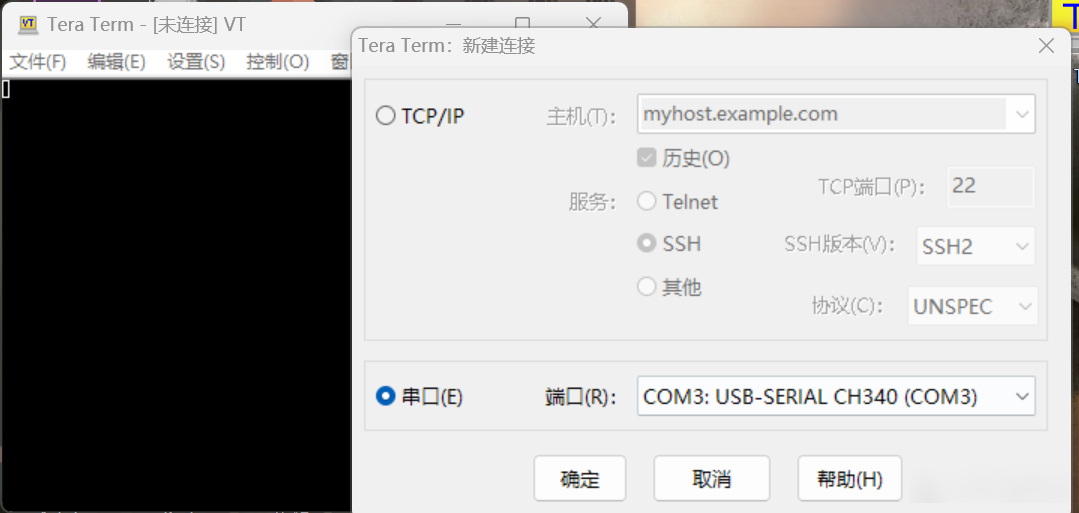
After the software is opened, a window will pop up automatically, here is the serial port below us, pay attention The port should choose the same COM number as in the previous device manager , For example, I am above COM3, here must choose COM3, must not choose wrong.
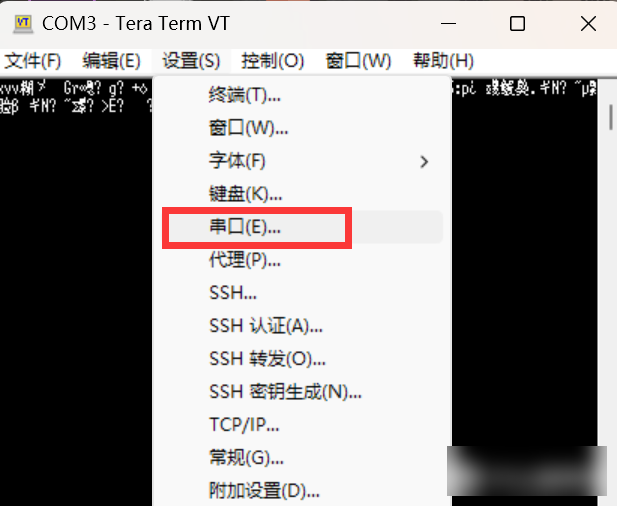
Then we click on the serial port in the settings.
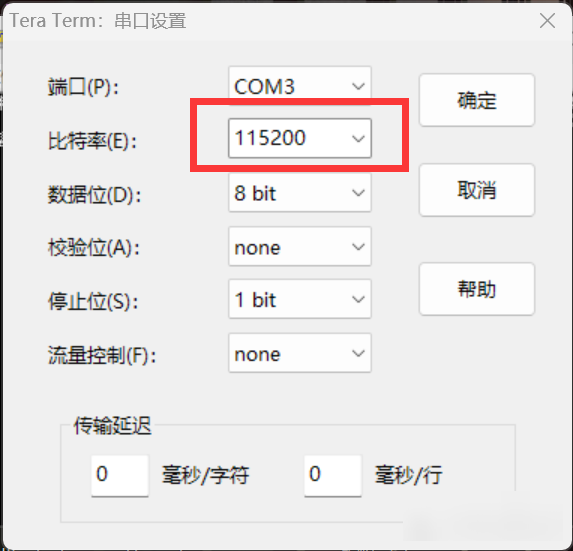
Set the baud rate to 115200, then "OK".
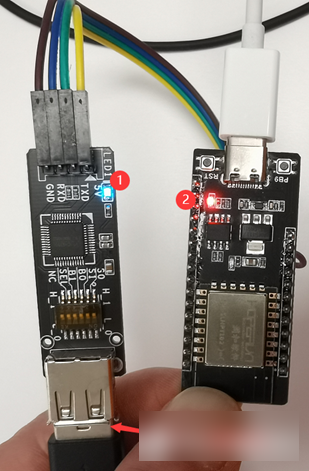
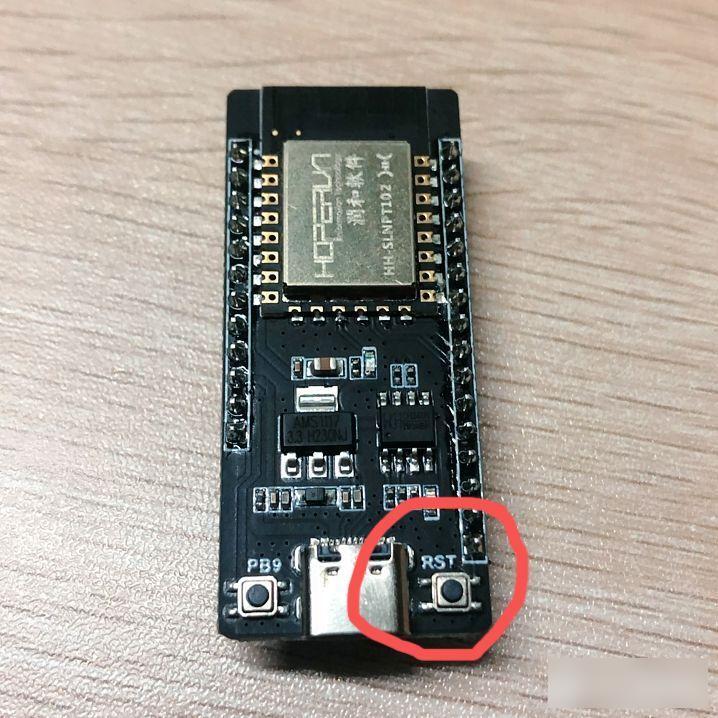 The red circle is the reset button.
Then press and hold the Esc key on the PC keyboard. (Note: The ESC key of a non-Bluetooth keyboard is the ESC key of a PC keyboard) , and then click the reset (RST) button of the Neptune development board.
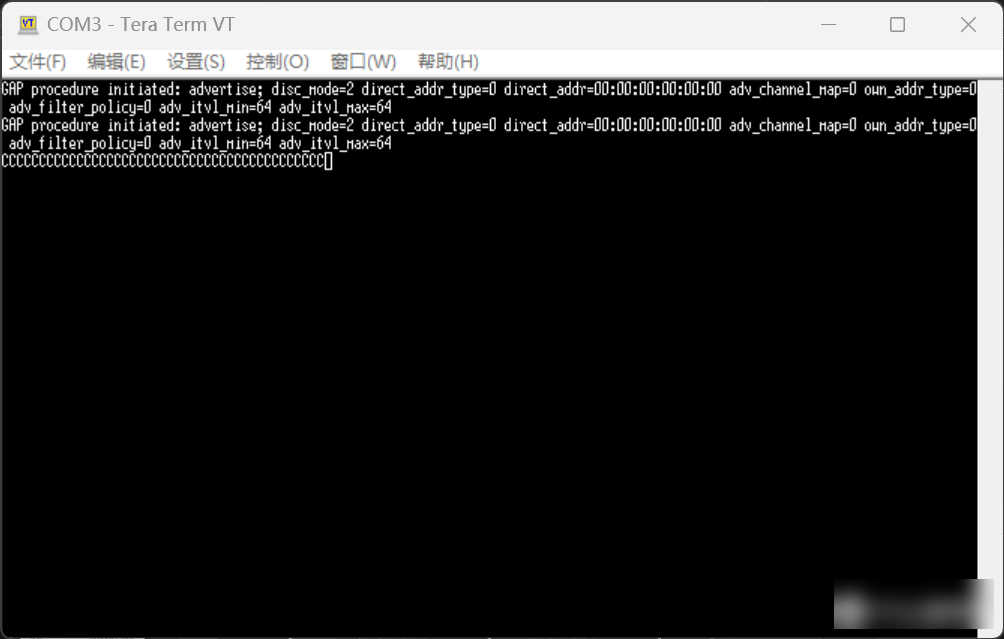
As shown in the figure, when "cccccccccc" appears continuously in the software, it means that the module has entered the burning state. We can release the "ESC" key on the PC keyboard to start flashing the firmware into the module.
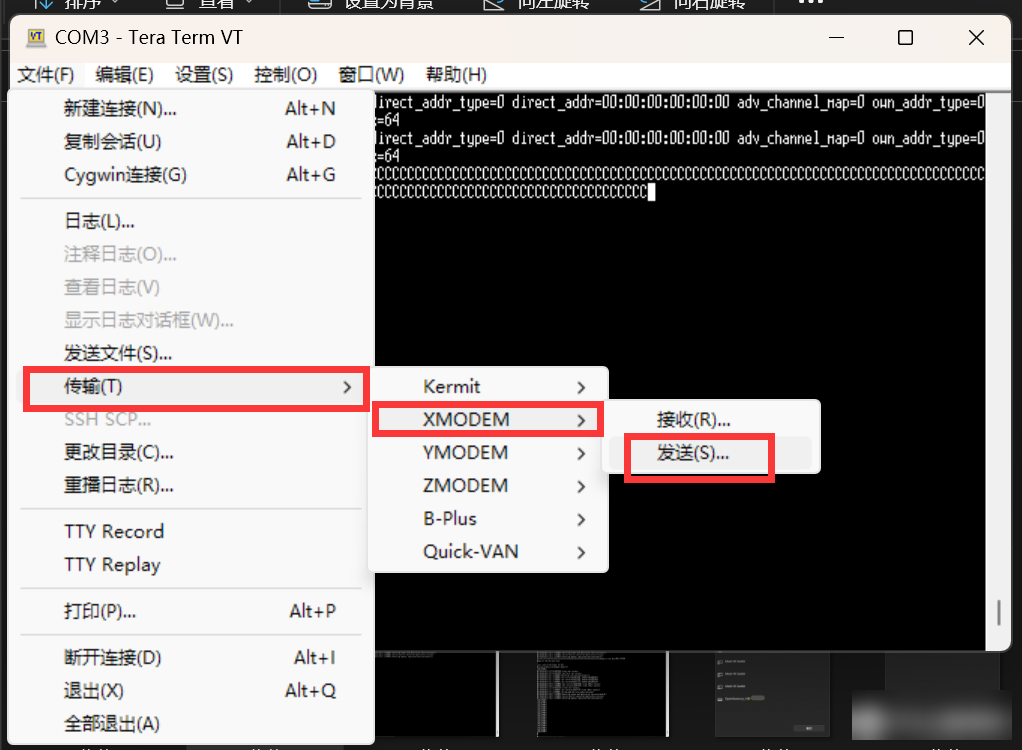
choose" Transport -> Xmoderm -> Send(S) ” to enter the burning interface.
Then select the firmware you want to flash in, for example, I flash the latest V 0.3 version.
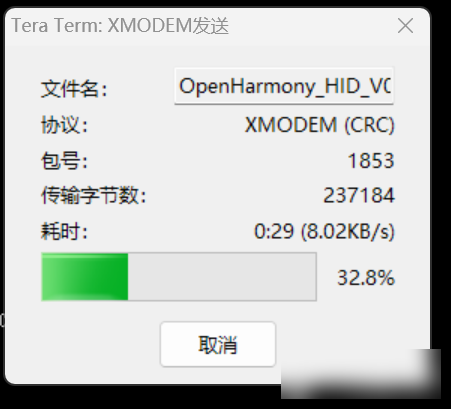
Then the recording started. However, be careful not to click on this page casually during the process, so as not to interrupt the process.
After the burning is completed, the pop-up window will automatically close, and then the same interface as before will appear C continuously, which means that you have burned successfully.

Then we click the reset (RST) button to exit the burning mode.
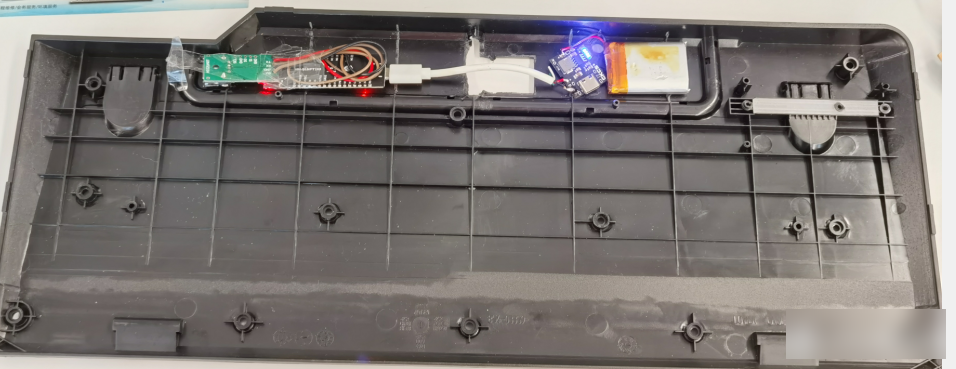
At this point, our firmware has been successfully burned into the Bluetooth module, and then we only need to connect the modules with wires, and then it can be used normally.
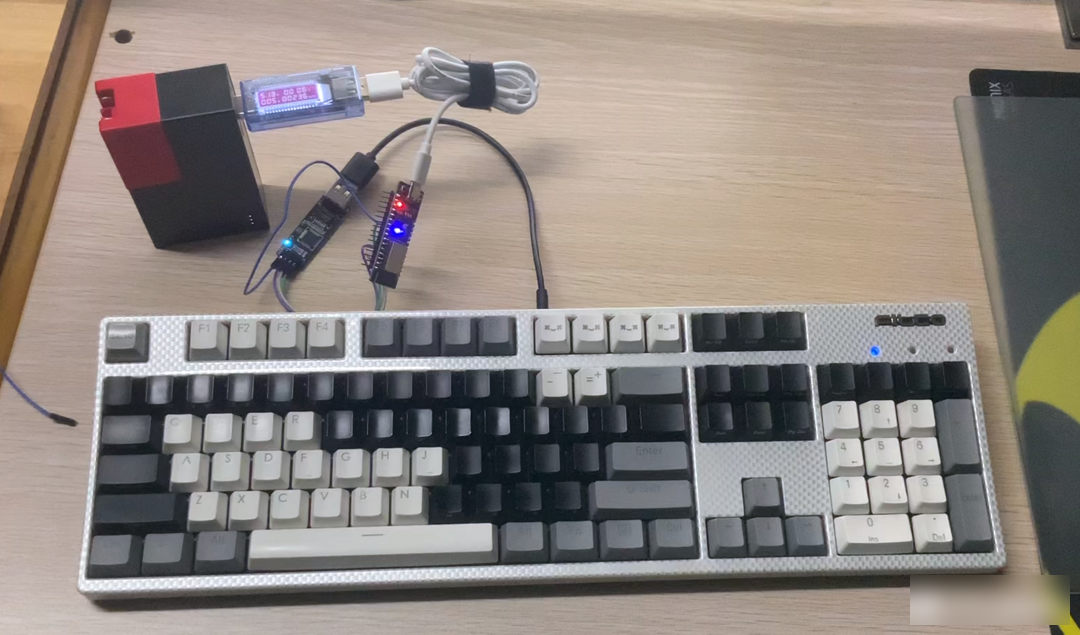
When I tested it myself, I didn't take pictures of the hardware, so I will quote the official pictures here.
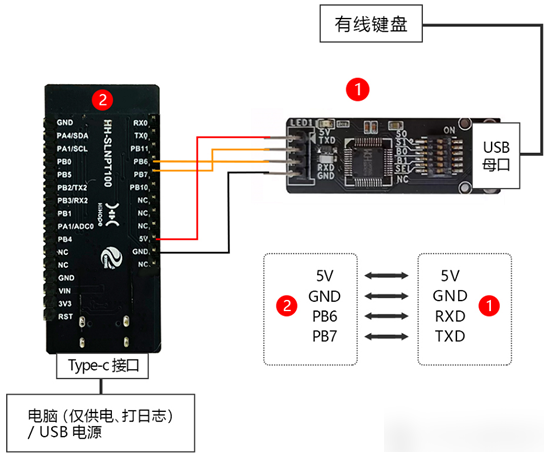
According to the official diagram, connect the module and the keyboard.
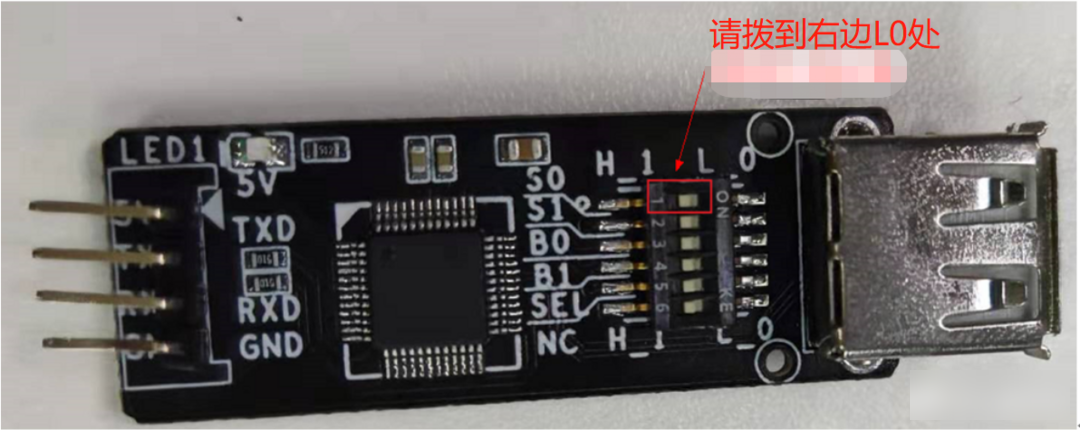
Then we need to turn the S0 DIP switch of the CH9350 board to the right to L0.
After connecting correctly, red and blue lights will be constant, if you press any key on the keyboard, blue light number one will blink.
All is ready except for the opportunity.
This module can support Windows, Linux, Android, and IOS. I will use my Windows as a demonstration here.
After the module is powered on, it will basically enter the pairing state automatically, and you can see openharmony by opening the Bluetooth discovery interface of Windows.
If you can’t find it, you can try alt+1 (the 1 on the letter Q, not the 1 on the keypad) and press and hold for 3-5 seconds to enter the pairing mode manually.
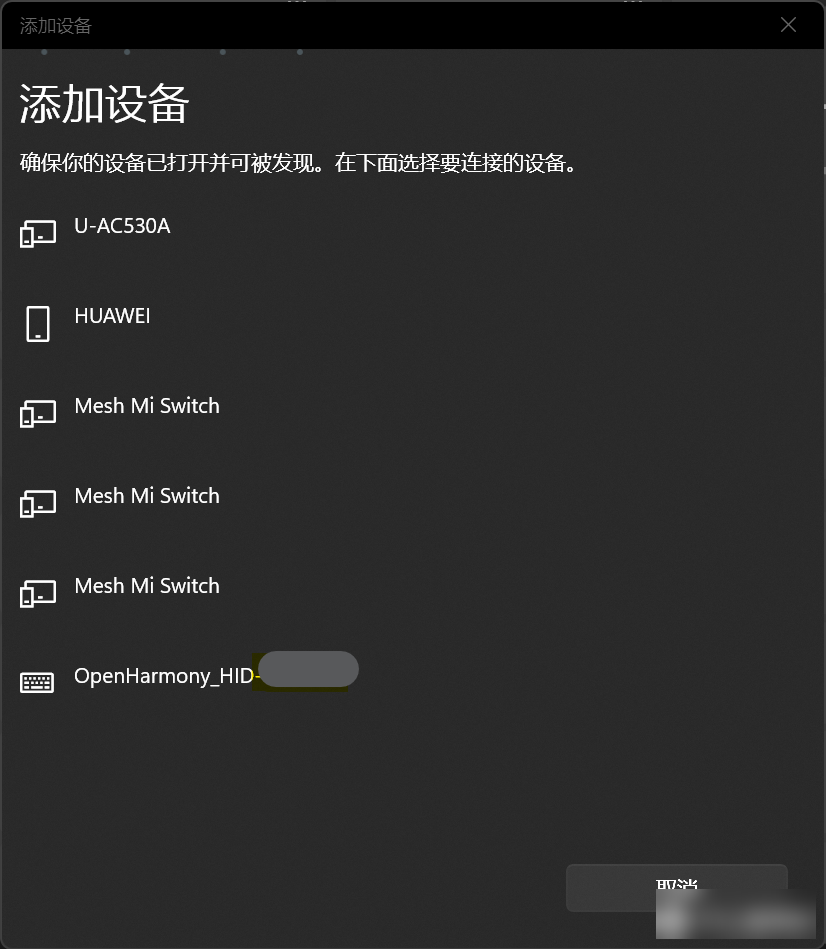
Find openharmony.

connection succeeded! ! ! ! !

Take a picture, you can see that the NUM keys are all lit.
At this point, we can have fun.
Have fun.
Let's play.
La.
。
Really happy?
It's not very elegant to drag such a lot of things, my friend.
So we need to stuff this bunch of stuff into the keyboard, just like in the article I read at the beginning of the article.
All plugged in, this is called a Bluetooth keyboard.
Therefore, the last step in changing a wired keyboard to a Bluetooth keyboard is:
I didn't do this in reality (I'll explain why later), but here I can show you my plan first.
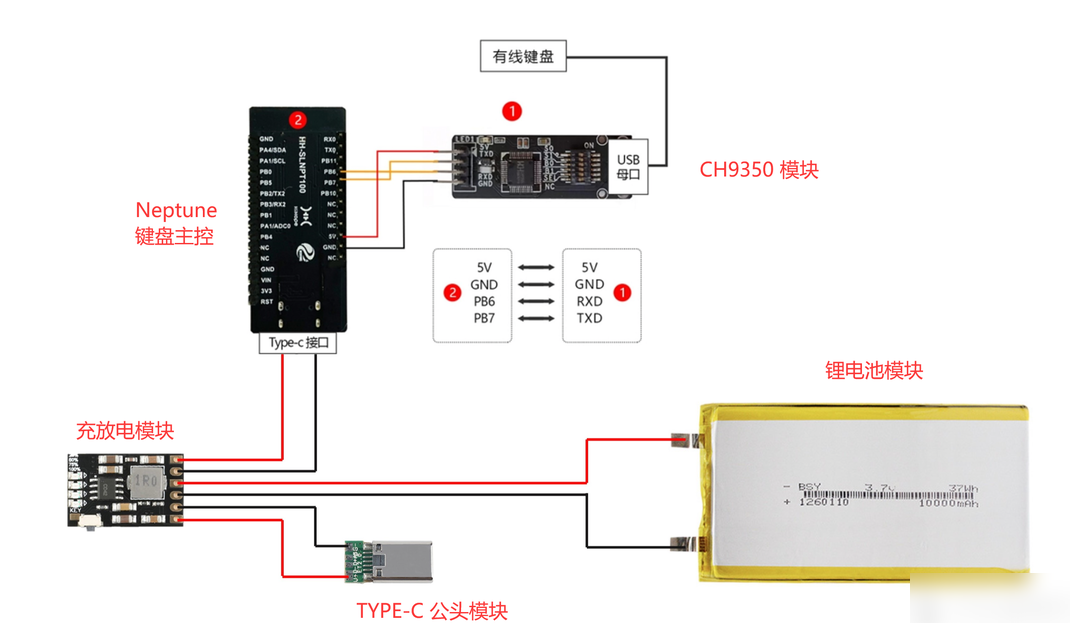
Keep the original module still, the typec interface is no longer connected to the power bank, but a typec cable is used to connect the charging and discharging module, and then add a lithium battery for power supply, and a typec female socket as the input port for the lithium battery power supply.
Therefore, we need three small things: charging and discharging module, lithium battery, typec female seat (the picture is misplaced as a male module
 )
)
Because the Bluetooth main control needs 5V power supply, the charging and discharging module must have a 3.7v to 5V function. I use MH-CD42 here.
But you can also use this, it comes with a typec socket, which is cheaper.
I use CD42 only because the bottom one is too big to fit into the typec port, so I use a small typec female socket to connect to it.
In fact, you can buy it casually, but there are also points that need to be paid attention to.
First of all, it is best to buy one with a protective board, which is safer.
Secondly, we need to pay attention to the balance between capacity and volume. Don’t ignore the volume in pursuit of battery capacity. It will be ridiculous if it cannot be inserted into the keyboard.
There is nothing to say about this, just stuff it all in and fix it.
There are many ways to fix it, hot melt glue, double-sided tape are all OK, as long as the tape is insulated.
Don't stick the positive and negative electrodes of the battery with conductive tape like me, it's so sour. . . . .
At this point, your wired keyboard has officially become a Bluetooth keyboard.
We can finally have almost perfect fun.
Yes, I said that too. We can have almost perfect fun. But the problem lies in this almost.
Nothing in the world is perfect, and it also obeys this law.
If before this sentence, I was in blow This module, then this chapter, I will come black one black This module is up.
The most inescapable thing about Bluetooth is the delay problem, so here I summarize it in one sentence:
Typing at work is no problem, playing games is just a dream.

Let's put it this way, because it uses the BLE 4.2 protocol instead of 5.0 and above, so it belongs to the kind that you can obviously feel the delay compared with the wired mode, but it will not affect your daily work.
But if you play games, you should really wash and sleep. I played LOL Infinity Brawl, and the hero I used was Zed (
 It is recognized that this hero does not eat delay, no one objected to it
).
It is recognized that this hero does not eat delay, no one objected to it
).
The result is that I almost smashed the keyboard.
A program without BUG does not exist, and obviously, this firmware has a very fatal BUG.
Every time I finish using the computer, power off the Bluetooth keyboard, and then next time I use the computer, power on the Bluetooth module again, although it can still connect to the computer with Bluetooth, but it is useless, the keyboard is pressed but No characters will be entered on the computer.
Maybe you will ask, brother, why don’t you just turn off the Bluetooth and turn it on again, what a big deal~!
To which I would answer:
Well said, don't say it again next time.

Because the fatal part of this BUG is that even if you turn off Bluetooth and turn it on again, it can indeed reconnect, but it cannot respond.
You have to delete the device in Bluetooth, and then re-pair it like I just connected the keyboard Bluetooth for the first time.
This directly made me give up the idea of building it into the keyboard.
The Union Keyboard K375S, which is famous for its power saving, claims that two AAA batteries can last for 24 months, but the power consumption of this module makes me fear whether the keyboard can survive 24 days. . .
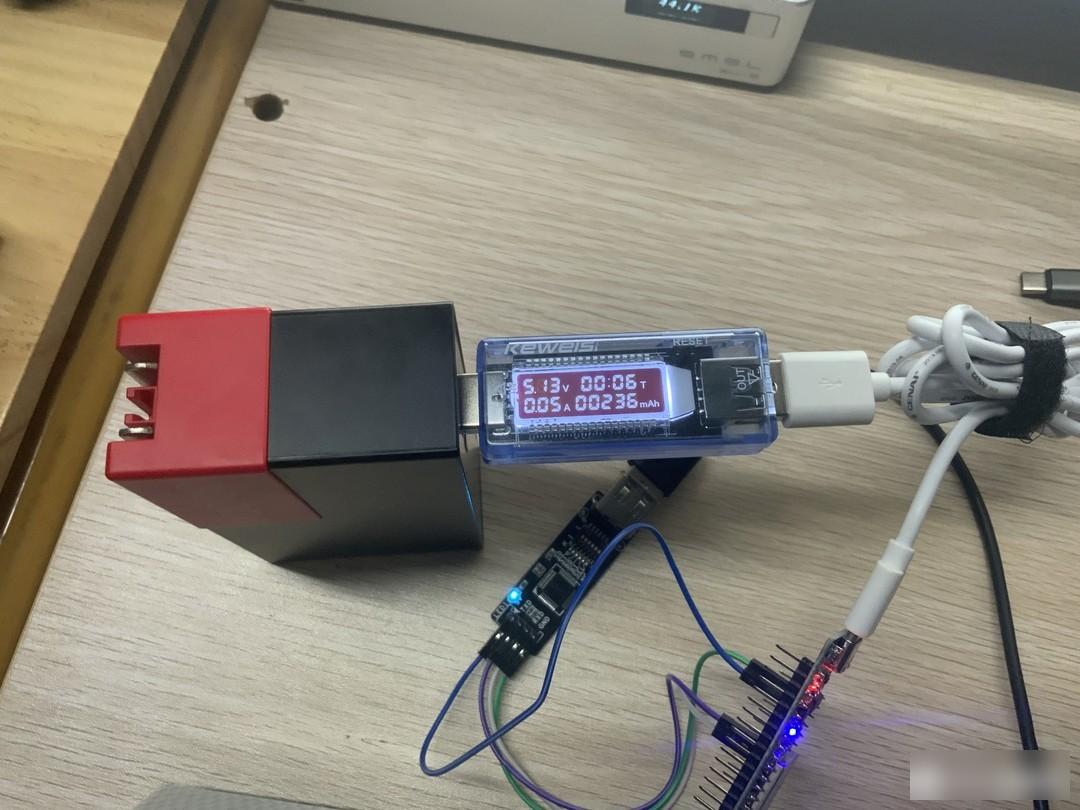
That's right, 236mah in standby, basically 250+mah in use, which is outrageous.
What's even more outrageous is that this still uses the v0.3 firmware, and it will cost 500+mah if you use v0.1.
That's why I have to power off the Bluetooth module when I don't use it. As a result, I found the above unsolvable BUG because of the power off.

This is a small problem, I just mention it here.
That is, if you download the v0.1 version of the firmware, there will be a certain chance of button clicks in that firmware. When I first encountered it, I thought my keyboard switch was broken, but I later found out that it was a firmware problem.
But this is the best solution, just burn the 0.2 or 0.3 firmware.
Now that we've talked about firmware, let's talk about it.
The official profile says so
V0.1:
Based on OpenHarmony V1.0
USB keyboard upgrade bluetooth keyboard
Support one device, 4 kinds of OS (Hongmeng, Windows, Linux, Android)
V0.2:
Support lithium battery
Support free switching between 2 devices, 4 OS (Hongmeng, Windows, Linux, Android)
OpenHarmony upgrade to V1.1.0 LTS version
V0.3:
Support 5 devices to switch freely
Support 5 kinds of OS (Hongmeng, Windows, Linux, Android, IOS)
Support one-touch connection
Let me summarize:
Convert a USB keyboard to a Bluetooth keyboard
Support switching between different devices (similar to Logitech Flow)
Support Windows, MAC, iOS, Android
Support one-touch connection
It’s time to say goodbye again, so let’s make a summary at the end of this article.
OK, no problem at all.
This is a matter of opinion, if you want to use it perfectly, my personal suggestion is to add a fast charge, and then plug a large battery of tens of thousands of mAh to the maximum.
Or simply get a wireless charging table mat and plug him a wireless charging module.
Otherwise, you are likely to abandon it due to power consumption problems or unsolvable BUGs when the power is disconnected and reconnected.
Really, please, use it to play games or go to sleep, early to bed and early to rise is good for your health.
No, but the firmware may be upgraded later, and then it will be supported, which may not be possible.
For me, this module is very powerful. This price can achieve development board + CH9350, which is very cost-effective, but in terms of actual experience, it is really unsatisfactory. It is not difficult to use. Because of BUG, power consumption and other reasons, it is more like a toy that can help you experience functions, rather than a tool to solve problems.
Know, don't correct me, I'm using passable here to mean very dissatisfied, not barely satisfied.
As for why, because I love to use it that way

I don't make specific suggestions, I'm just a passing ramen raider.
If you think it suits you, buy it, anyway.39

emmmmm, I actually got in touch with several of their staff members during this period, and joined the group and community, so let me tell you.
The customer service is very competent. When I send her WeChat messages at eight or nine in the evening and five or six in the morning, she will reply in time. When I asked her about it during the Dragon Boat Festival, she said so.
Belonging is very dedicated.
The opposite is their development. . . .
I can't get in touch at all. I heard that I'm on a business trip. I guess I'm too busy.
The firmware of the module was last updated 10 months ago, and it has not been updated in the past 10 months.
Those who don’t know thought they deleted the library and ran away. . . .

Another thing to name is their warehouse, which is simply a sand sculpture among sand sculptures. I would like to call it a sculpture within a sculpture.

It was sent to Shanxi for the first time, and I don’t know which lucky person got this module.
It’s the second time. I don’t know if it’s because of guilt or because this old man is really careless. I sent two of them by SF Express. The two are still different express numbers and packaged separately.

Show me straight up silly.

As a result, their company sold 3 modules for 39 yuan, each for 13 yuan. I am afraid that the shipping fee is not enough, and it is a blood loss if you think about it.

But that has nothing to do with me.
After all, I'm just a passing card to play.

I am Tiantian, see you next time.
Bye bye~~~!
Factory Adress: No.11,FengpingRoad