Talking about "Advanced" MIDI Functions on MIDI Keyboards - Taking Keystation 61 as an Example
Advanced Features of MIDI Keyboards
Careful friends should have already discovered that some black and white keys on the keyboard are marked with different English and numbers. Most of these labels indicate the MIDI function menu of the keyboard, which is used to set the transmission of MIDI signals on the keyboard.
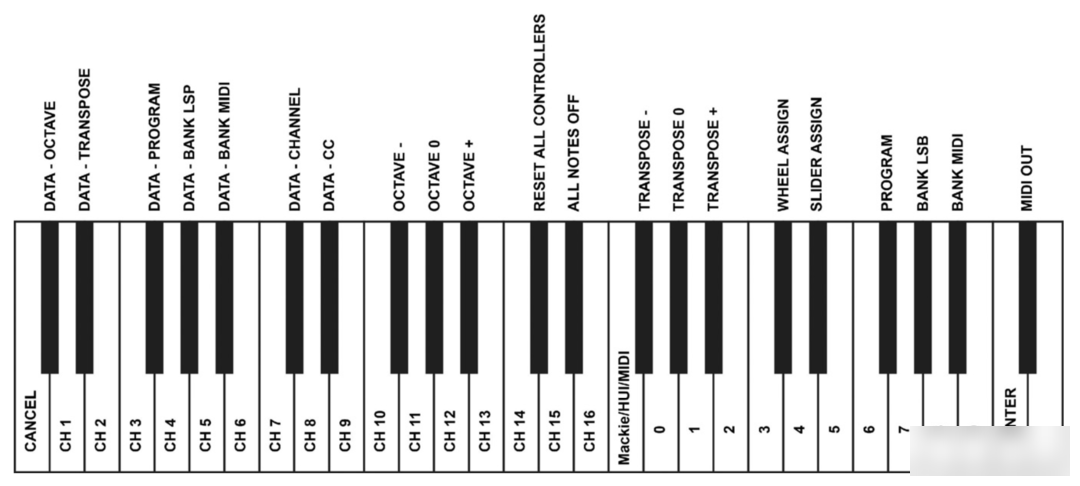
The plus and minus signs (+, -) of octaves on the keyboard can also be used to control the parameter selection of MIDI functions:
The first 7 black keys are used to select the specific function of the octave button, and when the plus and minus signs of octave up and down are used to control these functions, the two LEDs above the button will remain lit regardless of the current setting of that function.

The plus and minus signs (+, -) on the keyboard are used to control the octave rise and fall by default, so generally there is no need to reassign the functions of the plus and minus signs.
If you find that the plus and minus signs are no longer valid to control the octave function, you can reassign it to the octave function as follows:
1. Press the Advanced button to enter edit mode.
2. Press the black key labeled "OCTAVE" (keyboard exits edit mode automatically at the same time).
Another operation method to control the octave up and down through the black and white keys is as follows:
1. Press the Advanced button to enter edit mode.
2. Press the black key labeled "OCTAVE +" to move the keyboard up an octave (press twice to move up two octaves, and so on); press the black key marked "OCTAVE -" once to move the keyboard down an octave (Pressing twice means down two octaves, and so on); press the black key marked "OCTAVE 0" once, and the keyboard octave will return to the default.
3. After selecting the desired octave setting, press the white key labeled "ENTER" to confirm and exit the edit mode; press the white key marked "CANCEL" or the Advanced button to cancel and exit the edit mode.
Semitone transposition is the same as octave transposition, and there are two ways to achieve it!
Method 1: Set the descending plus and minus signs (+, -) to semitone transposition:
1. Press the Advanced button to enter edit mode.
2. Press the black key labeled "TRANSPOSE" (keyboard exits edit mode automatically at the same time).
At this time, the plus and minus buttons on the keyboard control the transposition of the upper and lower semitones. After selecting the desired transpose setting, press the plus and minus signs at the same time to exit the semitone transpose mode, and the plus and minus signs will return to the default octave transposition. tune function.
Method 2: Directly use the black and white keys to control the semitone transposition
[same octave transposition]
1. Press the Advanced button to enter edit mode.
2. Press the black key marked "TRANSPOSE +", the keyboard will go up a semitone (press twice to raise two semitones, and so on); press the black key marked "TRANSPOSE -", the keyboard will go down a semitone (press twice means descending two semitones, and so on); press the black key labeled "TRANSPOSE 0", and the keyboard transposition will return to the default.
3. After selecting the required transpose setting, press the white key marked "ENTER" to confirm and exit the editing mode; press the white key marked "CANCEL" or the Advanced button to cancel and exit the editing mode.
MIDI signal can be said to be one of the greatest inventions since the birth of computer music. When most friends use MIDI keyboards, they may only deal with common MIDI signals such as MIDI Note, MIDI CC, etc., but MIDI keyboards still retain Channel, Program They may not be so commonly used, but they are still an integral and important part of MIDI signals.
The essence of Program Change is to switch the instrument or voice in a specific MIDI channel. We can simply understand Program as a Preset, and Program Change is to switch between different instruments or timbres!
Of course all control signals are sent as MIDI signals.
There are also two methods of Program Change:
method one:
1. Press the Advanced button to enter edit mode.
2. Press the black key labeled "PROGRAM" (DATA-PROGRAM, ie F#2) (the keyboard will automatically exit the editing mode at the same time).
At this time, the plus and minus buttons on the keyboard control the switching of the Program, and cycle between 0-127 in turn.
Method Two:
1. Press the Advanced button to enter edit mode.
2. Press the black key labeled "PROGARM" followed by the corresponding number.
3. After selecting the desired value, press the white key labeled "ENTER" to confirm and exit the editing mode.
Friends who have been exposed to computer music earlier should be familiar with abbreviations such as GS and GM. The timbre switched by the Program corresponds to the GM standard timbre.
Although it is rarely used now, even when we use it, for the convenience of performance, we are more inclined to customize the control signal corresponding to the Program data, but let us miss the touch of the year:

The method of selecting LSB and MSB on the MIDI keyboard is basically the same as that of Program Change, so we won’t go into details here. Compared with how to operate, more friends may want to know what LSB and MSB mean!
The effective value of the standard MIDI signal is only 0-127, if we need to control parameters far more than 128 values, then we need to use LSB and MSB!
LSB and MSB are abbreviations of computer terminology, interested friends can learn by themselves.
Let's give an example to illustrate what these two "SB" mean and what is their use. The picture below is a screenshot of the MIDI parameter table of the Elektron Analog Drive:
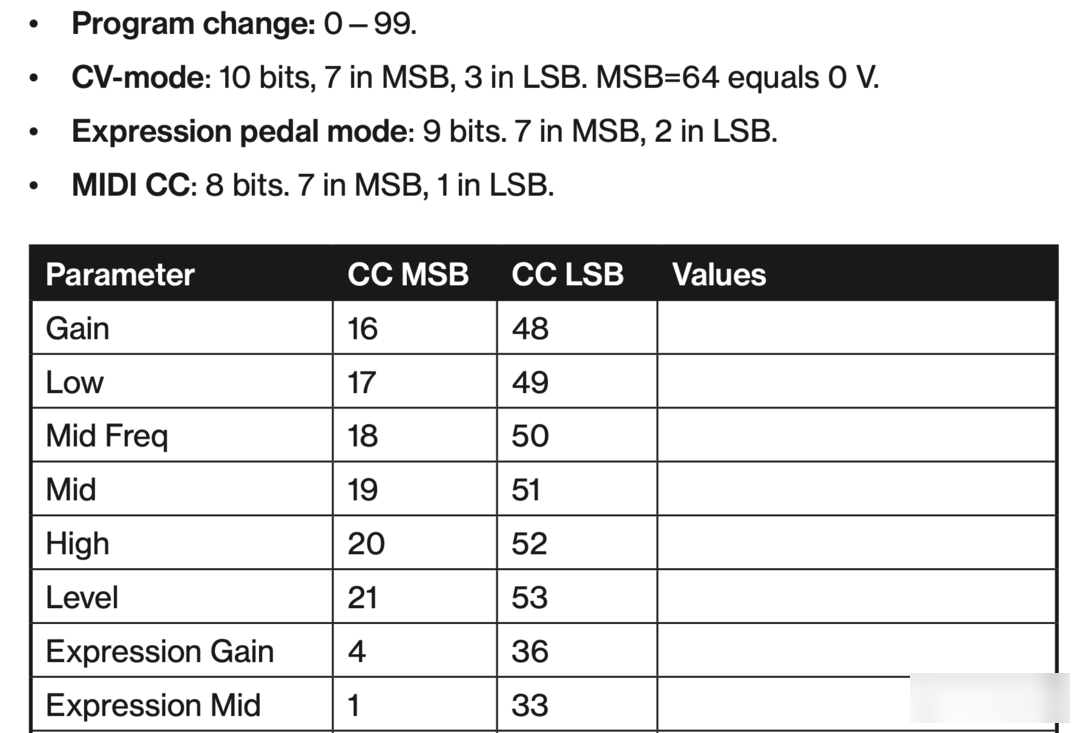
Let's take the MIDI CC signal value as an example, we can see that MSB has 7 bits, LSB has 1 bit, a total of 8 bits, that is, it can represent 256 effective values, that is, 0-255!
The effective value of conventional MIDI CC signal is 0-127, obviously 0-255 can control more parameters, or make the control finer.
Some synthesizers even use 7bit MSB and 7bit LSB, allowing effective values as high as 0-16383!
In the above chart, we can also see that the CC MSB of Gain is 16, and the CC LSB is 48. Suppose now that our Gain is 0, and we send a value of 108 through CC16 (that is, MSB), then we actually send What is the effective value for Gain?
Converting 108 to binary is 1101100, and after expanding to 8bit, it becomes 11011000, which is 216!
There are also two ways to change the MIDI channel:
1. Press the Advanced button to enter edit mode.
2. Press the white key representing 16 channels (the keyboard will automatically exit the editing mode at the same time).
Or, after pressing the Advanced button, press the black key marked DATA-CHANNEL on the keyboard, and set the plus and minus signs (+, -) on the keyboard as the channel switching function.
Tip: No matter what function is assigned, pressing the plus and minus signs at the same time will immediately restore the default parameters of the function.
When it comes to MIDI CC, you must be familiar with it. If you want to set the Octave/Data button on the keyboard to send MIDI CC information that can be turned on and off, you can do the following:
1. Press the Advanced button to enter edit mode.
2. Press the black key labeled "CC" (Eb3).
3. Use the keyboard to enter the number to assign the CC signal to.
4. The device will transmit assigned MIDI Control Change messages, which can be toggled on and off (press once to turn on, press again to turn off).
In actual use, we are often more accustomed to assigning MIDI CC signals to faders or knobs, because it is more convenient to control commonly used parameters such as volume, expression, sound direction, etc. with faders or knobs!
So the following setup might be more practical:
Assign MIDI CCs to volume faders:
1. Press the Advanced button to enter edit mode.
2. Press the black key labeled "FADER" or "SLIDER".
3. Use the keyboard to enter the number to assign the CC signal to.
To assign a MIDI CC to the mod wheel:
1. Press the Advanced button to enter edit mode.
2. Press the black key labeled "WHEEL".
3. Use the keyboard to enter the number to assign the CC signal to.
For the control information of MIDI keyboards or controllers, it is also highly recommended that you use the MIDI Learn function in the DAW to assign!
The arrow keys and transport control keys on the Keystation keyboard can call three control protocols: MIDI, Mackie and HUI. To select the corresponding protocol, please do the following:
1. Press the Advanced button to enter edit mode.
2. Press the key labeled "DAW" or "Mackie/HUI/MINI" to switch between the three control protocols:
Plus and minus signs (+, -) green for Mackie
Plus and minus signs (+, -) red, indicating HUI
Plus and minus signs (+, -) orange, indicating MIDI
3. Once selected, press the white key labeled "ENTER" to confirm and exit edit mode.
Note: Your software must also support the above three control protocols, and the control operation will be realized. MIDI, Mackie and HUI control signals are usually sent through virtual port 2 (Port 2)
Reset all controllers:
1. Press the Advanced button to enter edit mode.
2. Press the black key labeled "RESET".
reset:
1. Close Keystation.
2. Press and hold the plus and minus signs (+, -) at the same time, and turn on the Keystation.
3. let go.
MIDI OUT switch:
The MIDI OUT interface on the keyboard panel can be used to connect hardware audio sources or other external MIDI devices.
By default, MIDI OUT transmits the same control information as USB output. If you want to send the MIDI signal on the computer through the MIDI OUT of the Keystation keyboard, you can perform the following settings:
1. Press the Advanced button to enter edit mode.
2. Press the black key labeled "MIDI OUT".
Factory Adress: No.11,FengpingRoad