Guide to Shop Pro Gaming Keyboard in Keyceo Tech
pro gaming keyboard undergoes several transformations in the manufacturing process in the face of changing market dynamics. As there are more requirements given to the product, Keyceo Tech Co., LTD resorts to set up a professional R&D team for exploring the latest technology for the product. The quality is significantly enhanced with higher stability and reliability.
We prepare well for some challenges before promoting the Keyceo to the global. We clearly know that expanding internationally comes with a set of obstacles. To meet the challenges, we hire bilingual staff members who can translate for our overseas business. We research different cultural norms in the countries we plan to expand into because we learn that foreign customers' needs are probably different from those of domestic.
At Keyceo, attention to details is the core value of our company. All products including pro gaming keyboard are designed with uncompromised quality and craftsmanship. All services are rendered with consideration to the best interest of the customers.
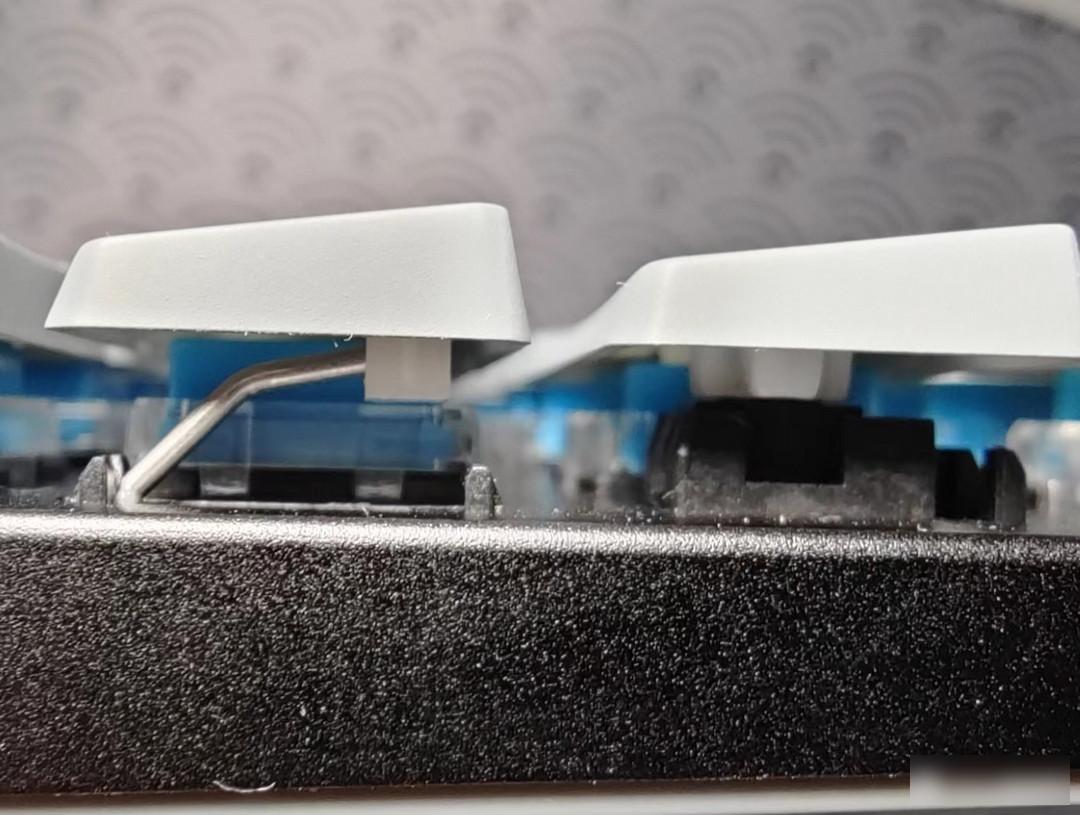
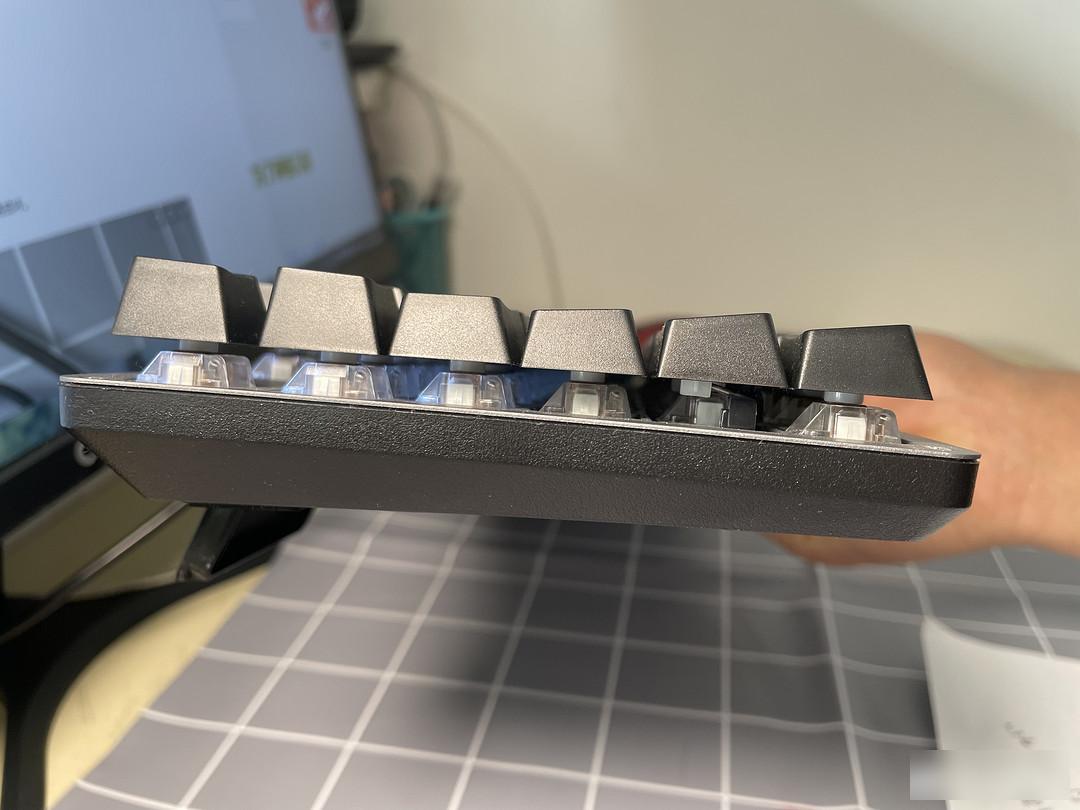
Big key science: Generally, a key with a length greater than two U is called a big key. For the normal use and rebound effect of the big key, a satellite shaft or a balance bar is installed in the big key.

To introduce the topic, under normal circumstances, the large keys above 2U will be installed into the satellite shaft or the balance bar, but the Keychron K3 not only installs the steel satellite shaft in the 4 left Shift, backspace, carriage return, and space larger than 2U, The two 1.75U key positions of Caps and right Shift are actually equipped with a balance bar. The material used for this "crazy" big key really opened my eyes. I would like to call it the low-axis mechanical keyboard with the most detailed large keys.
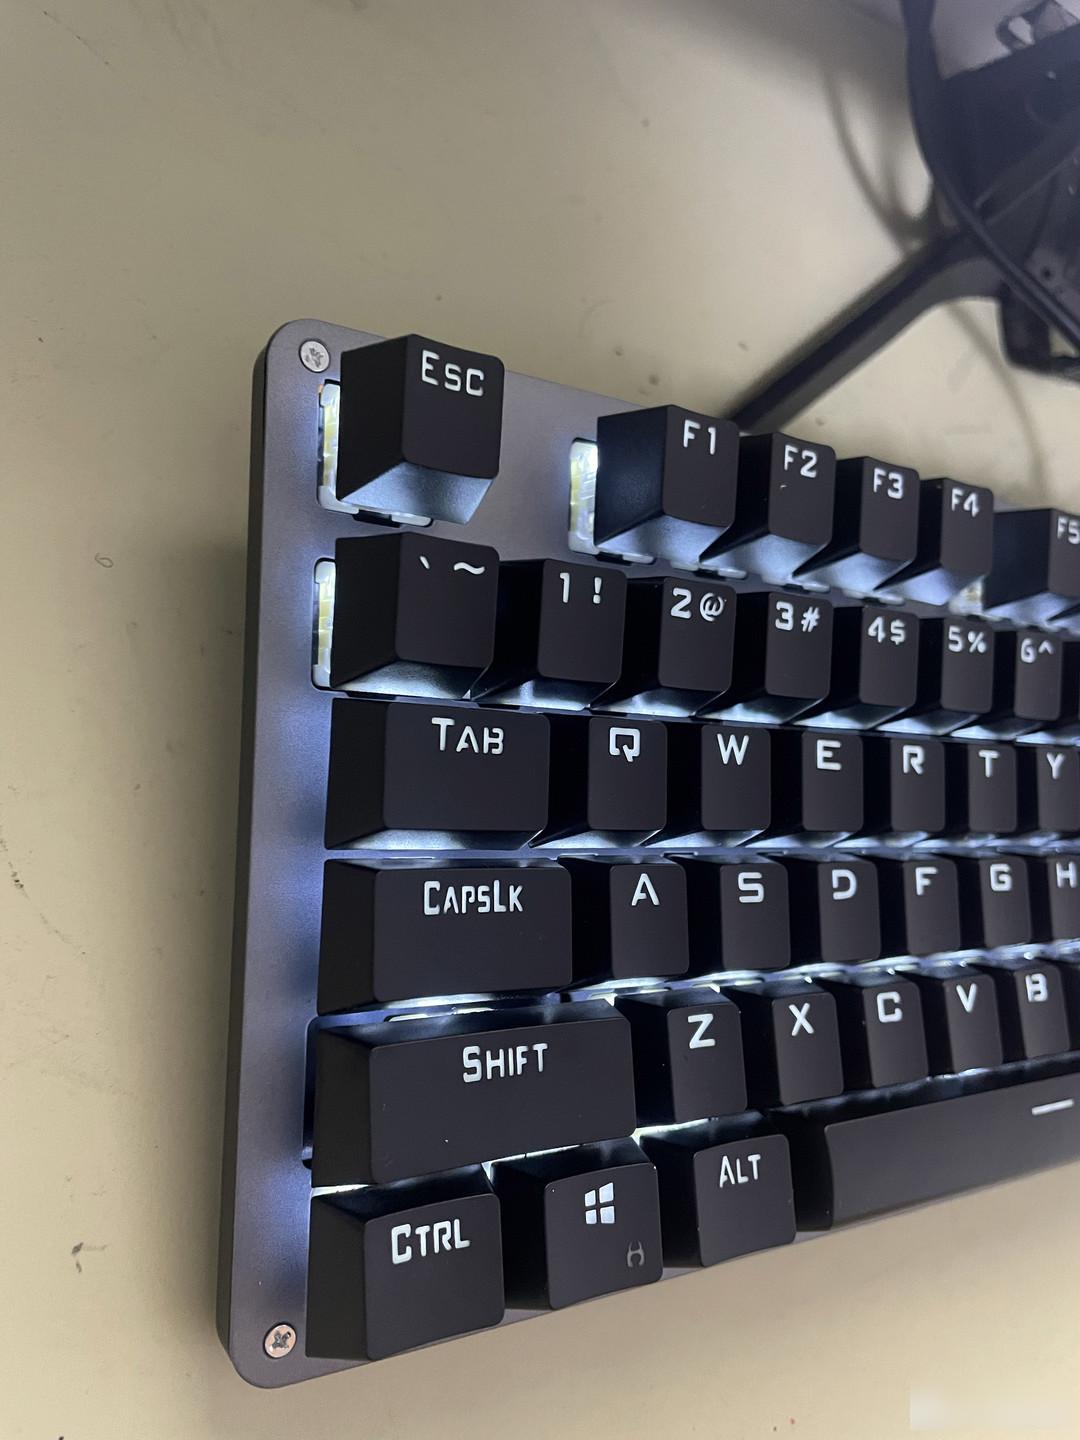
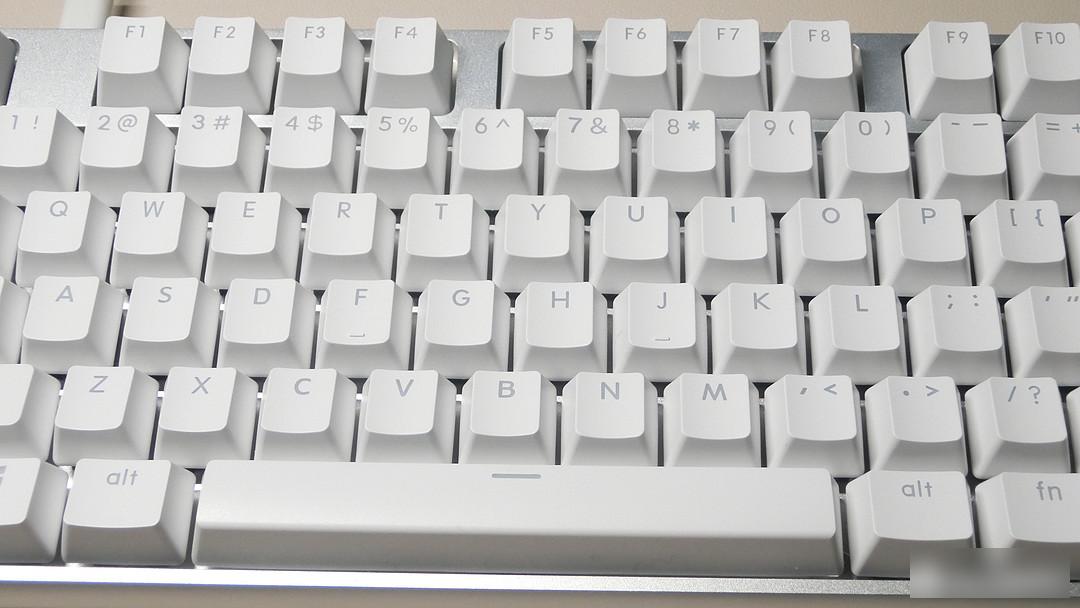
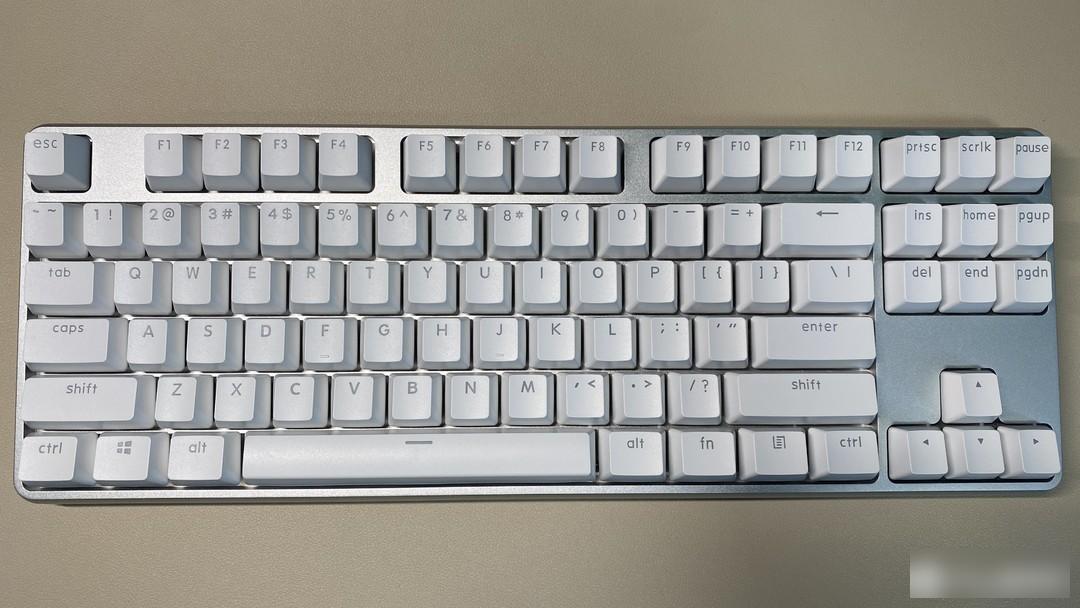
Keychron K3 adopts a 75% compact layout, 84 key positions, F area and commonly used function keys, which is both compact and practical. A very good point is the addition of a separate molded dust cover, which is very practical for each key position. Suspended, borderless design, full of technology style. The sky-covering structure, the upper cover is made of aluminum alloy, full of texture. The bottom case has a double-stage foot support that is extremely rare in low-axis keyboards. This is worthy of praise, because the thickness of the low-axis mechanical keyboard itself is relatively low. If there is no foot support, it is difficult to find a suitable input angle.

Keychron K3 uses ABS two-color lettering keycaps, the keycaps are very delicate to the touch, but because it is made of ABS material, oiling is inevitable. The transparent keycap can clearly identify each key in a dark environment, which is convenient for input. Although this set of keycaps is at the height of the chest, it is extremely ergonomic. Each keycap is designed with a vertically low front and a high rear, and is accompanied by a horizontal depression from the outside to the inside. Every touch of the finger on the keycap and the Every tap is a treat.
When choosing a low-axis keyboard, the low-green switch is the first choice, because the short-axis key travel is short, and the low-blue can bring better input feedback.


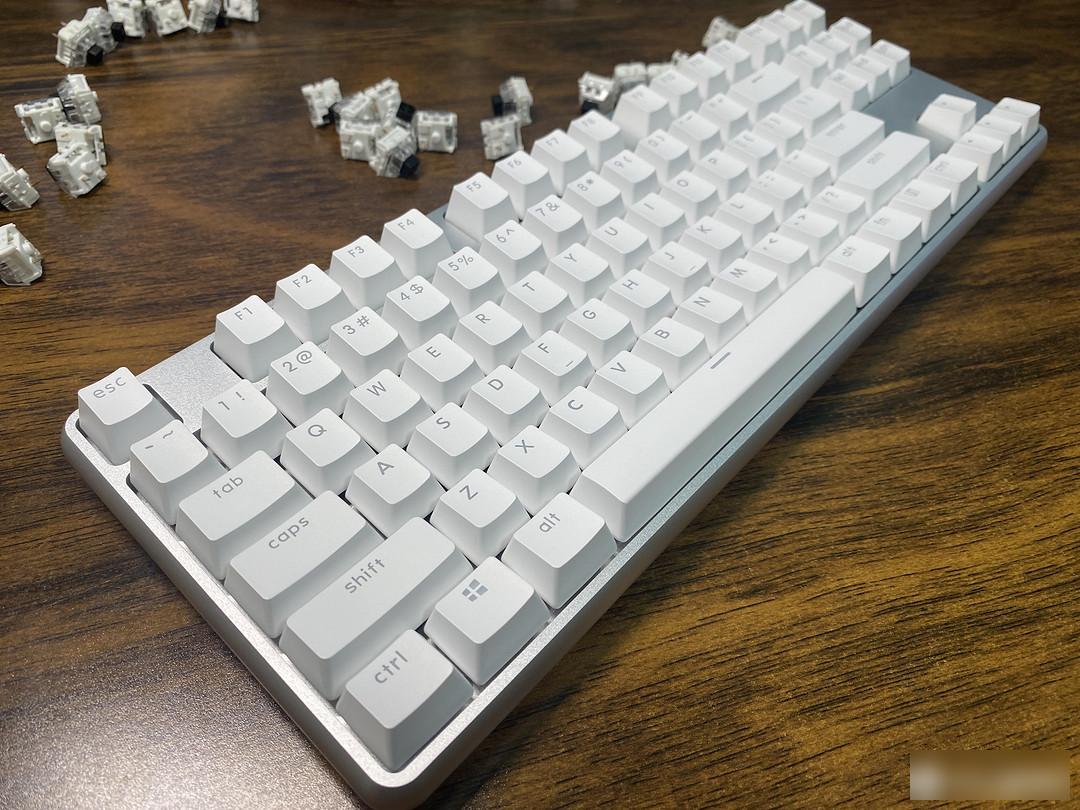
My Keychron K3 adopts the hot-swappable low-light blue axis RGB version. It is not only a low-axis mechanical keyboard, but also a low-axis mechanical keyboard, which can be replaced with Keychron's own low-light axis. The low-light green switch has a clear sense of passage, and the sound is crisp, but not noisy, much quieter than the traditional green switch.

Keychron K3 supports Bluetooth and wired dual-mode, and is perfectly compatible with the Mac system. The layout of multimedia functions in the F area is highly consistent with that of the Mac. If you are using a Mac system, then Keychron must be your first choice.
Keychron K3's unique keycap design, the most detailed large keys, and the blessing of the three major skills of its own low optical axis can bring an excellent input experience. The details are a very good low-axis mechanical keyboard.
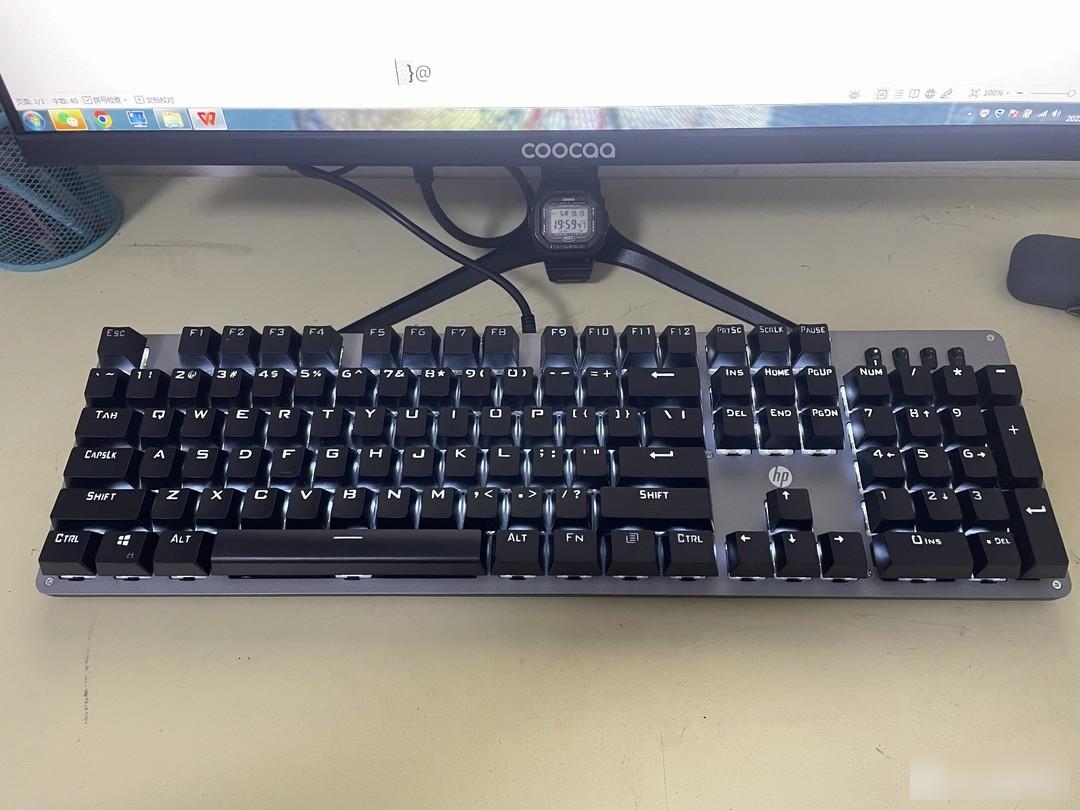
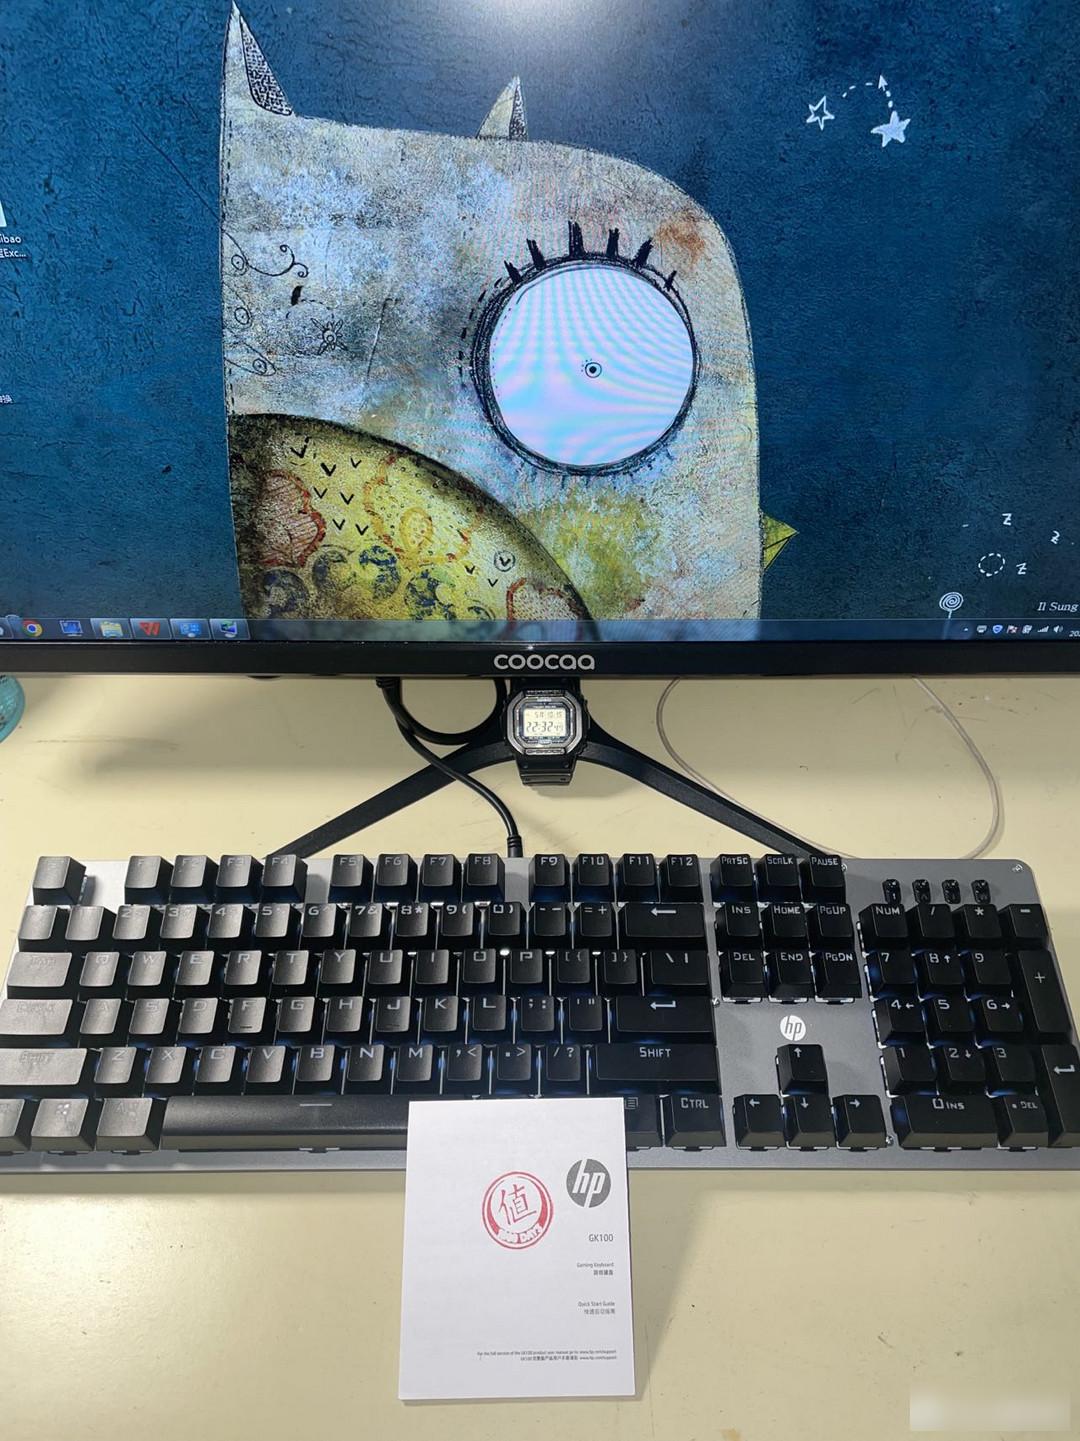
A few days ago, I bought a 24-inch monitor for the convenience of watching video courseware. Looking at my old keyboard from ten years ago, the 1234 keys are out of order. It seems that Aunt Zhang looked at it for several days, and she didn't ask for a high price of about 100-200 yuan. Finally, she chose the HP GK100 white light tea shaft, which started at 126 yuan.
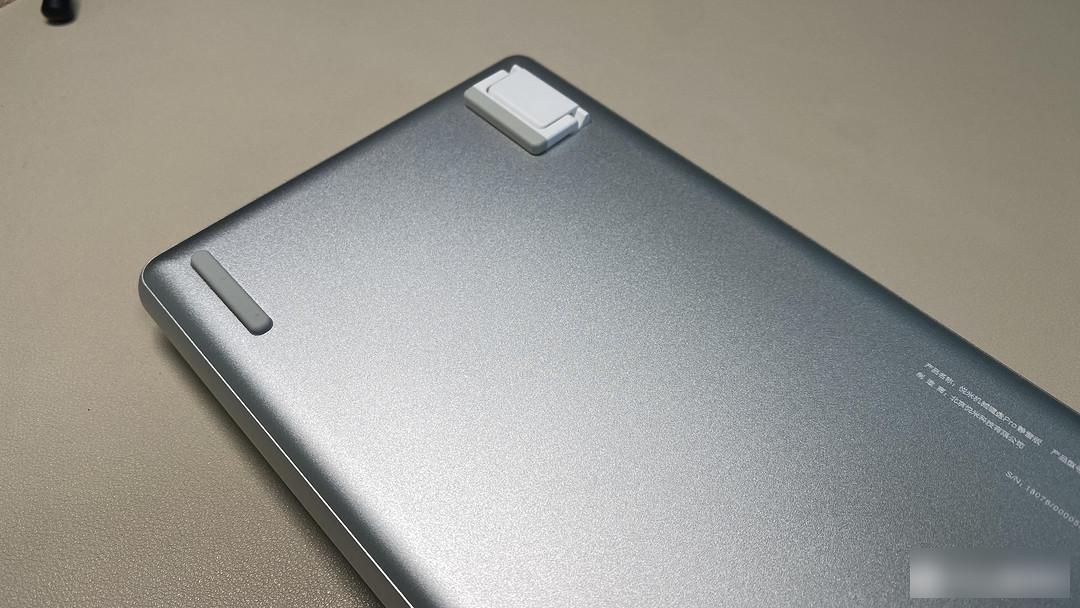
Silver-gray metal surface, narrow frame, size 486x180x43mm, weight 1400g, very thick, and feels very textured
The USB cable is very thick, about the same thickness as a gel pen refill, resistant to bending, and not easy to damage.


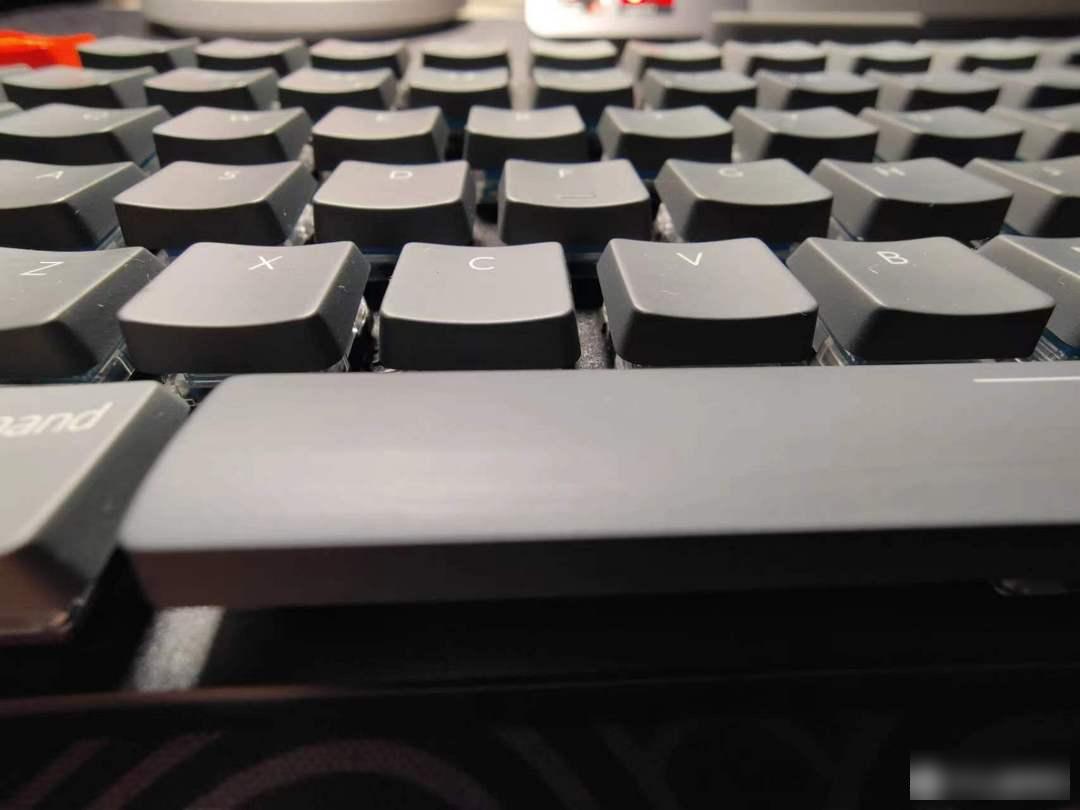
Suspended black keycaps, the top surface of the keycaps are frosted, the tea switch feels good, the elasticity is moderate, the typing sound is not loud, and it is suitable for home use. The keyboard adopts OME height, and the keys are distributed in steps. You can type without fatigue for a long time. Aunt Zhang writes articles, notes and codes really much faster, which can be called a typing tool. Of course, if you want to play games, it is recommended to buy a black axis.

The white breathing light is comfortable and not dazzling, and can be adjusted in various breathing light modes under the combination of FN+. There are also Blu-ray and mixed light versions available.
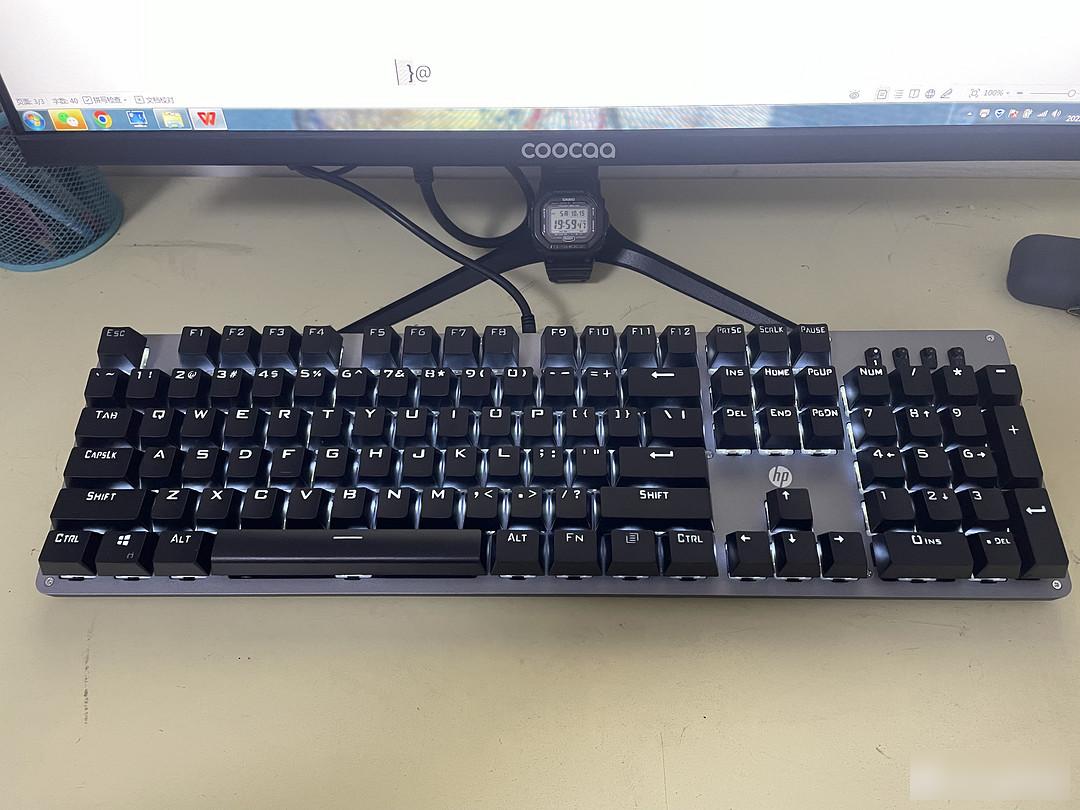
A picture of the monitor and keyboard is all it takes, and the mouse is perfect.
It is worth choosing a hundred-yuan keyboard!
This Yuemi Pro has been around for some years. In 2019 and 20, it was a representative of the cost-effectiveness of mass-produced aluminum lumps. Unfortunately, it was not available at that time. Today in 2023, being able to receive such a gift can be regarded as making up for a regret. Haha, maybe I can receive such a strange gift.
87 keys, Cherry red/TTC silent red, CNC aluminum Tuotuo, when it first came out four years ago, it was once the best mass-produced aluminum Tuotuo at that time. Whether it is the integrated structure of the positioning bar and the upper cover, or the excellent anodizing process, there has been a wave of transformation of Yuemi Pro.
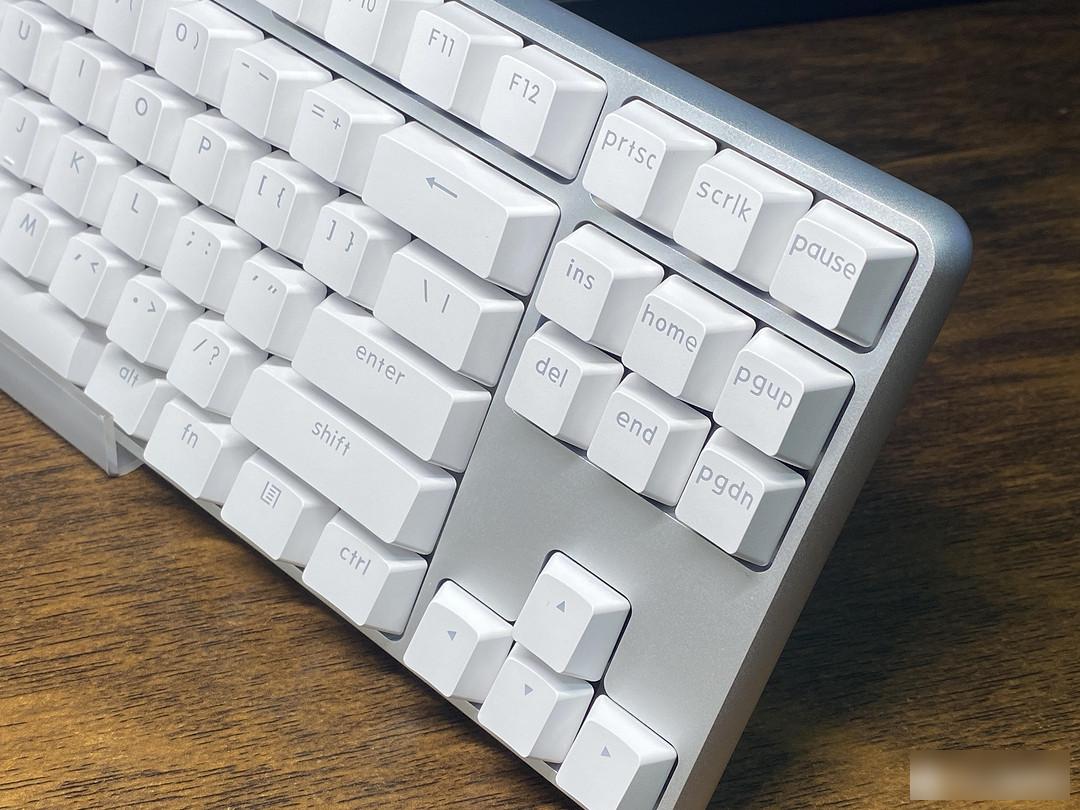
However, as a mass-produced keyboard, the performance of Yuemi Pro is not satisfactory, and the price has jumped from 599 until today, three years later, I bought this TTC mute red version for 179.
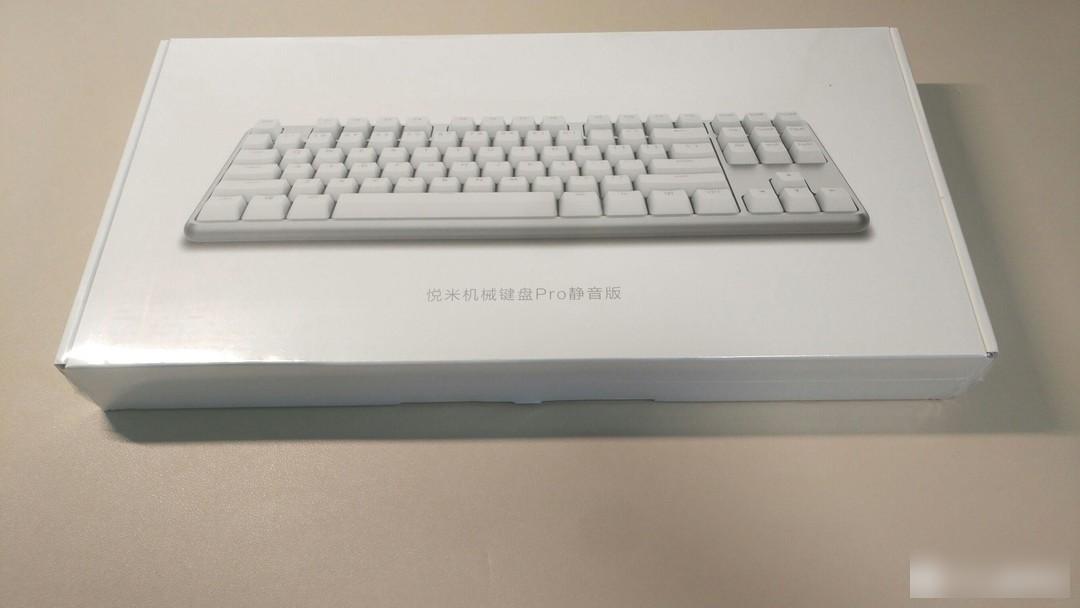
The packaging and accessories are very simple, the surface is the picture and introduction, and the sticker on the back is impressively written, the production date: 2018.
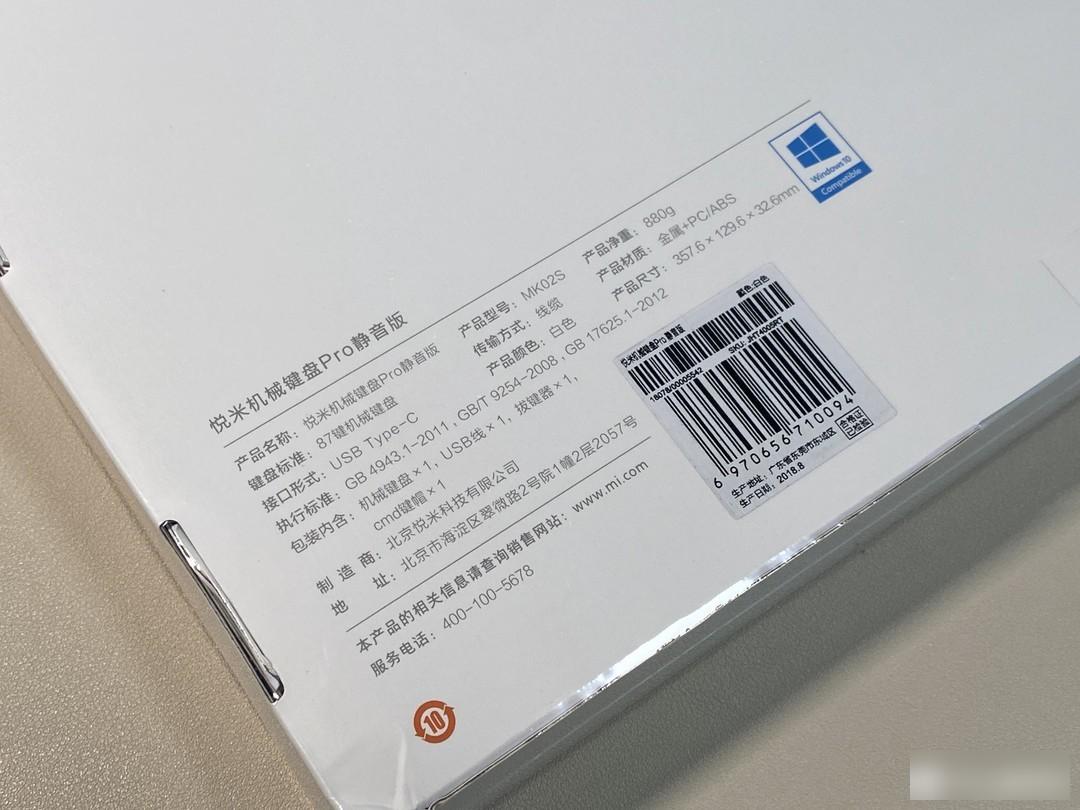
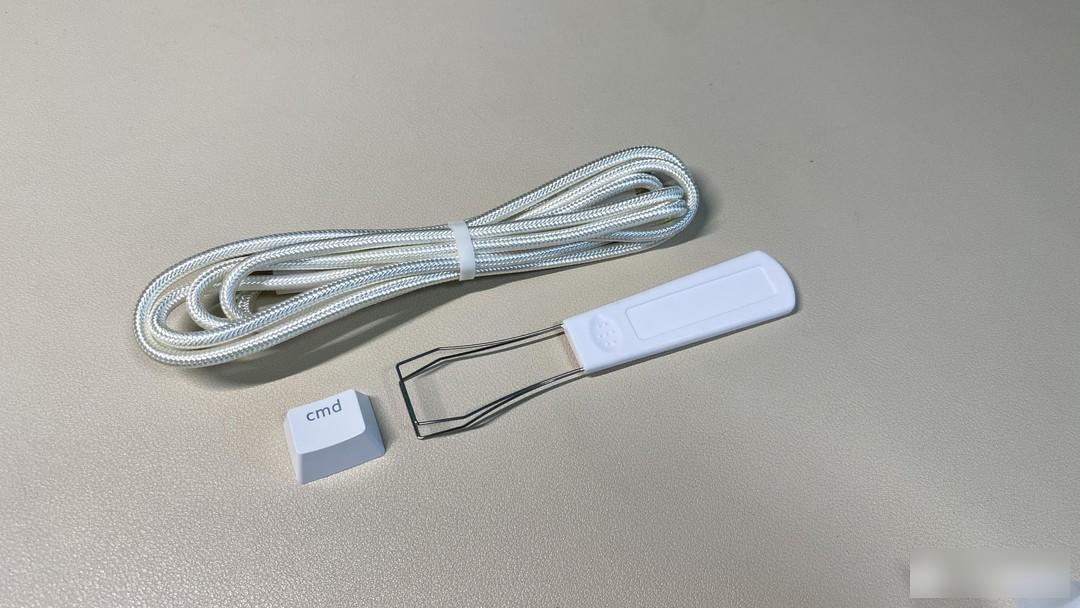
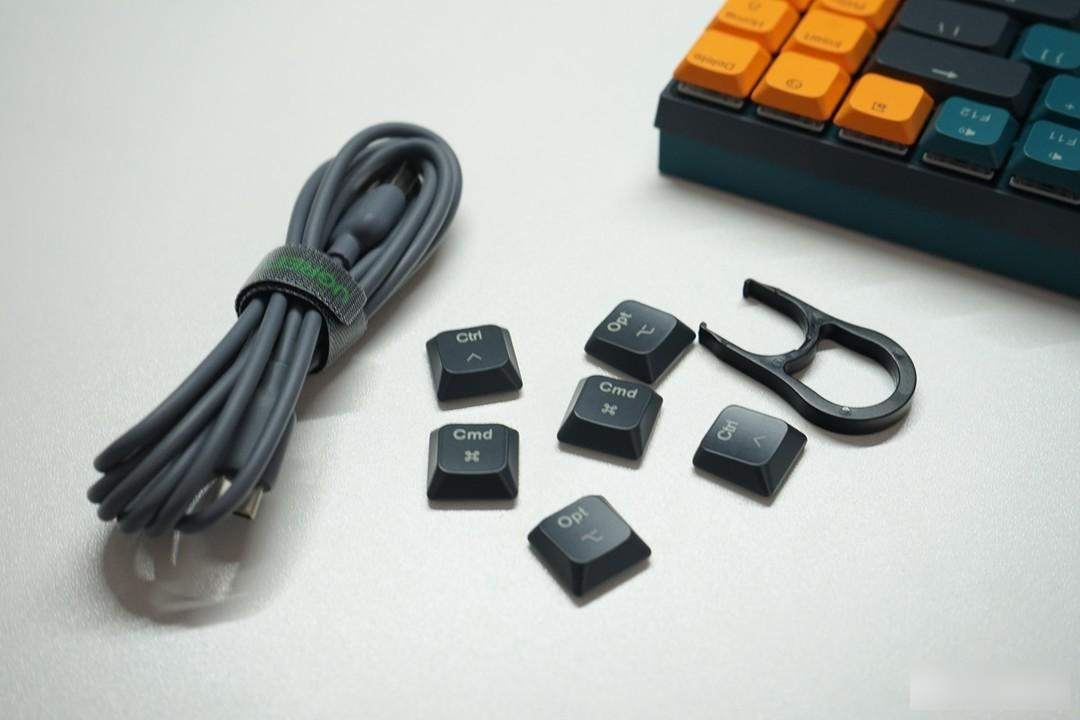
After opening, the dust cover, the keyboard body, a white braided data cable, a key puller, and a cmd key are supplemented. The cable is still good, but this supplement is a bit sloppy, and it’s all given to cmd. What about opt?
I think the appearance of the keyboard body is still very high, and the corner transitions are very rounded, which is more difficult to deal with than the current square aluminum lumps.
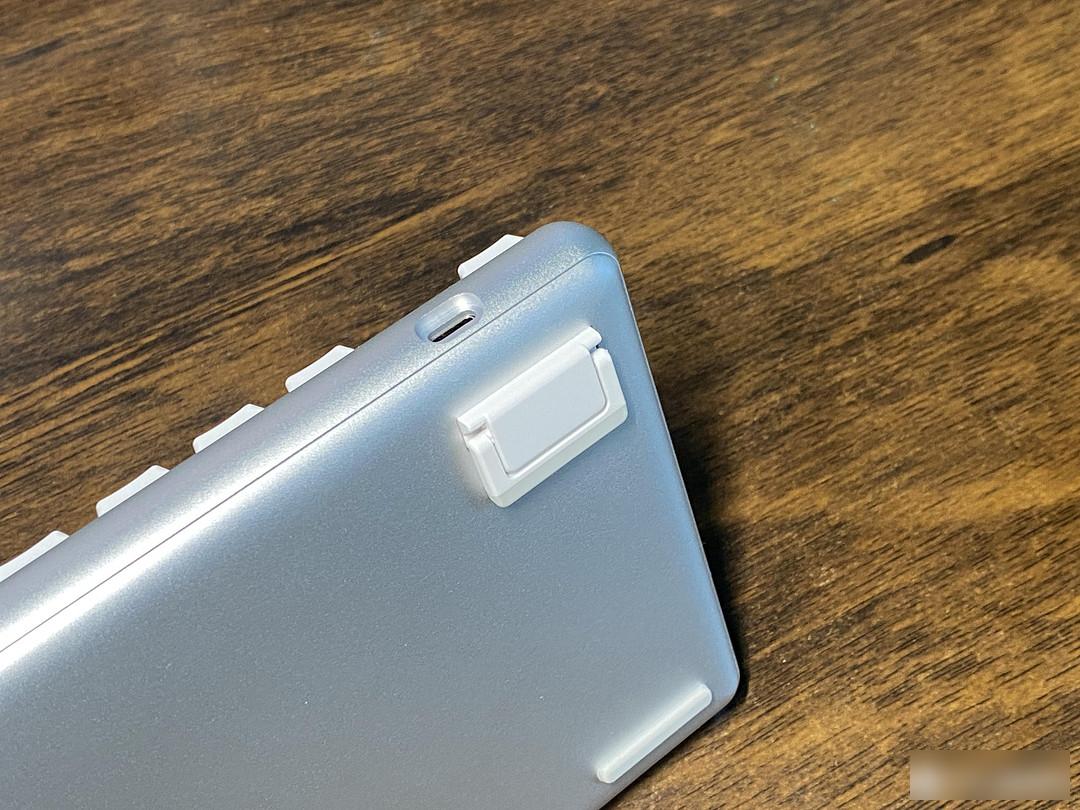
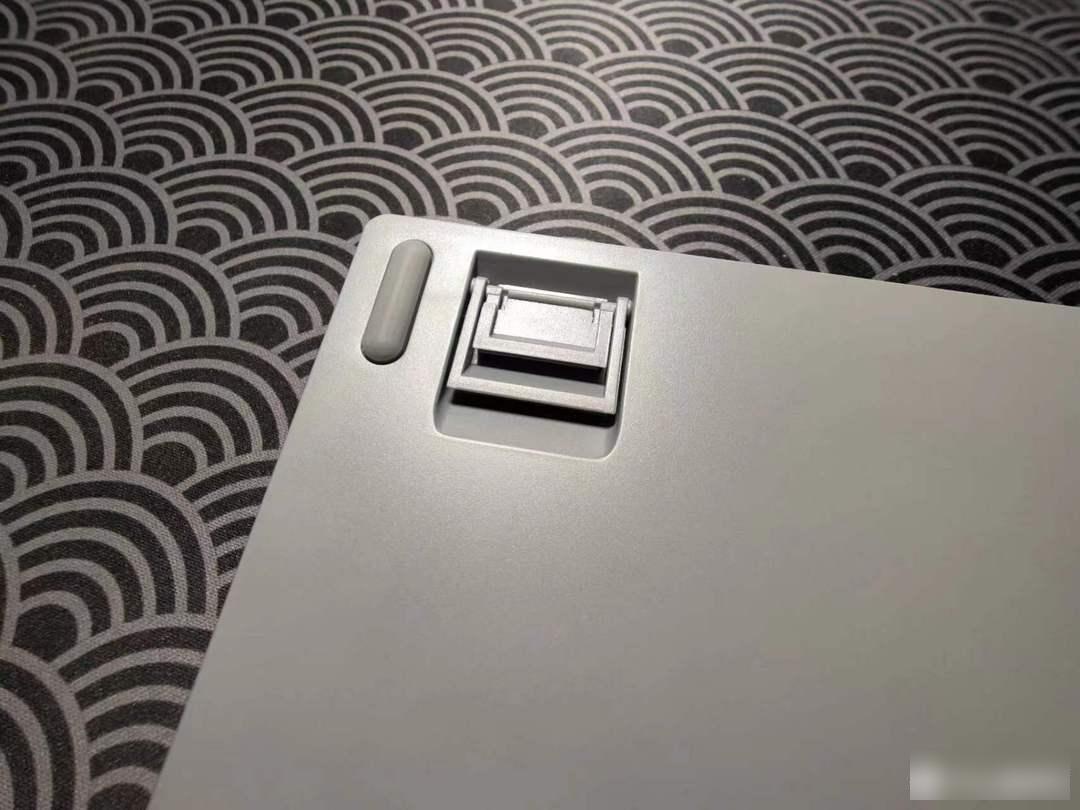
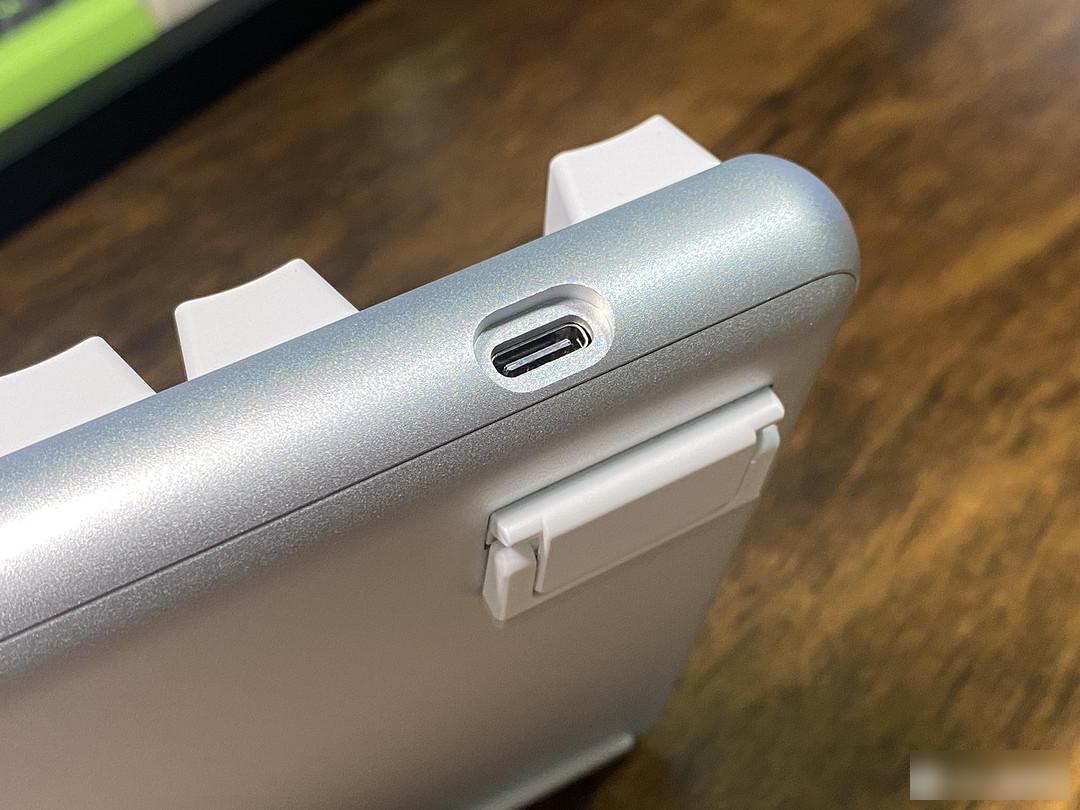
The front is a conventional TKL arrangement, and the back is a Type-c opening, which fits perfectly, the socket does not shake, and the size is moderate, and there is no problem with general cables.
On the back is a non-slip pad and a one-piece foot support, with four screws hidden underneath. The entire keyboard is very flat, and there is basically no curvature without opening the feet. You may not be used to it. Fortunately, it has feet.
The keycaps are a set of very ordinary OEM height ABS lettering, which is unremarkable, and the standard is relatively rubbish. Anyway, it needs to be replaced.
I don't know if it's the shaft body or the keycap is a bit tight, it's a bit difficult to pull it out, but there are no other problems.

Anodizing can’t be made white, so the keyboard shell is silvery. I don’t think the color matches well. Even the original keycaps seem a bit inconsistent to me.
The keyboard is wired single-mode, no hot-swappable, monochromatic white light. This should be the first time that Yuemi has made a keyboard. In terms of software, it can’t be said that it has everything, but it can only be said that there is nothing.
Monochromatic white light is pure white light, always on, without any lighting effect, and the five levels of brightness can be switched by FN + arrow keys.
Although I don't use this thing, you can't live without it. Then, although he has a FN key that takes up a precious space of 1.25U, its function is limited to switching the brightness, there is no multimedia function such as volume, and there is no driver. As today's keyboard, it is undoubtedly unqualified. Maybe I am a bit harsh on it four years ago.

We all know that the now defunct TTC base axles are rubbish, and this Silent Red is no exception. Although there is no spring sound, there is a word - astringent. Let's put it this way, if a normal shaft is stepped on a stone road, then this shaft is like stepping on snow. In order to mute the sound, the bottom is also very meaty. If I can, I will choose Cherry red.
Then the big key is also at a very rubbish level, it should be the pot of the satellite shaft. These problems seem a bit intolerable today, but for it four years ago, it was normal.
After talking for a long time, it felt like nonsense. Indeed, looking at it from today's perspective, there are indeed problems everywhere. But after using it as the main force for a few weeks, I feel that these problems are not so unacceptable. 179 yuan such a handful of aluminum lumps, what else can you ask for? Just buy a case! After two days, it will be fully remodeled.
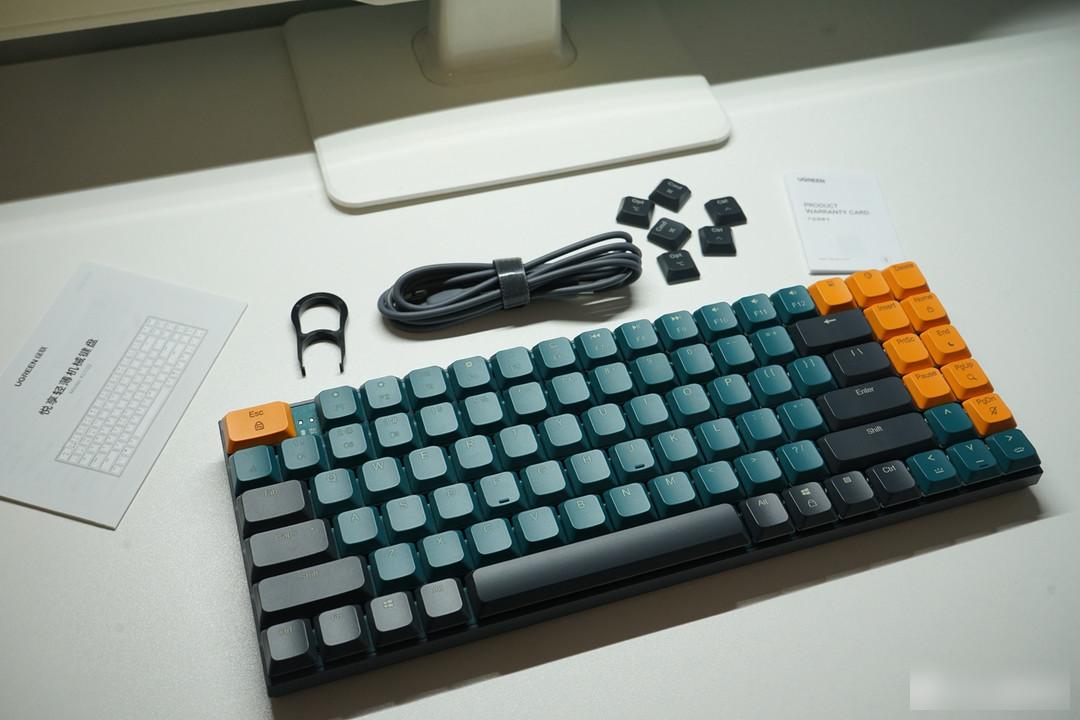
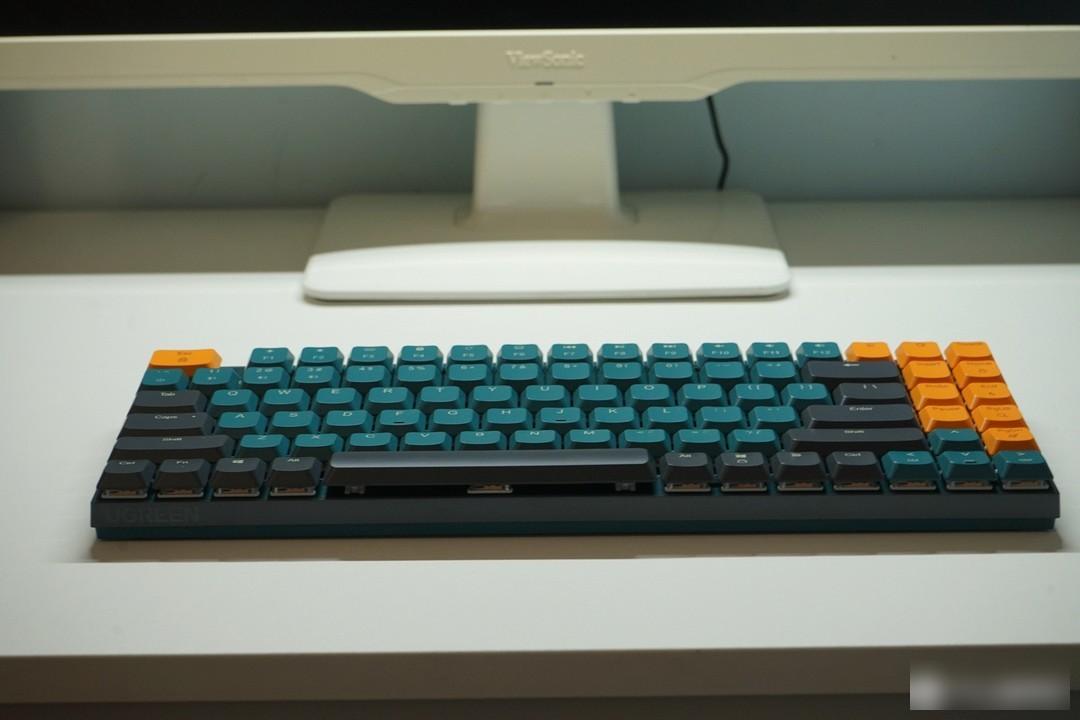
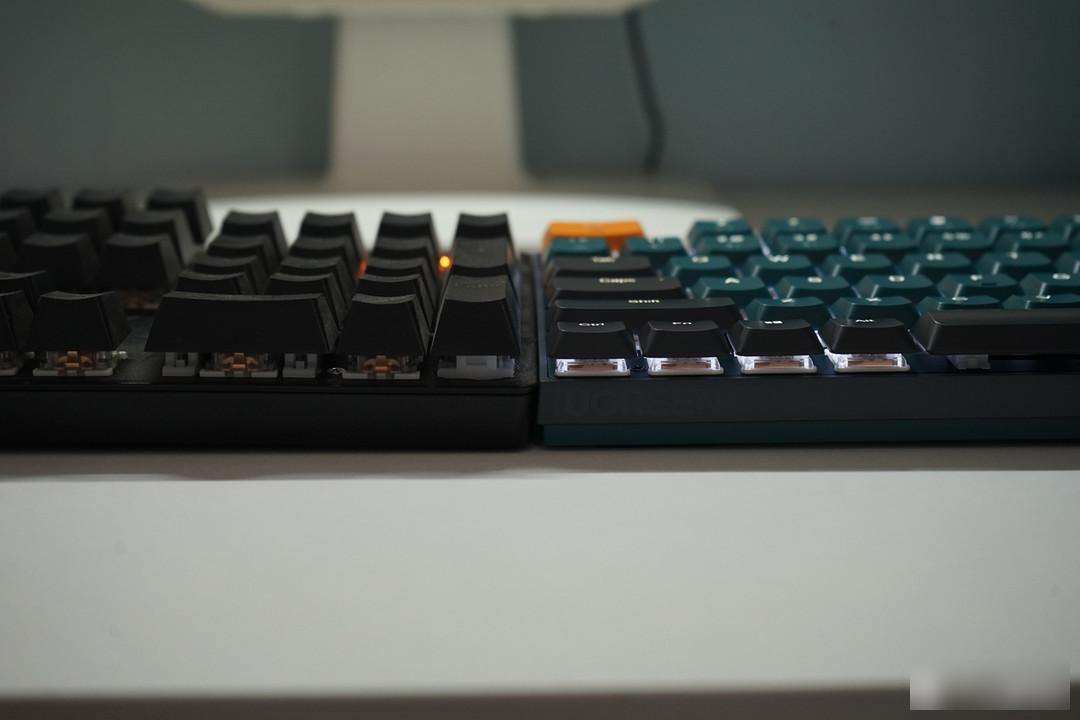
The keyboard that is equipped with an office computer is really not suitable, and the film is fine, and it is also ultra-thin, so I really don't want to touch it. A while ago, I arranged a Greenlink low-axis wireless keyboard for my child, and it feels pretty good, so I paid attention to this brand again recently, and there just happened to be a low-key compact new model, arrange it and share it with the website.
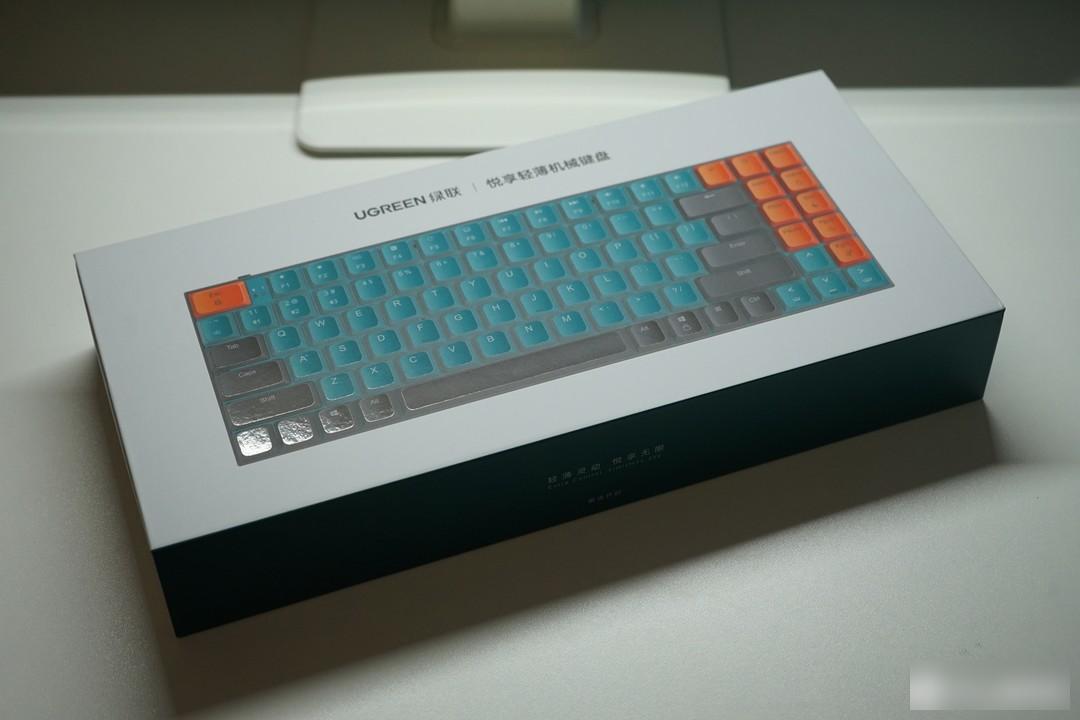
The front of the package is a rendering of the product, with three-dimensional rendering.
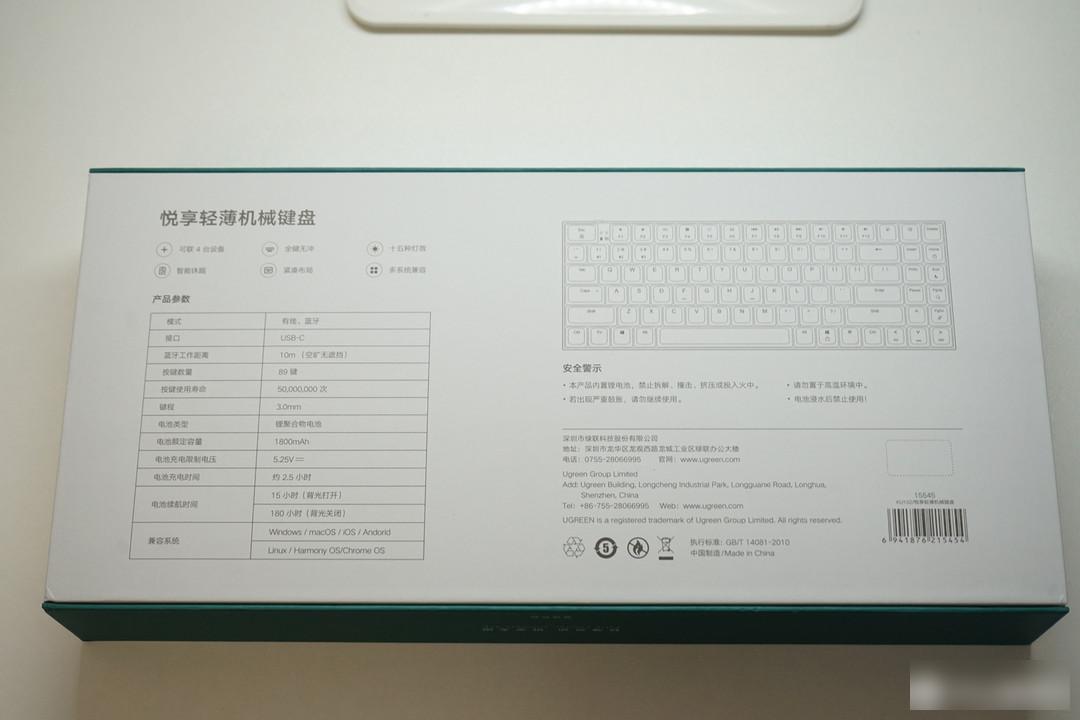
The main parameters and features of the keyboard are on the back.
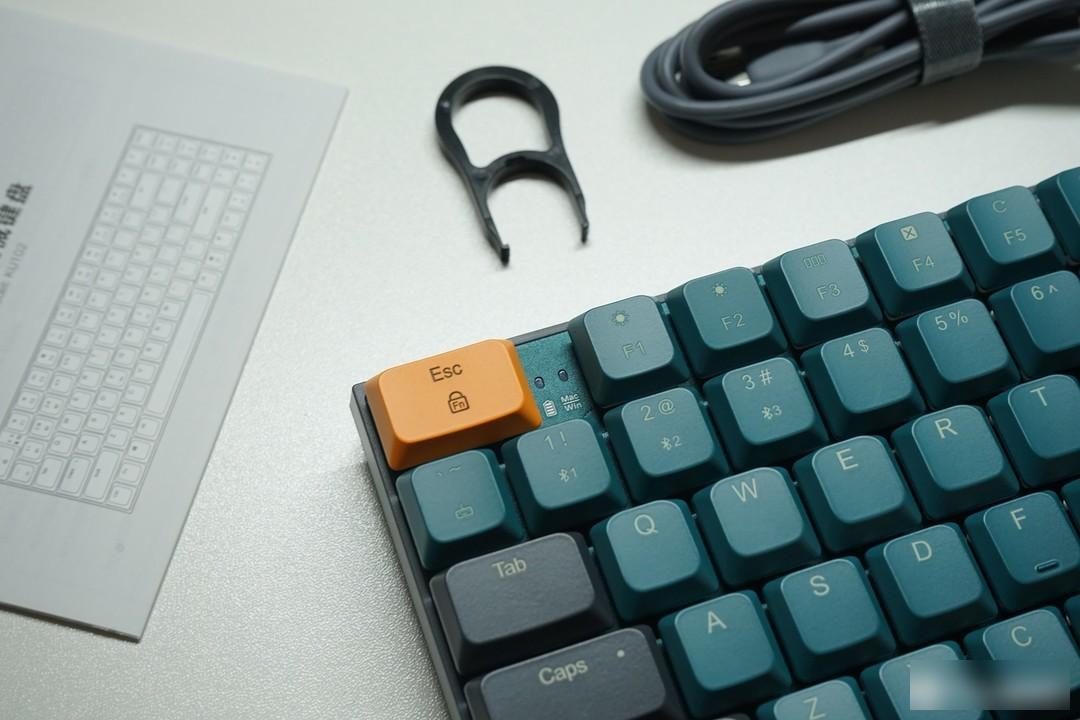
After opening the package, the keyboard lies quietly inside the inner protective panel. The accessories include a data cable, 6 replacement keycaps for mac system, a key puller, manual and warranty card.

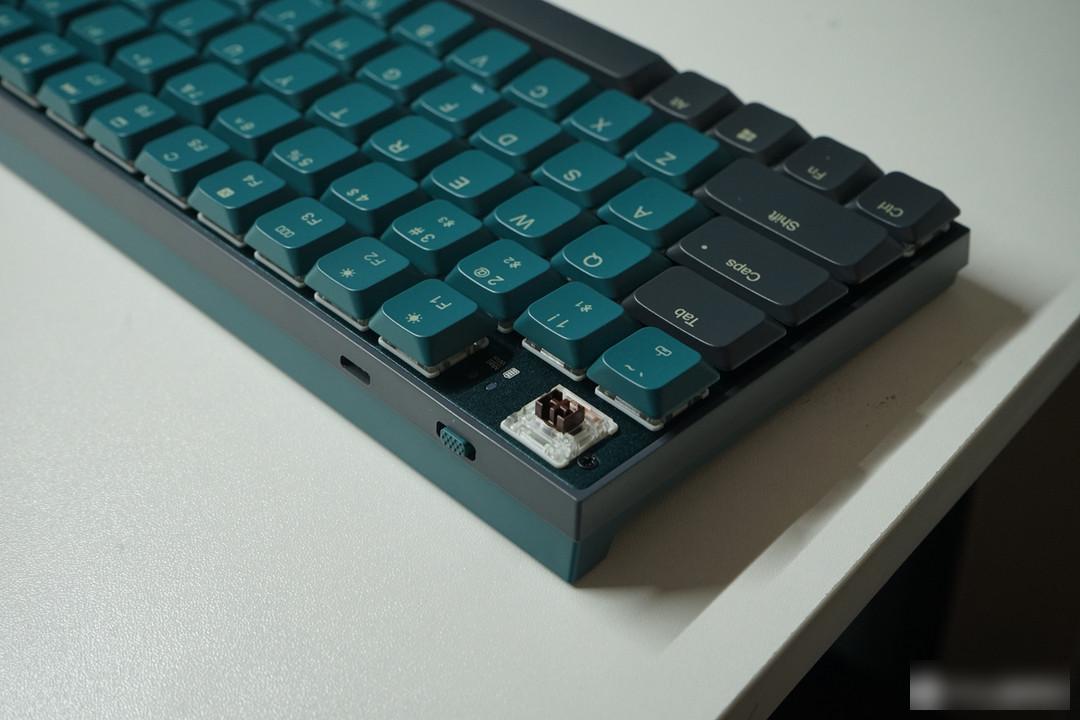
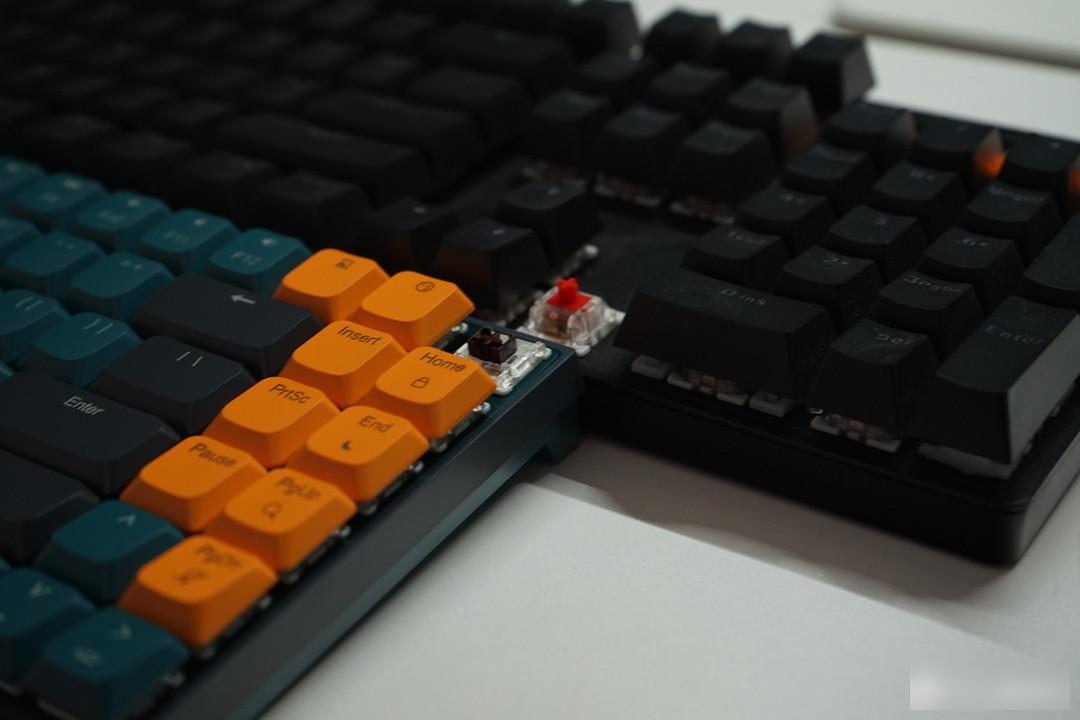
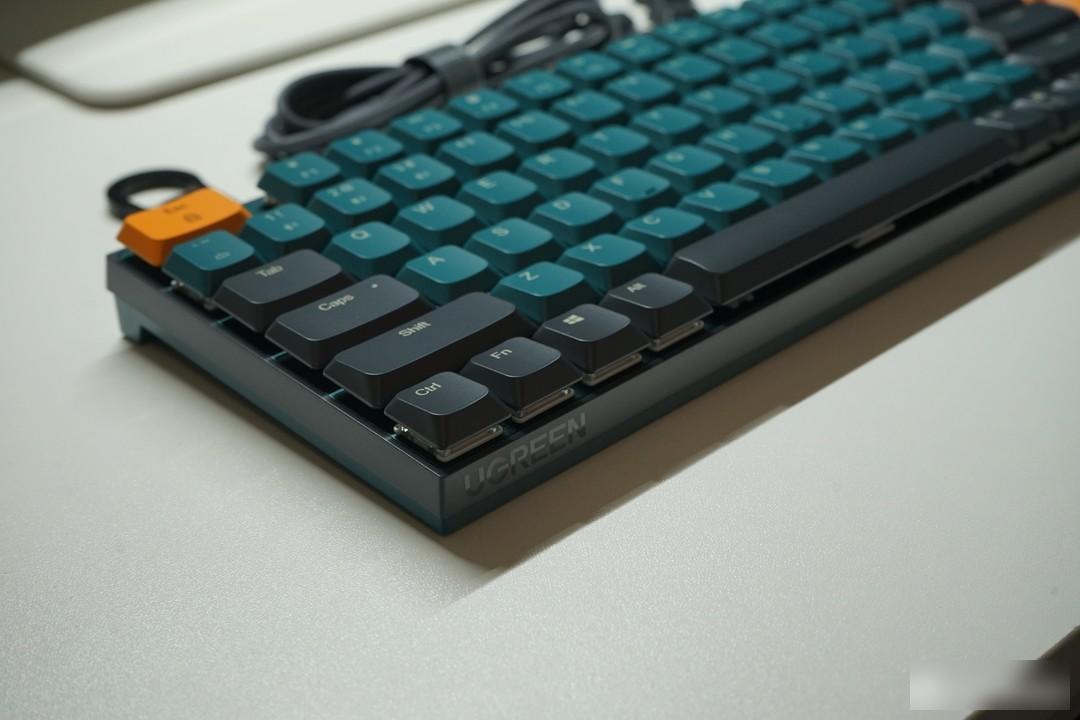
The keyboard as a whole has a layout of 89 keys. The high-tech LP brown switch is short and the key stroke is short. The trigger is faster. The light sound design allows it to be used in a company environment or at home. The mechanical keyboard feels comfortable and labor-saving, but it will not affect others. .
The overall weight is less than 500g, which is lighter than a bottle of mineral water. It is very convenient to carry and expands its usage scenarios.
6° ergonomic angle, non-adjustable, slightly inclined is more user-friendly, and the four anti-slip rubber strips on the back can be very stable on smooth surfaces.
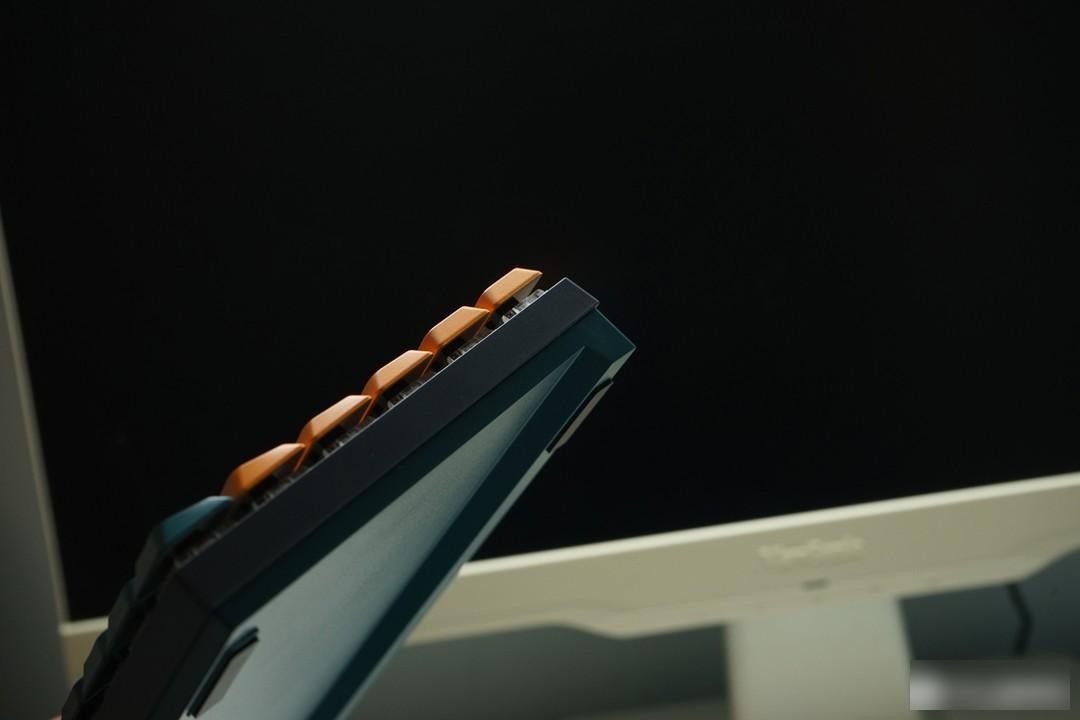
The indicator light is next to the ESC key on the top, and the TYPE-C port and switch are on the top side. Greenlink KU102 can connect 3 devices in Bluetooth mode, plus wired connection, 4 devices can be switched at one time (Fn+~ 1 2 3).
Bluetooth only supports 3.0 under the win7 system, and the system above win7 can support Bluetooth 5.0, with lower power consumption and faster response.
The center of the switch is off, and the connection can also be used at this time. Toggle left and right to switch the win mac system. If you are a mac user, replace the mac keycap in the accessory to bring an experience close to the original mac keyboard, which is very friendly to mac users.
The orange functional area on the right side of the keyboard adds screenshots, emoticons, lock the computer, sleep, search, and switch light effects. It is very practical and convenient to touch fish while working or working...
White backlight + light-transmitting keycaps, the visual effect is very eye-catching, supports 15 kinds of lighting effects and 4 levels of brightness adjustment, and has a wide range of applications.
Built-in 1800mAh lithium battery, the official battery life is 15 hours in backlight mode, and it can reach 180h if it is turned off. In addition, it supports intelligent sleep, enters the low-power mode without any action for a long time, touches it again to resume the working mode, and responds quickly.
Compared with conventional mechanical keyboards, the size is significantly smaller from the thickness to the height of the switch body. The conventional 4mm stroke, this switch body is only 3mm, so it feels lighter and optimizes silence.
The purchase experience of this Lulian KU102 thin and light mechanical keyboard is still very good. It is compact, light and portable, but there are also abundant shortcut keys for people to use in the case of 89 keys. The Gaote LP brown switch is short and comfortable to the touch. He is very friendly to himself and others, and it is not awkward to carry on a business trip. Give it a push~
Welcome to a world of ultimate customization and sublime typing experiences! Are you tired of generic keyboards that fail to deliver on both functionality and aesthetics? Look no further – in this article, we will dive into the captivating realm of mechanical keyboards and guide you through the exhilarating process of building your very own. Whether you're a tech enthusiast, a gamer seeking unparalleled precision, or simply someone who appreciates the craftsmanship of a well-designed keyboard, this journey will empower you to create a personalized masterpiece that elevates your typing to a whole new level. Get ready to unlock the secrets of tactile pleasure and unlock the boundless potential of a truly astounding device. Join us as we uncover each intricate step, empowering you to craft a mechanical keyboard that perfectly suits your individuality – your fingertips will thank you.
Choosing the Right Mechanical Key Switches
If you are planning to build your own mechanical keyboard, one of the most important decisions you will need to make is choosing the right mechanical key switches. The type of key switches you select will greatly impact the overall performance and typing experience of your keyboard. In this article, we will provide you with a comprehensive guide to help you understand the different types of key switches available and assist you in making an informed decision.
Understanding Mechanical Key Switches:
Mechanical key switches are the heart and soul of a mechanical keyboard. They are responsible for registering keystrokes and providing tactile feedback. There are three main types of mechanical key switches available in the market today: linear, tactile, and clicky.
1. Linear Switches:
Linear switches have a smooth keystroke without any tactile bump or audible click. They are popular among gamers due to their fast and smooth actuation. When a linear switch is pressed, it moves straight down and registers the keystroke. If you prefer a quieter and more consistent typing experience, linear switches might be the right choice for you.
2. Tactile Switches:
Tactile switches provide a noticeable bump when pressed. This bump provides tactile feedback, which can be beneficial for touch typists as it helps them determine when a key has been actuated. The bump can occur at different points in the key press, and this is referred to as the actuation point. Tactile switches are suitable for those who prefer a more pronounced typing experience and who want to ensure each keystroke has been registered accurately.
3. Clicky Switches:
Clicky switches are similar to tactile switches in that they provide a tactile bump. However, what sets them apart is the audible click sound they produce when pressed. This clicking sound is satisfying for many typists and can provide an additional level of feedback. However, the noise can be bothersome for some, particularly in office environments or shared spaces.
Factors to Consider when Choosing Key Switches:
When selecting the right mechanical key switches for your keyboard, there are a few factors you should keep in mind:
1. Typing Style:
Consider your typing style and preferences. If you type with a heavy hand or prefer a more pronounced tactile feedback, tactile or clicky switches might be ideal. Conversely, if you have a light touch or prefer a smoother keystroke, linear switches could be a better fit.
2. Noise Level:
Think about the environment in which you will be using your keyboard. If noise is a concern, you may want to choose linear or tactile switches, as they tend to be quieter than clicky switches.
3. Use Case:
Consider how you will primarily be using your keyboard. Are you a gamer or typist? Different key switches are suited for different purposes, so selecting switches that align with your specific use case can enhance your overall experience.
When it comes to building an OEM mechanical keyboard, selecting the right key switches is crucial. Keyceo Tech, a leading brand in the industry, offers a wide range of high-quality mechanical key switches to suit various preferences and needs. Whether you are a gamer, typist, or someone who values a comfortable and enjoyable typing experience, Keyceo has the perfect key switches for you. Remember to consider factors such as typing style, noise level, and use case when choosing key switches, and you'll be well on your way to building the perfect mechanical keyboard.
Gathering the Necessary Components and Tools
Mechanical keyboards have gained immense popularity due to their superior typing experience and customization options. Building your own mechanical keyboard allows you to personalize every aspect of your typing experience, from the switches to the keycaps. In this article, we will provide you with a step-by-step guide on how to build an OEM mechanical keyboard using components and tools from Keyceo Tech.
1. Understanding OEM Mechanical Keyboards:
Before delving into the process of building, let's familiarize ourselves with OEM mechanical keyboards. OEM (Original Equipment Manufacturer) refers to a company that manufactures products for other companies to rebrand. Keyceo Tech is a renowned brand that offers a range of high-quality OEM mechanical keyboard components, ensuring both exceptional performance and affordability.
2. Choosing the Right Components:
To build your mechanical keyboard, gather the necessary components. Keyceo Tech offers an extensive collection of components, allowing you to create a keyboard tailored to your preferences. Start with selecting the PCB (Printed Circuit Board), which acts as the central circuitry connecting all other components.
Next, choose the switches – the heart of any mechanical keyboard. Keyceo Tech offers a variety of switches with different keypress forces, actuation points, and feedback. Take your typing style into consideration when selecting the switches.
Additionally, you'll need stabilizers to enhance key stability and minimize key wobble. Keyceo Tech provides compatible stabilizers necessary for a smooth typing experience.
3. Selecting Keycaps and Layout:
Keycaps are an important aspect of personalization. Keyceo Tech offers a wide range of keycaps, including different colors, materials, and profiles. You can choose between ABS or PBT keycaps based on their durability and texture. Additionally, select a keycap layout that suits your typing needs, whether it's a full-sized, tenkeyless, or compact layout.
4. Preparing the Tools:
Gather the essential tools required for the assembly process. These include a soldering iron and solder wire for connecting the switches to the PCB, a keycap puller to remove and install keycaps effortlessly, and a switch puller to safely remove and replace switches. Additionally, ensure you have a screwdriver set for securing the PCB and other components.
5. Step-by-Step Assembly Process:
- Begin by securing the PCB to the keyboard case provided by Keyceo Tech using the screws and screwdriver.
- Next, solder the switches onto the PCB, ensuring proper alignment and positioning.
- After soldering, mount the stabilizers onto the PCB, making sure they are sturdy and secure.
- Now it's time to attach the keycaps. Use the keycap puller to gently remove any existing keycaps, then carefully place the new ones onto the switches.
- Finally, test all the keys to ensure they are functioning correctly.
Building your own mechanical keyboard is an exciting and rewarding process, allowing you to craft a personalized typing experience. By following this comprehensive guide and utilizing Keyceo Tech's OEM mechanical keyboard components, you can create a keyboard perfectly suited to your preferences. Remember to take your time during the assembly process and enjoy the satisfaction of typing on a keyboard you built with your own hands. Happy building with Keyceo Tech!
Assembling the Keyboard's Frame and Base
Building your own mechanical keyboard is a rewarding and exciting endeavor. It allows you to customize and personalize your typing experience, ensuring optimal comfort and efficiency. In this article, we will guide you through the process of assembling the keyboard's frame and base, providing step-by-step instructions and insights on how to create your own OEM mechanical keyboard.
First and foremost, it is essential to gather all the necessary tools and components before commencing the assembly process. These include the keyboard frame, base plate, switches, keycaps, stabilizers, PCB (Printed Circuit Board), a soldering iron, solder wire, keycap puller, tweezers, and a screwdriver.
To begin, take the keyboard frame and align it with the base plate. Ensure that the screw holes on the frame match perfectly with those on the base plate. Once aligned, secure them together using the provided screws and a screwdriver. This step is crucial as it forms the foundation of your keyboard, providing stability and durability.
Next, it is time to install the switches onto the PCB. Place the PCB over the base plate, ensuring that the switches' pins are aligned with the corresponding holes on the PCB. Gently push each switch into its designated position, ensuring a snug fit. Take your time during this process to avoid any damage to the switches or the PCB.
After installing the switches, it is time to install the stabilizers. Stabilizers are essential for ensuring smooth and consistent key presses, particularly for larger keys such as the spacebar, enter key, and shift keys. Insert the stabilizers into their designated slots on the PCB and secure them using the provided clips or screws. Make sure they are firmly in place to prevent any unwanted rattling or wobbling.
Once the switches and stabilizers are securely installed, it is time to attach the keycaps. Keycaps come in various shapes and sizes, allowing for endless customization options. Place each keycap over its corresponding switch, ensuring that they fit perfectly and are aligned correctly. If any keycaps require additional force to install, gently press down using the keycap puller or your fingers, taking care not to damage the switch or the keycap.
Now that the keyboard's frame, base plate, switches, stabilizers, and keycaps are all assembled, it is time to test the functionality of your OEM mechanical keyboard. Connect the keyboard to your computer via the USB cable provided and ensure that all keys register correctly. Test each key individually to ensure there are no inconsistencies or issues.
If any keys fail to register, it is likely due to a faulty switch or a loose connection. In such cases, carefully inspect the affected area, re-solder any loose connections, or replace any faulty switches if necessary.
Congratulations! You have successfully assembled your very own OEM mechanical keyboard. Enjoy the satisfaction of typing on a personalized keyboard designed to meet your unique preferences and needs. Remember to customize the keyboard further by programming macros, creating lighting effects, or exploring additional keycap options.
In conclusion, building a mechanical keyboard from scratch can be a rewarding and fulfilling experience. By following the steps outlined in this article, you can create a high-quality OEM mechanical keyboard that suits your preferences and enhances your typing experience. Explore the world of mechanical keyboards, unleash your creativity, and enjoy the benefits of a tailored typing experience with your Keyceo Tech keyboard.
Installing and Soldering the Mechanical Key Switches
Installing and Soldering the Mechanical Key Switches: A Comprehensive Guide by Keyceo Tech
Building a mechanical keyboard from scratch can be a rewarding experience for keyboard enthusiasts. In this article, we will guide you through the process of installing and soldering the mechanical key switches, using our OEM mechanical keyboard kit. Whether you are a beginner or a seasoned DIY-er, our step-by-step instructions will help you create a personalized mechanical keyboard that suits your preferences.
Choosing the Right Mechanical Key Switches:
Before diving into the installation process, it is crucial to select the appropriate mechanical key switches for your keyboard. Keyceo Tech offers a wide selection of high-quality switches, ranging from tactile to linear and even clicky switches. Consider factors such as actuation force, travel distance, and sound preference while making your choice.
Preparing the Keyboard Plate:
To start, ensure you have a compatible keyboard plate that matches the key switches you have selected. Keyceo Tech provides OEM keyboard plates, designed to accommodate various switch types. Place the plate on a stable surface and insert the switches into their designated slots, making sure they are aligned correctly.
Soldering the Key Switches:
Now, it's time to solder the switches in place. Prepare your soldering iron and solder wire, ensuring they are clean and in good condition. Begin by heating the soldering iron and melting a small amount of solder on its tip. Gently touch the soldering iron to the contact points on the keyboard PCB (printed circuit board) and the corresponding switch pins, ensuring a strong and secure connection.
It is essential to exercise caution while soldering. Apply just enough solder to create a reliable joint without causing any damage. Be mindful of the temperature and time your soldering iron remains in contact with the components to avoid overheating and potential harm to the keyboard.
Testing the Mechanical Key Switches:
After soldering all the switches in place, it is advisable to test their functionality before proceeding further. Connect the keyboard to a computer and verify that each key press registers accurately. Keyceo Tech's OEM mechanical keyboards come with a reliable software tool that allows you to fine-tune and customize the keyboard layout, ensuring optimal performance.
Finishing Touches:
Once you have confirmed that all mechanical key switches are working correctly, it's time to complete the assembly of your mechanical keyboard. Attach the keycaps to the switches, ensuring they fit snugly and align perfectly. Keyceo Tech offers a wide range of keycap options, including stylish and customizable sets that add a personal touch to your keyboard.
Maintenance and Further Customization:
Now that you have successfully built your mechanical keyboard, it's essential to maintain its performance and longevity. Regularly clean the keycaps and switches using a keycap puller and compressed air to remove any dust or debris. Additionally, Keyceo Tech provides an extensive range of accessories and customization options, such as different keycap colors and materials, allowing you to further personalize your keyboard to your liking.
Congratulations! You have completed the process of installing and soldering the mechanical key switches for your OEM mechanical keyboard. With Keyceo Tech's meticulous guidance, you have gained the necessary skills to embark on your keyboard-building journey. Enjoy the tactile satisfaction, optimal performance, and personalization that come with owning a mechanical keyboard tailored to your preferences. Happy typing!
Finishing Touches: Keycaps, Keycap Puller, and Keycap Removal Guide
Building your own OEM mechanical keyboard is a rewarding and customizable experience, allowing you to create a keyboard that meets your specific needs. In this comprehensive guide, we will walk you through the final steps of the keyboard-building process, focusing on the finishing touches that include keycaps, keycap pullers, and a keycap removal guide. Keyceo Tech, a renowned brand in the mechanical keyboard industry, will be your trusted companion throughout this exciting journey.
Keycaps - Personalize Your Keyboard Aesthetics:
One crucial element in creating a bespoke mechanical keyboard is selecting the perfect keycaps. Keyceo Tech offers an extensive range of keycaps, made from high-quality materials such as PBT (polybutylene terephthalate) and ABS (acrylonitrile butadiene styrene). PBT keycaps are highly durable, resistant to shine, and provide a comfortable typing experience, making them a popular choice among mechanical keyboard enthusiasts.
Additionally, Keyceo Tech offers various keycap profiles, such as OEM, Cherry, and DSA, allowing you to choose the shape that best suits your typing style and preference. With a vast assortment of colors, designs, and even artisan keycaps, you can truly personalize your keyboard aesthetics and create a unique masterpiece.
Keycap Puller - Convenient Removal and Replacement:
To ensure ease of customization, it is essential to have a keycap puller as part of your keyboard-building arsenal. A keycap puller enables you to remove individual keycaps without causing damage to the keyboard or keyswitches. Keyceo Tech's keycap puller is ergonomically designed, ensuring a comfortable grip while minimizing the risk of accidental keycap breakage during removal or replacement.
Keycap Removal Guide - Step-by-Step Instructions:
Whether you are a beginner or an experienced enthusiast, the process of removing keycaps can be unfamiliar. Keyceo Tech provides a comprehensive keycap removal guide that outlines simple step-by-step instructions, making it easy for you to modify or clean your keyboard. The guide covers different keycap layouts, including OEM, Cherry, and DSA profiles, ensuring compatibility with a wide range of keyboards.
By following the keycap removal guide, you will gain the confidence to experiment with different keycap sets, customize layouts, and perform routine maintenance, keeping your keyboard in pristine condition for years to come. Remember, the goal is to make your mechanical keyboard truly your own.
Building your own OEM mechanical keyboard is an immersive experience that allows you to unleash your creativity and tailor your typing experience to your preferences. Keyceo Tech, with its impeccable reputation and dedication to providing high-quality products, serves as the perfect partner for your keyboard-building journey.
Through Keyceo Tech's diverse selection of keycaps, keycap pullers, and informative keycap removal guide, you now possess the knowledge and tools to bring your mechanical keyboard vision to life. The finishing touches provided by Keyceo Tech ensure that your keyboard not only looks stunning but also functions flawlessly with a personalized touch.
Embrace the freedom of customization and embark on your journey to build the perfect OEM mechanical keyboard with Keyceo Tech, your trusted companion throughout this exciting endeavor.
Conclusion
In conclusion, building a mechanical keyboard is a fascinating process that allows individuals to customize and enhance their typing experience. With 7 years of experience in the industry, our company has gained extensive knowledge and expertise in creating top-notch keyboards that meet the diverse needs of our customers. From selecting the right components to meticulously assembling each unit, we take pride in delivering a high-quality product that surpasses expectations. Through our commitment to innovation and customer satisfaction, we look forward to continuing our journey in the mechanical keyboard industry, empowering users with the ultimate typing experience for years to come. So why settle for standard keyboards when you can build your own personalized masterpiece? Dive into the world of mechanical keyboards and elevate your typing game today!
Factory Adress: No.11,FengpingRoad