Gaming Keyboard Price: Things You May Want to Know
Keyceo Tech Co., LTD promotes gaming keyboard price with scientific and professional production process in the global market. It is at the leading level of the industry with standard the 5S operating environment, which is the guarantee of product quality. It features with scientific structure and aesthetic appearance. High-performance materials are bound to highlight the value of this product. Finest techniques ensure the accuracy of specifications, making it more convenient to apply.
Keyceo developed by our company has become stronger with our continuous efforts. And we pay high attention to our capacity-building and technological innovation decision-making, which puts us in a good position to meet the increasing and diverse demand of the present global market. Many breakthroughs are made in our company.
The ability and willingness to provide customers with small quantities of gaming keyboard price have been one of Keyceo's points of differentiation from our competitors for decades. Now learn more by exploring the selection below.
My baby is in the first grade. In order not to affect his homework and rest, I replaced the original green-axis mechanical keyboard with a Heijue AK816 Pro three-mode gasket mechanical keyboard with a multi-layer noise-cancelling structure, which supports hot-swappable axis seats. You can DIY at any time. Its biggest feature is that the sound is quieter. It uses the Jiadalong G Silver Pro2.0 linear shaft body. The first experience is really good, and the sound is OK when triggered with a light touch, even for a long time. Code words will not feel tiring. If you want to play with mechanical keyboards, but don’t like the “click” too loudly, you can try this new product of Heijue, which will definitely bring your fever down!
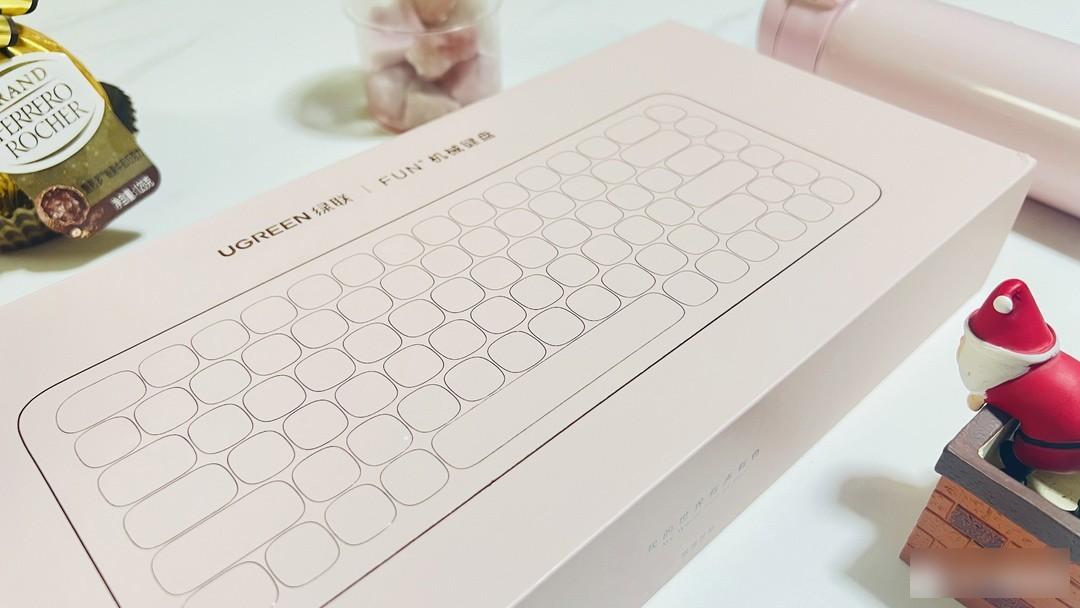
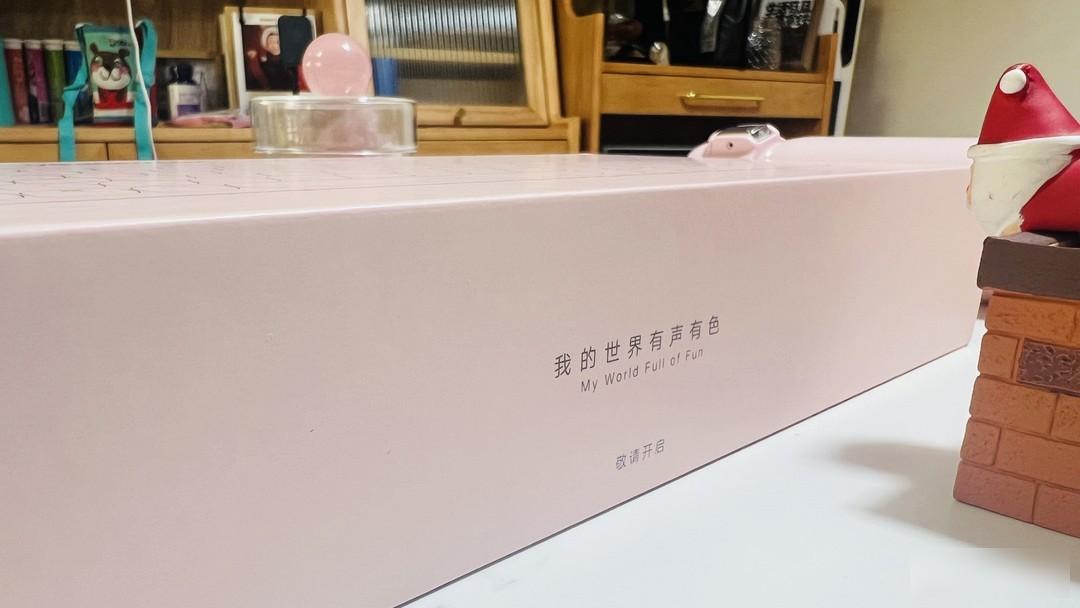
In terms of packaging, Heijue AK816 Pro three-mode mechanical keyboard adopts a set gift box design. This time, it even comes with a 30㎜×70㎜ super-large mouse pad and a transparent dust cover. The texture is full, and it is good for personal use as a gift.

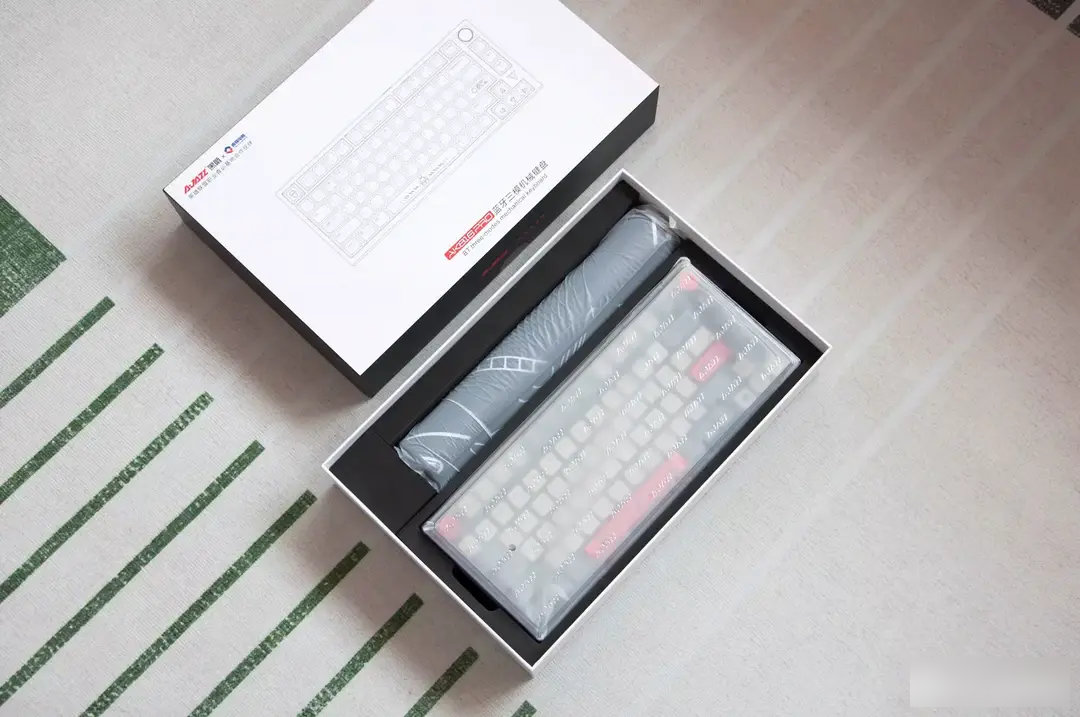 Family portrait: In addition to the mouse pad and dust cover, the gift box also contains 1 Heijue AK816 Pro three-mode mechanical keyboard, 1 data cable, 3 MAC supplementary keycaps, 1 dual-purpose key puller, and an instruction manual .
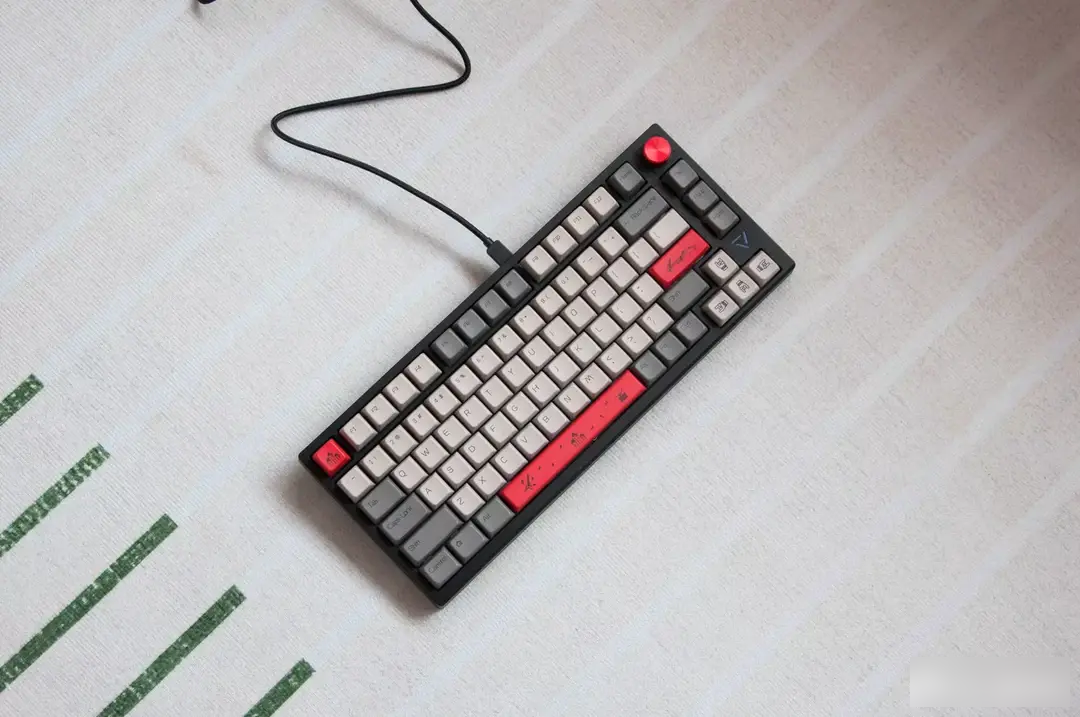
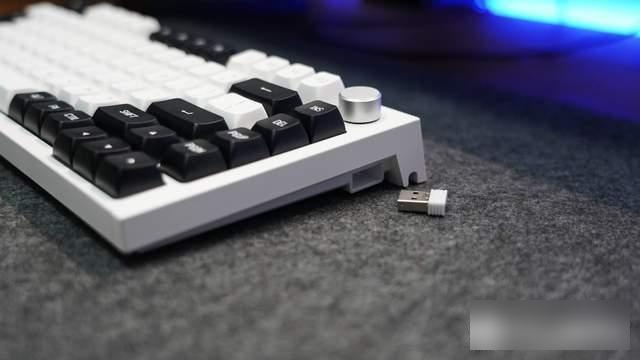
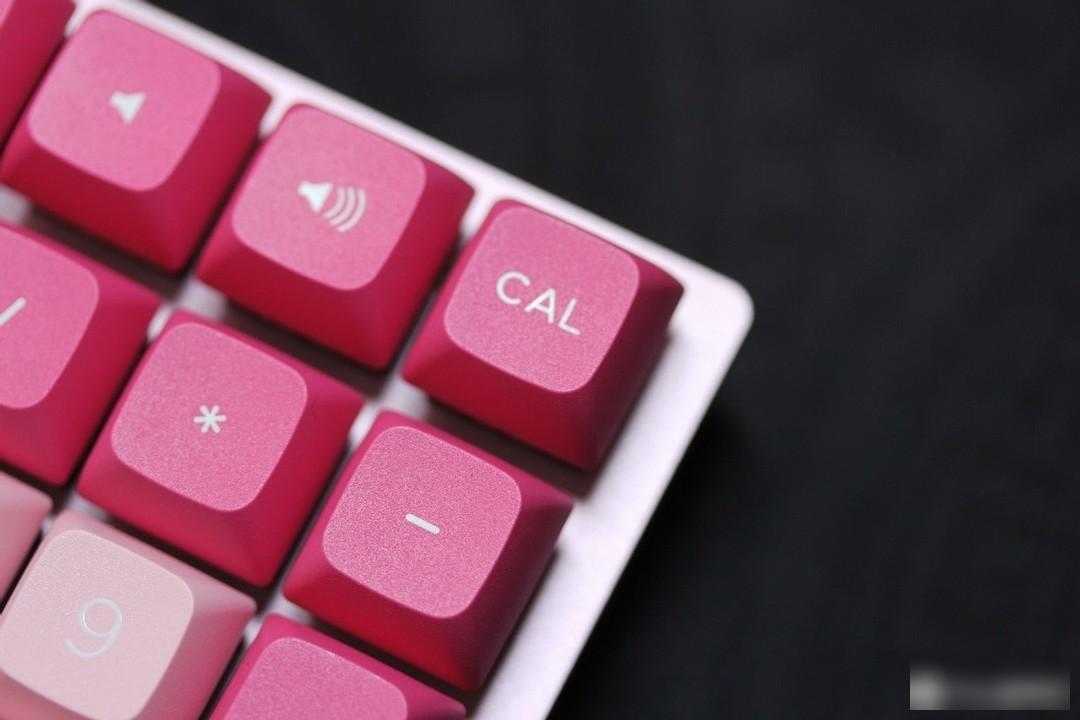
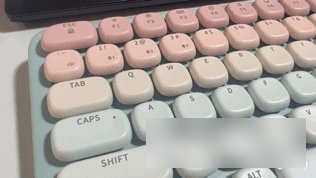
The first time I saw this keyboard, I was instantly attracted by the multimedia aluminum alloy volume knob in the upper right corner. I prefer red, so I chose the "Rock Rhapsody" color scheme.
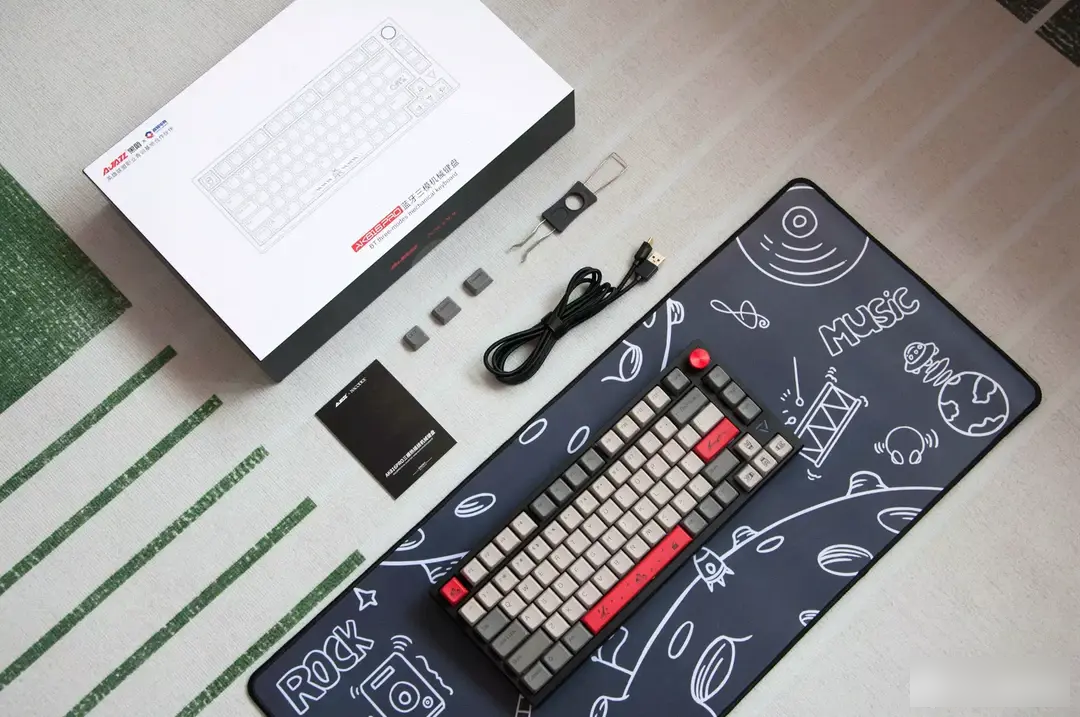
The color design of the theme of "Rock Rhapsody" is too passionate. When the cold black meets the lost gray and hot red, together with the trembling strings and shaking hands, it creates a rock-style appearance and shape. Simple and versatile no matter where it is placed.
Heijue AK816 Pro three-mode mechanical keyboard adopts 75% layout, 81-key design, size: 327.5㎜×136.5㎜×40.38㎜, and weighs about 812g.


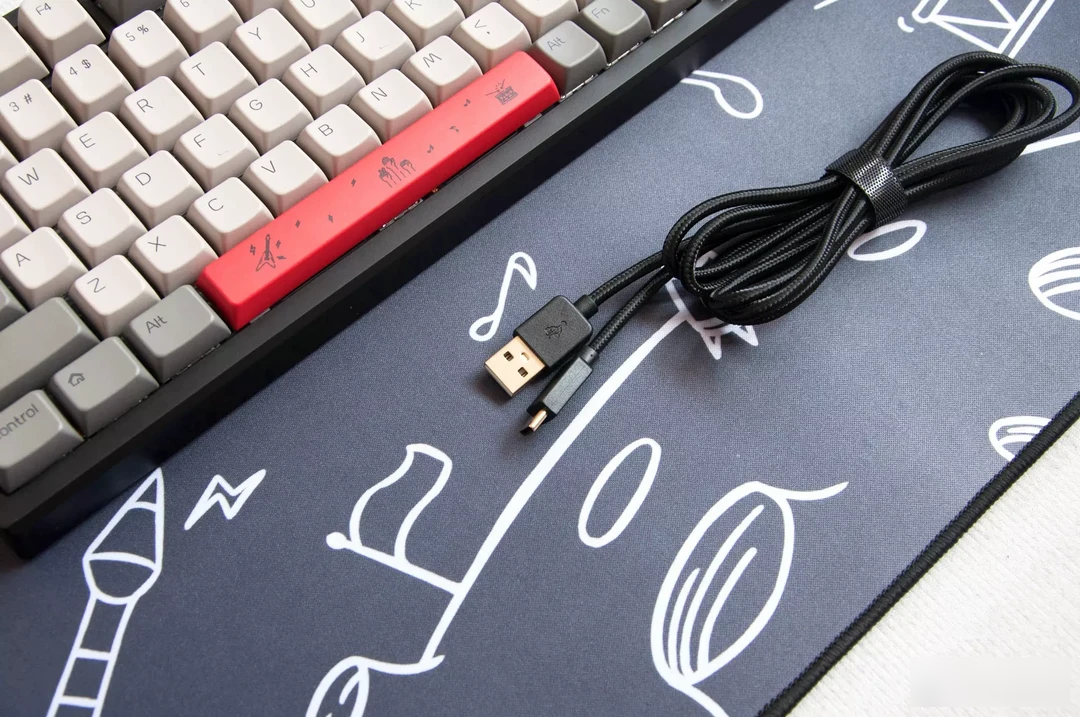
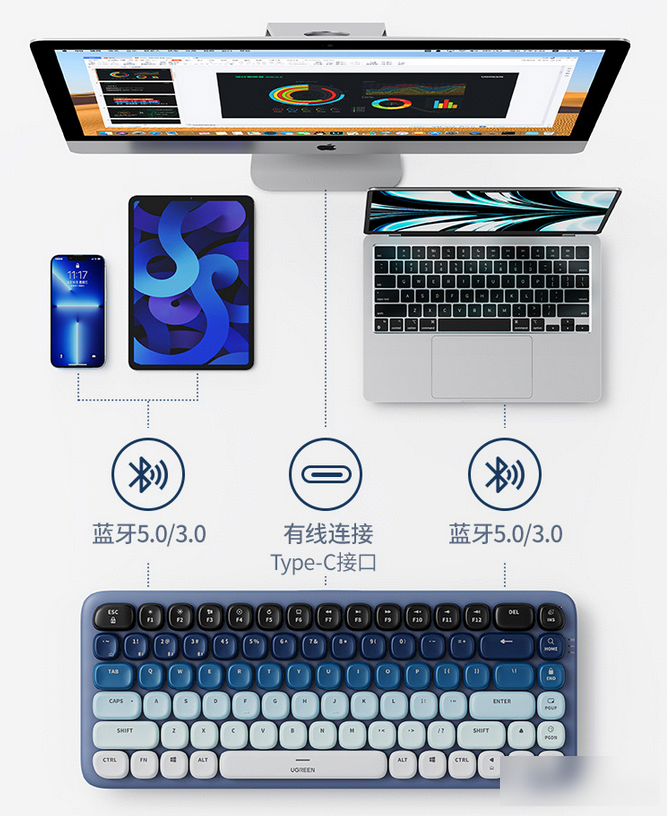
This is the standard braided data cable for the Heijue AK816 Pro three-mode mechanical keyboard. It is about 1.8M long, which is enough for charging and connection in various scenarios. In addition, it can be seen from the name that this keyboard supports Bluetooth 5.0, 2.4G wireless and Type-C wired three-mode connection, and is compatible with Windows, MAC/IOS and Android operating systems. How to use it and what device to connect to is up to you The final say.
Let’s take a look at the front of this keyboard first. Which of the two colors of “Rock Rhapsody” and “Cosmic Adventure” do you prefer?
I think the 81-key design is just right, and it looks bigger and more refined when placed on the desktop. More button functions can be expanded through custom macro design and FN combination keys.
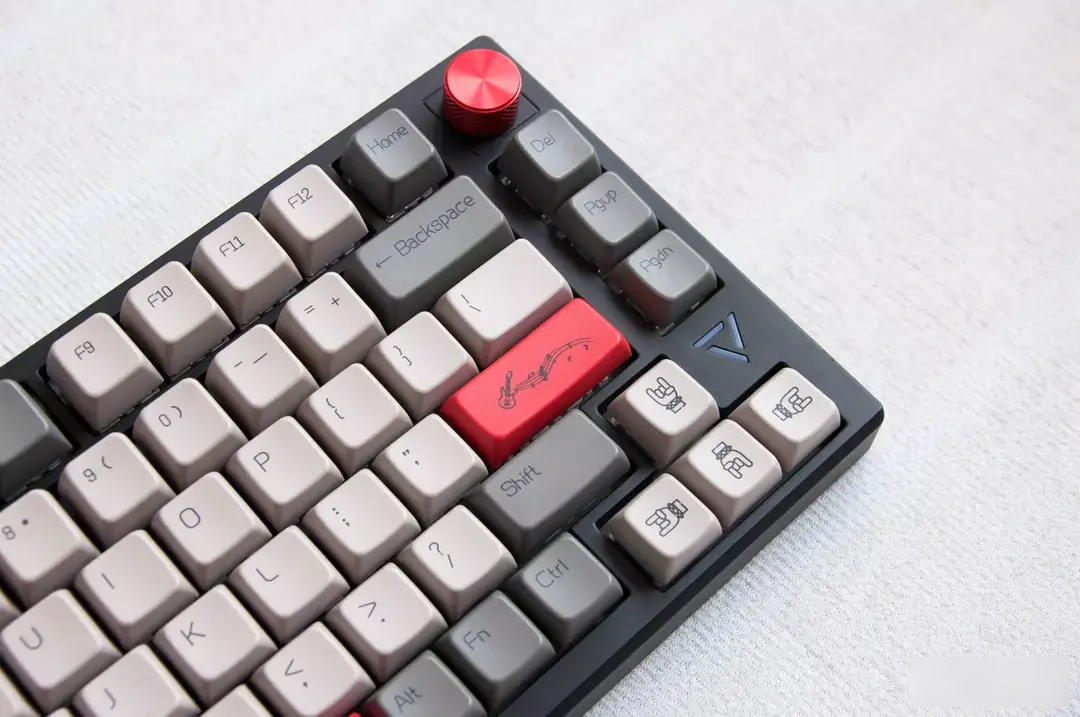
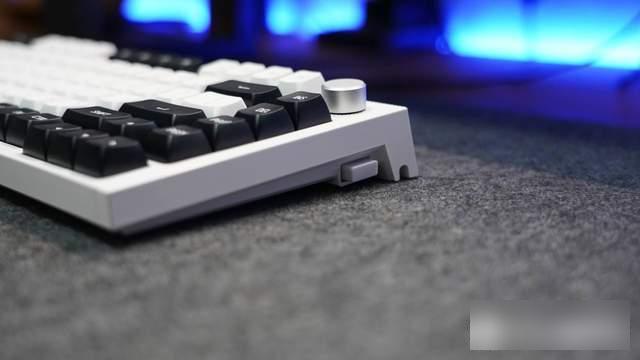
Be sure to take a close-up of this "Little Red Riding Hood" knob for everyone to see. It is made of aluminum alloy, and it is blessed with CD pattern and anti-slip pattern, which makes it both beautiful and easy to use. This knob switch is used to adjust the volume by default, press down to mute, and turn left to right to increase or decrease the volume.
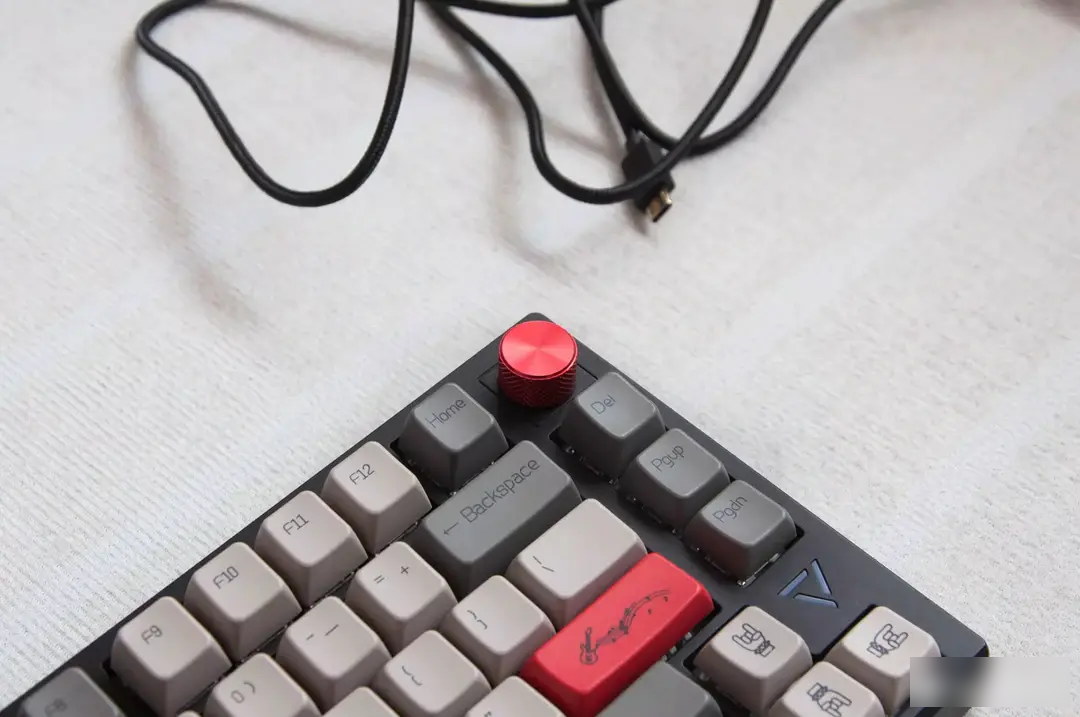
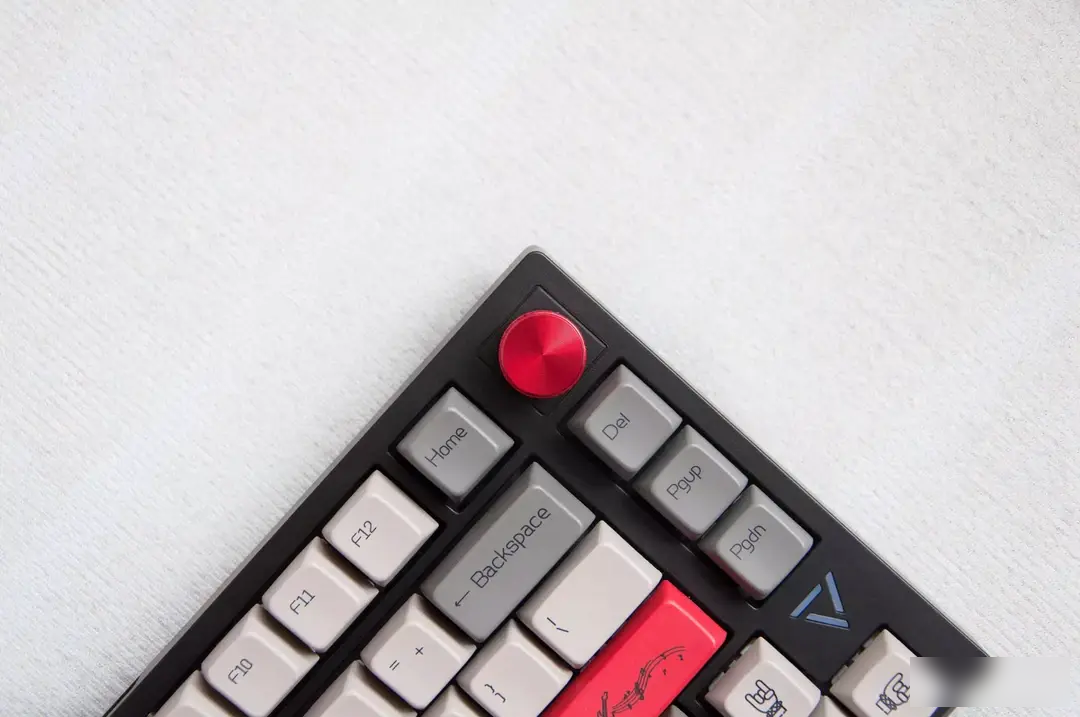

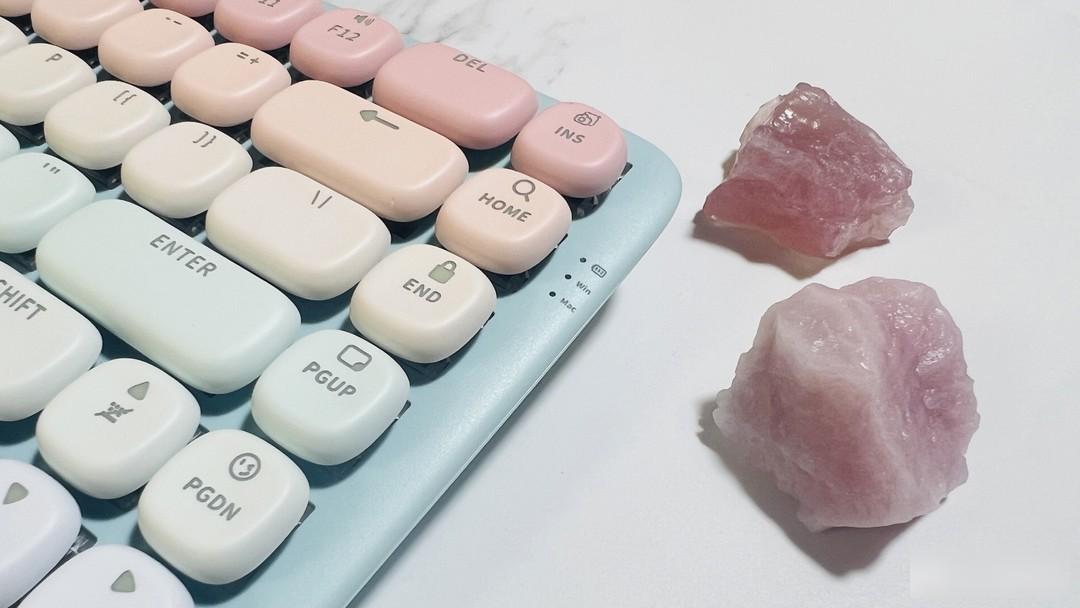
Button details, the keycaps are MDA-height sublimation keycaps, the designers have incorporated rock elements into it, the enter confirmation key, direction key, space bar and return key have all been redrawn to make the overall look more rock style. The lettering is clear and there are no burrs, and the workmanship and feel are very good. Made of PBT, there is no need to worry about oiling or fading after a long time of use.

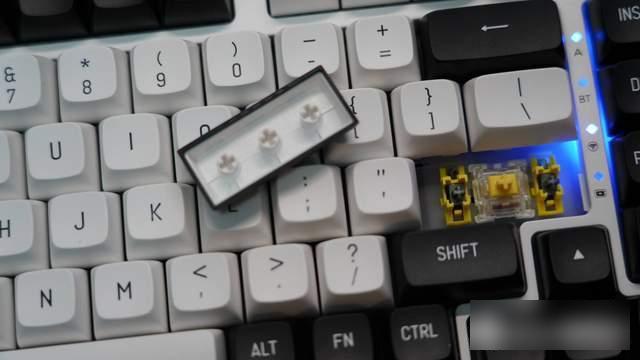
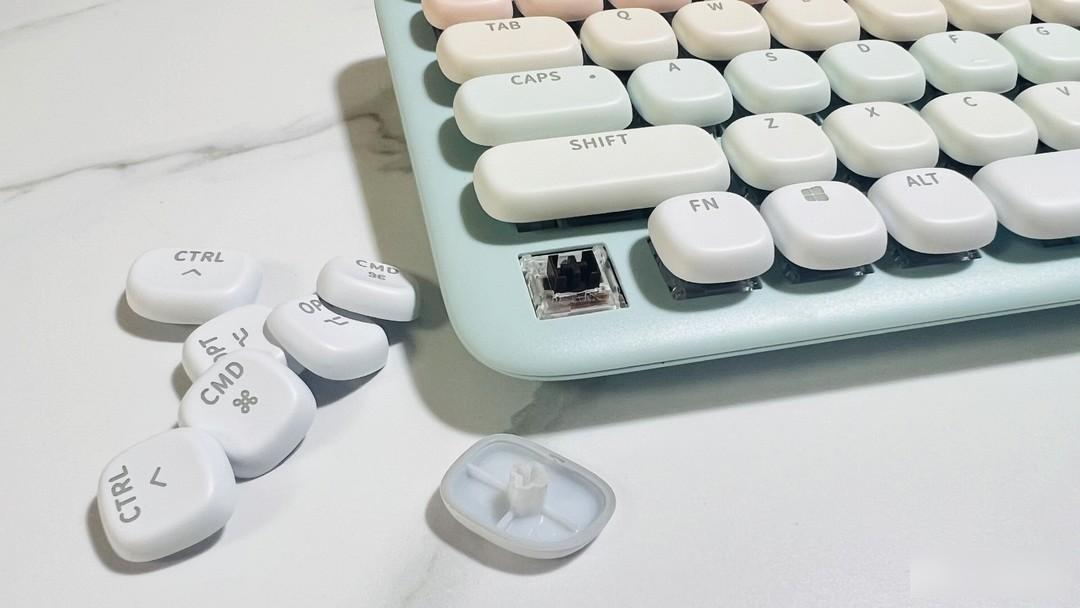
In terms of the switch body, the Heijue AK816 Pro three-mode mechanical keyboard is equipped with Jiadalong’s new generation of G Silver Pro 2.0 switch body. The biggest change in appearance is the upgrade of the raised light-gathering components, as well as the upgrade of the anti-oxidation alloy contact. Point and improve the material of the upper cover to further improve the transparency of the backlight and reduce the noise of the rebound. It comes with lubrication at the factory, and the more you use it, the more you like it.

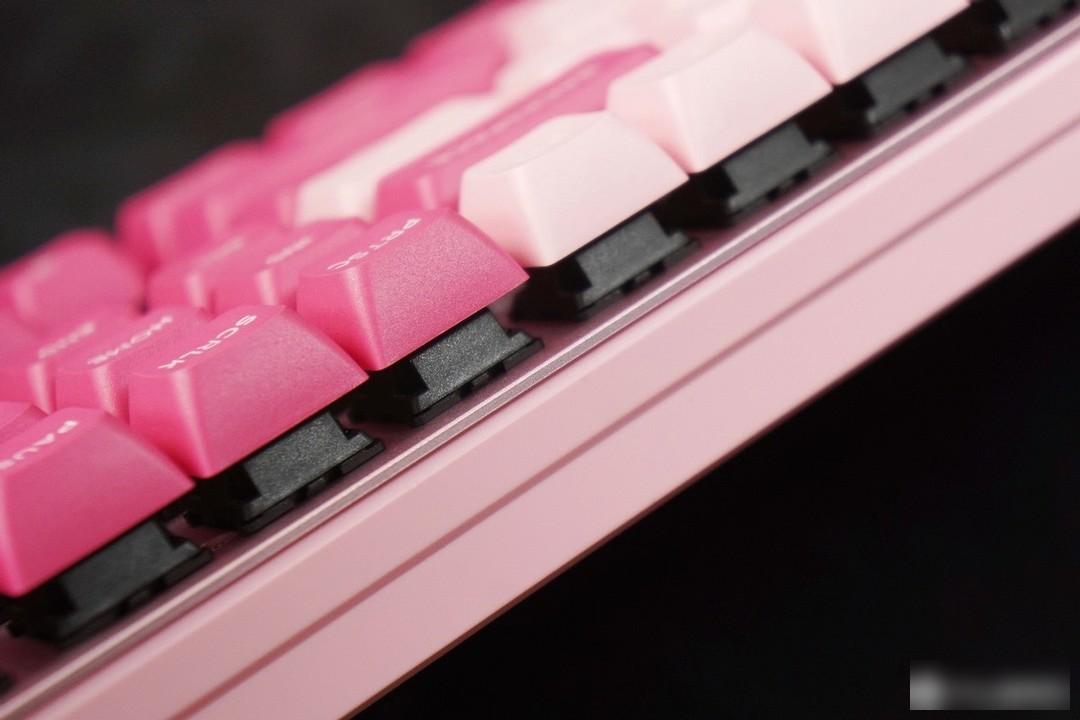
After talking about the switch body, of course I have to talk about the structure of the AK816 Pro. We know that the most important factors affecting the feel of the keyboard are the keycaps and the switch body, which have different structures. The Heijue AK816 Pro three-mode mechanical keyboard uses The hull structure keyboard is a more costly gasket structure, and the screwless structure that supports the positioning plate with silicone pads on the upper and lower covers is softer and more comfortable to the touch.
With the built-in poron sandwich cotton, the pad under the shaft and the bottom cotton, most of the cavity sound inside the keyboard is eliminated. With the above-mentioned G silver pro2.0 linear shaft, the sound is quieter and a little nicer.
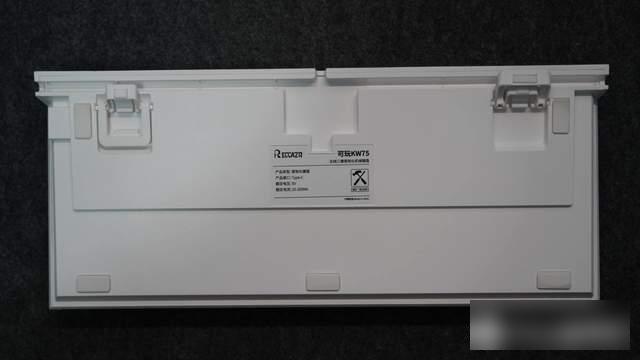
The mode/system switching key is designed on the back of the keyboard, and it can be adjusted by flipping the keyboard when needed. It can be seen that there are multiple rubber anti-skid pads on the back of the keyboard, with an adjustable support angle design, which can ensure the stability of the keyboard during use.
The storage compartment for the 2.4G receiver is designed on the side of the top, below the charging port, which is practical but does not affect the appearance.
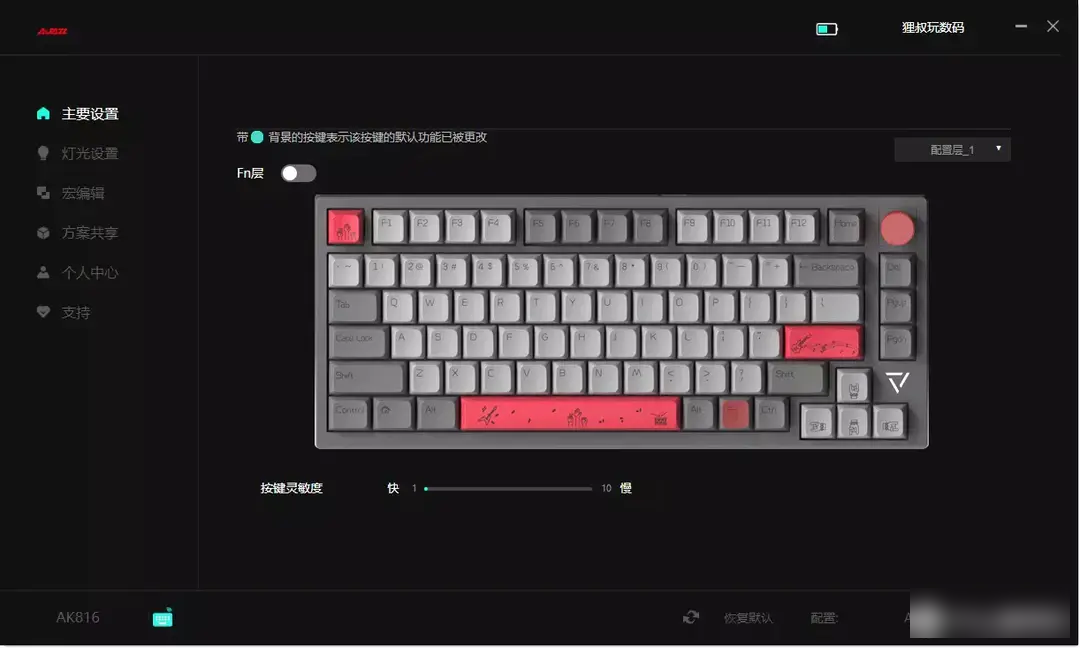
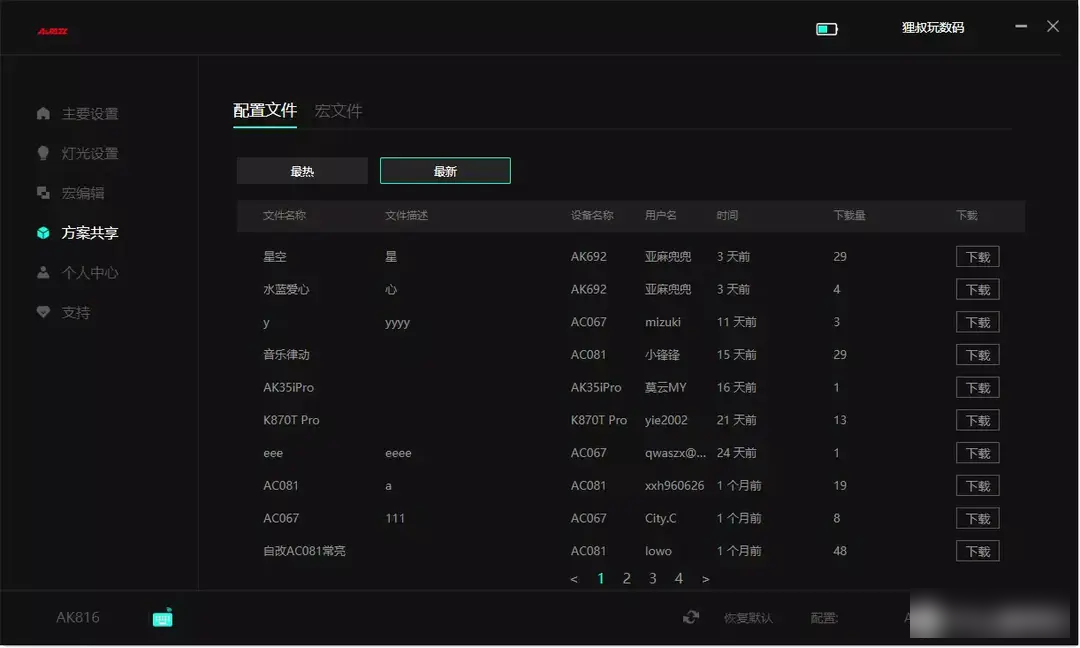
I have to say that the driver interface of Heijue is very tasteful, simple but not simple, the left side is the function switching area, and the right side is the function interaction area, which is intuitive and easy to use. There is no need to download the driver to use the keyboard normally, and it is very convenient to plug and play. If you want to change the default key settings, or customize lighting and macro schemes, you need to download the exclusive driver from Heijue official website. After installation, you can change the default settings, edit lighting/macro schemes and upgrade the keyboard system.
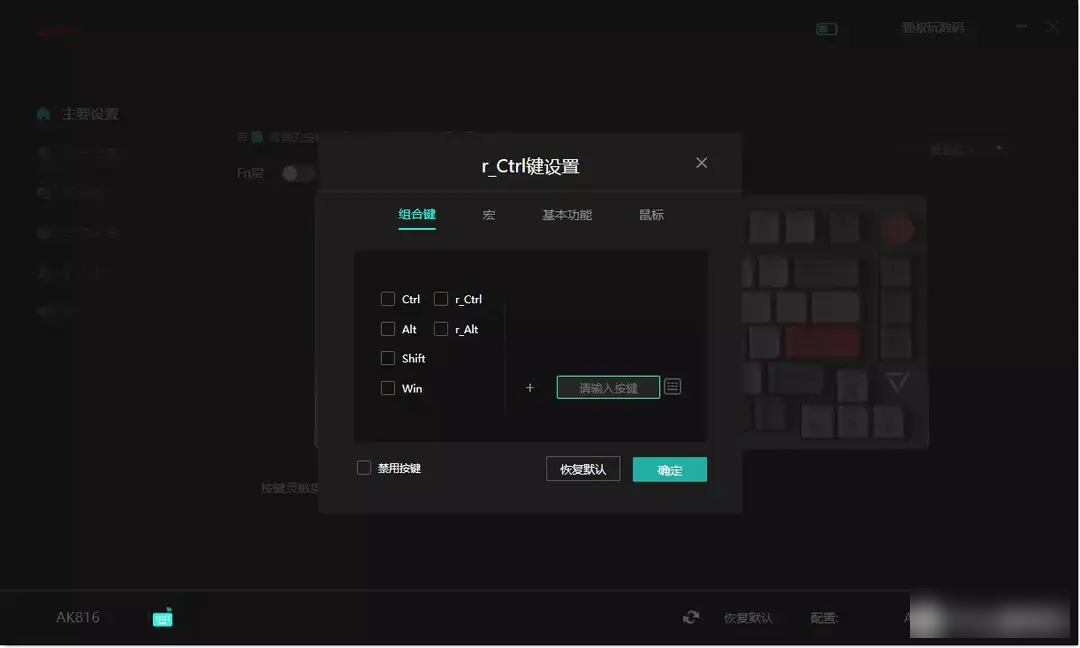
In the "Main Settings", we can set each button individually, including key combination, macro editing, basic functions and mouse functions, or use different configuration layers to adapt to the individual usage habits of each device, up to support Four configuration layers to toggle. For example, I assigned a task to open the calculator for the "Alt" key on the right. When you need to use the calculator, you can open it with one key, which is super convenient.
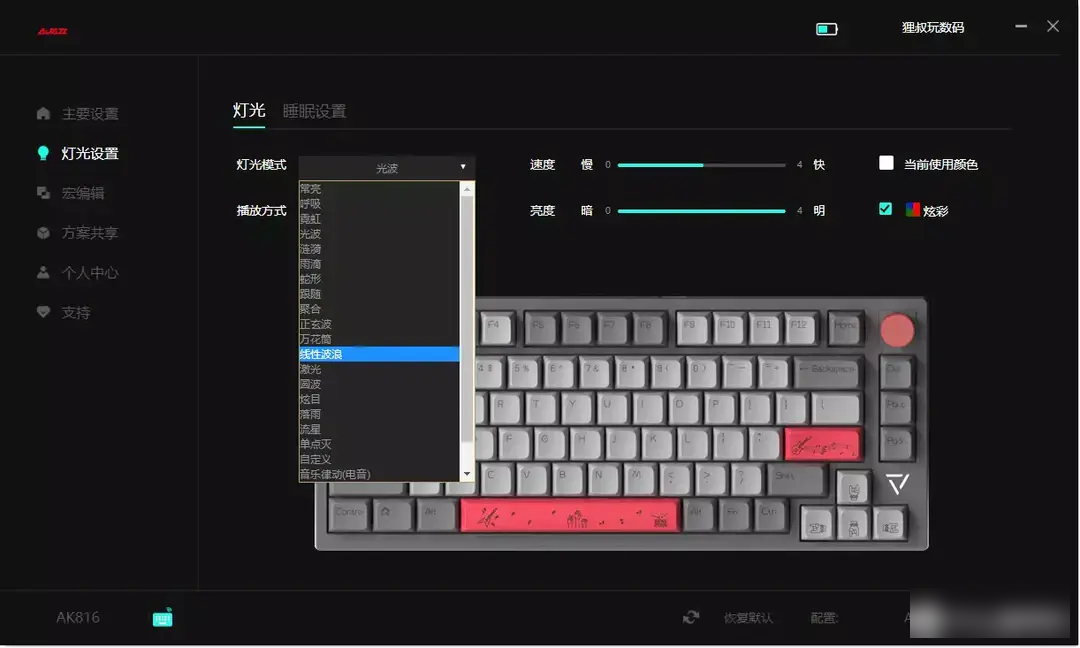
Do you all like lighting effects? The Heijue AK816 Pro three-mode mechanical keyboard has 1680 colors of RGB lighting, which is adjustable with a single key. We can use the combination keys to switch between 18 preset lighting effects, and we can also achieve more adjustable lighting effects through the driver. Playability.
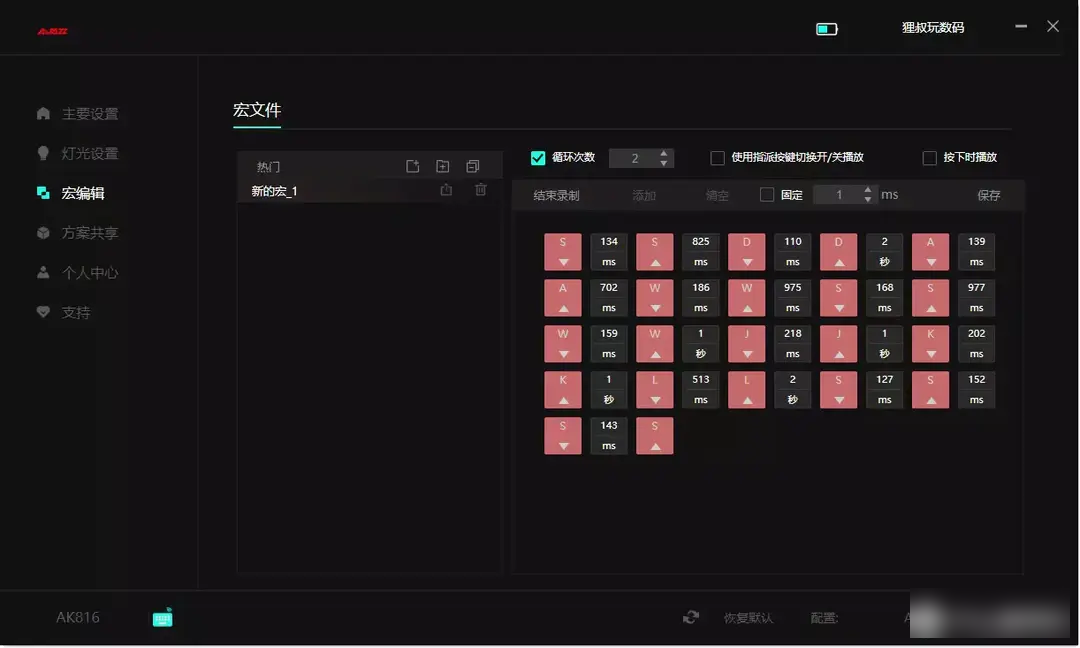
The Heijue AK816 Pro three-mode mechanical keyboard supports macro editing for all keys, which means that each key can complete a specific task independently. If you don’t want to set the macro command yourself, you can also use the program sharing to set it up. Like the macro editing feature? Through custom configuration, make your keyboard exclusive and have a stronger sense of manipulation.
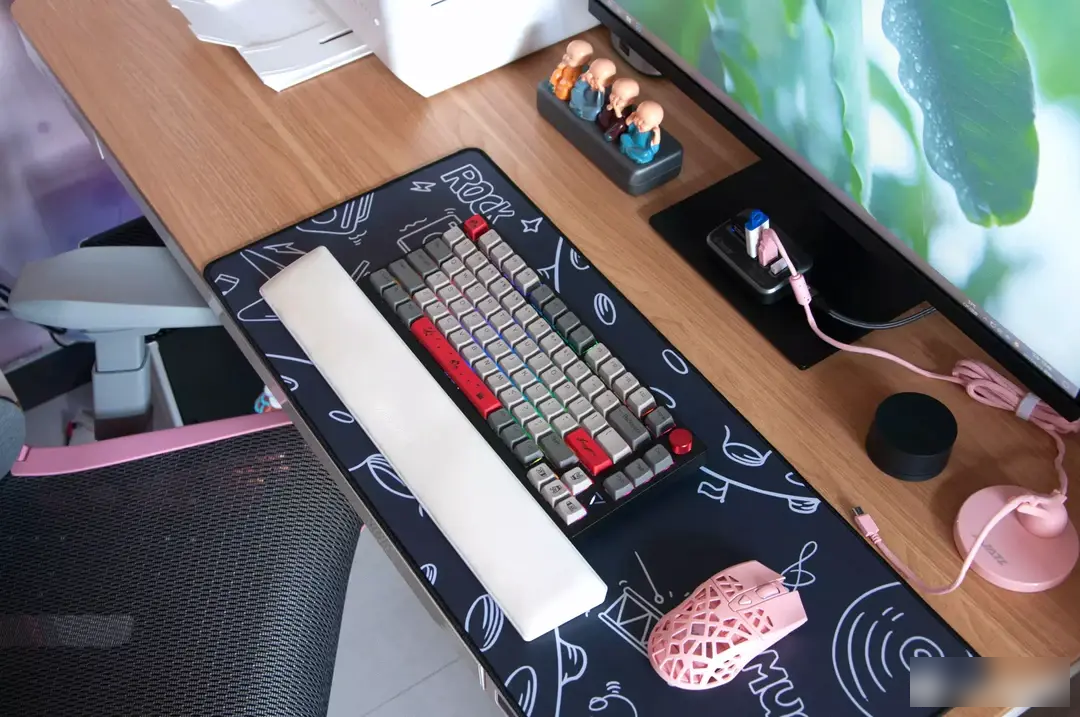
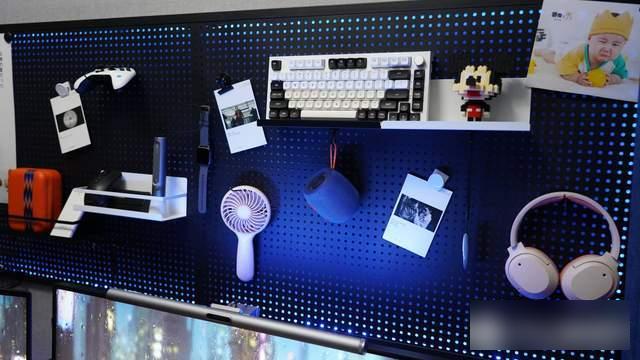
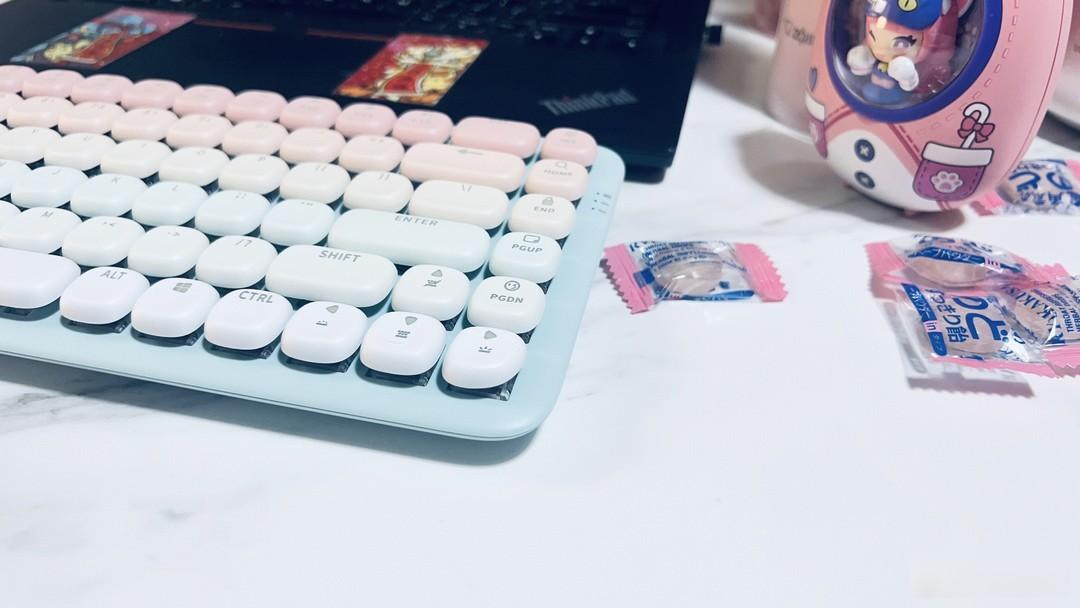
I use it on the computer desk in the living room most of the time. Let’s take a few photos to show you the overall effect. Does it appear that the desktop space is larger. One is the standby state, and the other is the effect after the light is turned on.

Here are two more lighting effects after turning off the lights, they look pretty good. It is worth mentioning that the RGB lighting effect of the Heijue AK816 Pro three-mode mechanical keyboard supports music rhythm, which means that you can DIY the atmosphere effect you want, and shooting videos can enhance the atmosphere, which is pretty good.


Finally, here are two pictures of my daughter-in-law at work to show you how it works in my home. My computer desktop is 1.2 meters. After replacing it with the Heijue AK816 Pro three-mode mechanical keyboard, does it appear that the desktop space is larger? Having said so much, in fact, the main purpose of my buying this keyboard is to reduce noise, so as not to affect my baby's study and rest. After the experience, it did meet expectations.

In terms of battery life, the Heijue AK816 Pro three-mode mechanical keyboard has a built-in 3000mAh battery. According to the official statement, it can provide about 10 hours of battery life when the light effect is fully turned on in wireless mode. I usually use the computer for 2 to 3 hours at night. The actual measurement is based on my usage frequency for a week. Down is no problem at all, excellent performance.
Through experience, the soft and comfortable feel is what I am most satisfied with. I am used to the green switch, and suddenly switched to Jiadalong G Silver Pro2.0 linear switch body with the gasket structure used for the first time. The difference is quite big.
The appearance of Heijue AK816 Pro three-mode mechanical keyboard is worth mentioning. The three-mode mechanical keyboard can be connected to almost all the devices in your home. rest. If you also need a mechanical keyboard with a quiet sound, you can try this new product of Heijue. It has both appearance and strength, and I believe you will not be disappointed.

As a desk enthusiast, I gradually have a higher pursuit of the indispensable keyboard on the desktop. Recently, I have become obsessed with customized keyboards, because it has higher playability on PCB boards, positioning boards, backlights, switches and keycaps.
For a novice who is new to customized keyboards, high cost performance has become my first choice. Recently, I bought the customized keyboard of RECCAZR 75, which is a keyboard with 75% arrangement and Gasket structure. Through this keyboard, from keycaps, shafts, upper covers, PC positioning boards, positioning board silicone, etc., I have deepened my understanding of customized keyboards step by step. What satisfies me the most is that through this hot-swappable customized keyboard, I can constantly add elements I like to it, and I can also transform it into my favorite sound and feel.

The price of Leikaze 75 provides a separate Gasket structure kit for all great players to choose from, but for a novice, I still directly bought the combination of the ready-to-use yellow switch and black and white keycaps.
【Exterior】
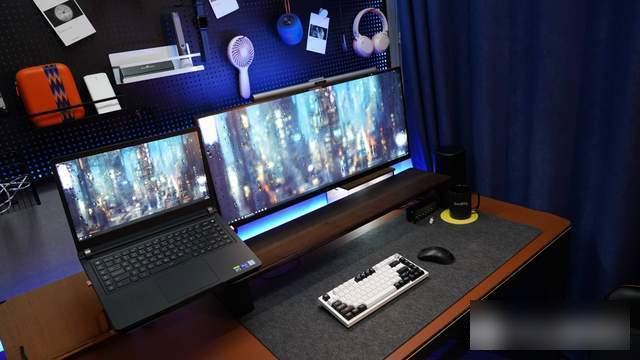
Let me talk about its appearance first. I personally think that a small keyboard can make the table look more concise and beautiful. It happens that Lei Kaze uses 75% of the keyboard layout, which saves 25% of the space on my desktop. By the way, I would like to explain here that the smallness mentioned here is purely small, and has nothing to do with the size of the desktop. Of course, placing this smaller Leikaze on my 2-meter table looks more refined than the full keyboard.

Originally, I fell in love with the color scheme of their Gundam, but unfortunately this color scheme is too popular and has been out of stock, so I finally chose the black and white color scheme. In fact, this color is black and white, and the RGB lighting effect is pretty good, isn't it?

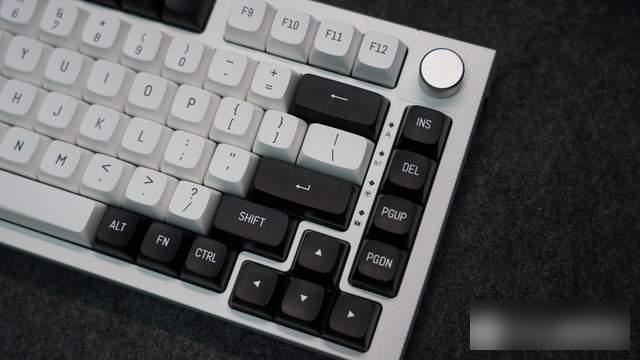
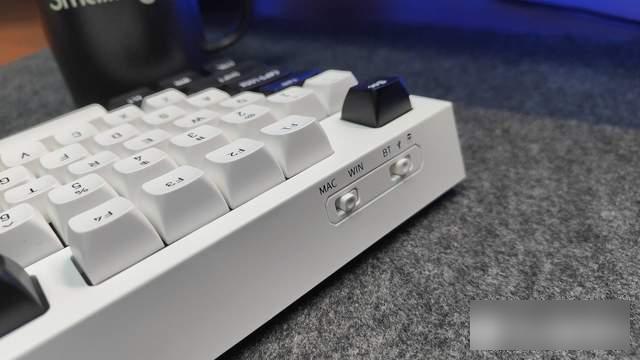
The highlight of this keyboard design is the practical rotation button in the upper right corner and its separate direction buttons. In addition, there are two physical buttons on the front of the keyboard for switching between connection mode and win and mic. The receiver is also arranged in the On the right side of the keyboard, it is easier to save and not lose.
There are two-stage feet hidden at the bottom of the keyboard, which can meet the needs of adjusting the height of the keyboard on different desktops. The details of the feet are still in place. Silicone pads are added. First, it has an anti-slip effect, and it also avoids Avoid damage to the desktop when moving.

【use】
For me, who needs to use multiple keyboards on the desktop, it is really convenient to seamlessly switch between the keyboard and the device. Lei Kaze's customized keyboard supports three-channel BT Bluetooth connection, 2.4G wireless connection and wired connection, and can support Mac and Win dual modes. In this way, all the notebooks, desktops, and mobile phones at home can be cleaned up.
As mentioned earlier, the knob in the upper right corner of the keyboard is not just a decoration, but it is used a lot for me. In addition to using it to quickly adjust the volume, one click can also switch to RGB brightness adjustment, which is very practical for dark players like me who rely on light pollution to improve the beauty of the table.

Finally, I would like to talk about the experience brought to me by the Jiadalong-Yellow axis. This axis is more sexy and has a straight up and down feel, which is smoother. With a trigger sense of 50±15gf and a trigger stroke of 2±0.6mm, the rhythm of typing is quite good. Due to the characteristics of the yellow axis itself, the pressure follows the hand, so it is naturally no problem for the game. During the use, I found that the typing sound of this keyboard is slightly different from that of my other yellow-axis keyboards. It does a better job of suppressing the cavity sound. After careful observation of its structure, it should be due to the interlayer buffer silicone and bottom buffer on the structure. Effects produced by silicone.

For a keyboard, the most troublesome place is their adjustment of the large keys. The self-lubricating satellite axis customized by Lei Kaze, the space bar can rebound quickly when pressed, and the overall feeling is not bad.

【Summarize】
RECCAZR Lei Ka Ze 75 customized mechanical keyboard adopts 75% configuration, and the RGB adjustable background light makes the original keyboard have a good viewing experience. The built-in 4000mAh battery capacity meets the needs of long-term use, and it also meets the seamless switching between various devices, which brings great convenience to our daily use.
As a customized keyboard, I plan to carefully select a set of cool keycaps for it in the next step. You may wish to look forward to its changes. If you have friends who want to try a customized keyboard, you may wish to try this one. RECCAZR Lei Ka Ze 75 it.
At present, there are already many brands of mechanical keyboards with a price of 100 yuan for office scenes on the market. However, in daily office scenes, the standard keyboards provided by companies to employees are often relatively cheap membrane keyboards such as tens of dollars, which are rarely used. Standard equipment and pricier mechanical keyboards. Many people will move their mechanical keyboards to the company for use in pursuit of feel or comfort, and I am one of these people.

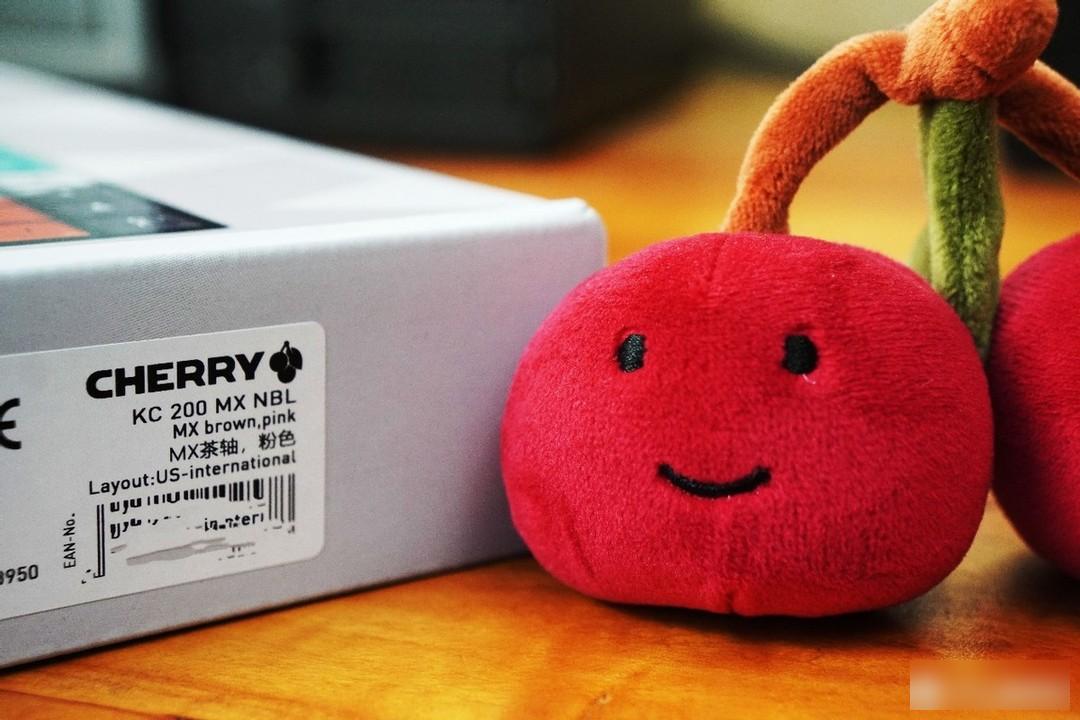
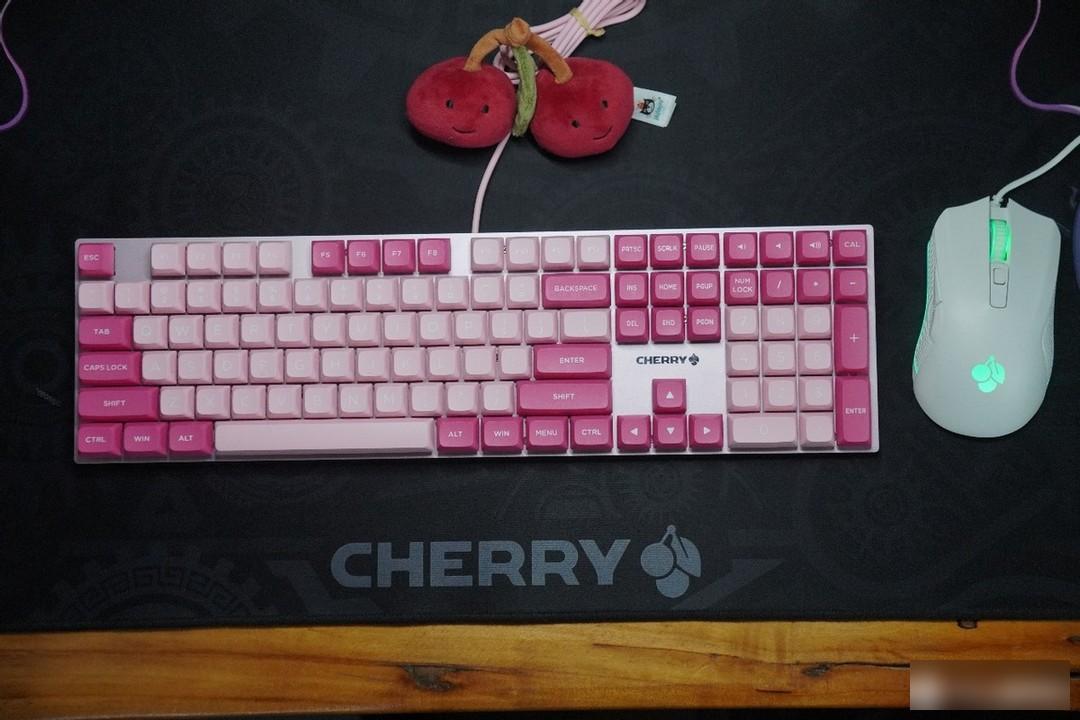
Today, Cherry, the leader of the mechanical keyboard industry, has also launched the entry-level full-key mechanical keyboard KC200 MX series for office scenarios. The price has dropped but it still maintains the consistent high-quality features. The main selling point of the Cherry KC200 MX series is the Cherry MX switch body + colorful color matching design + PBT spherical keycaps (caramel cocoa black keycaps are ABS laser engraved keycaps), and the colors include caramel cocoa, delicate red strawberry, rock gray sweet orange There are four colors of white mint and white mint for users to choose from. Among these four colors, I personally think that the red strawberry color is more beautiful. Because of the beautiful keycaps, the Cherry KC200 MX series does not add lighting design like other similar keyboards.

At present, the Cherry KC200 MX series has a variety of shafts to choose from. Different users can choose according to their own preferences. Here I choose the tea shaft.
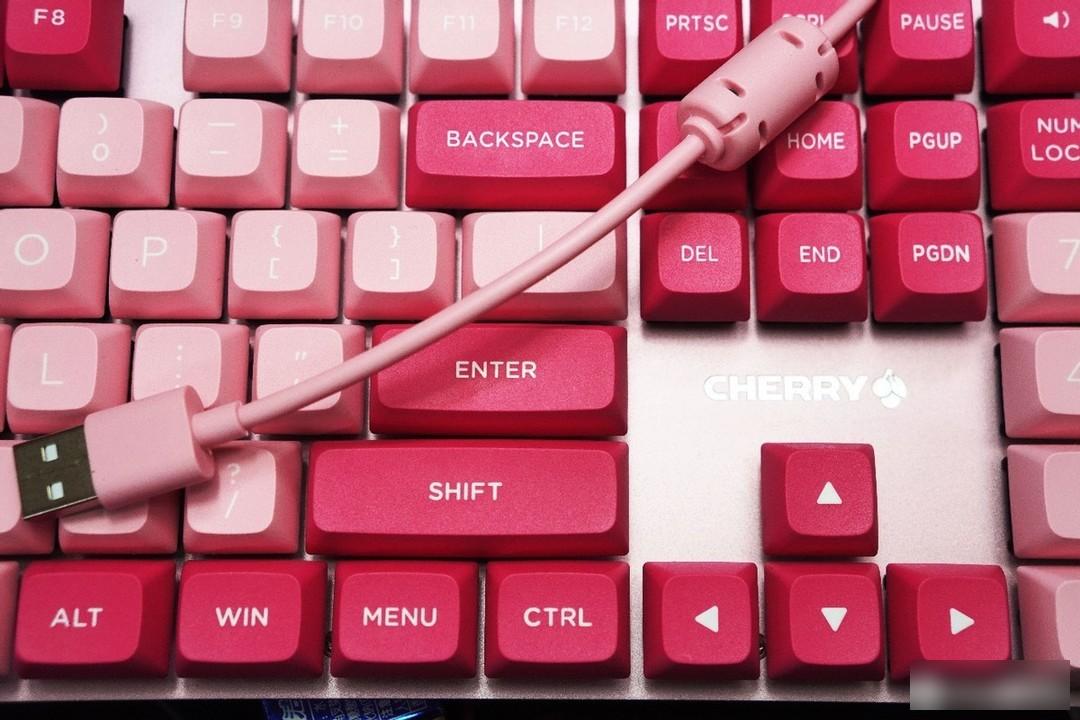
The Cherry KC200 MX mechanical keyboard adopts a narrow frame design, and it looks more simple and beautiful with the keycap color matching. The cable is designed in one piece rather than separated, and the length of the cable is about 1.5 meters, which can meet the wiring needs of most desktops.

The color of the wire is actually light pink, and the wire has its own shielding ring. In terms of accessories, there are no spare keycaps and key pullers provided with the package.
Let me briefly talk about the unique design of this Cherry KC200 MX mechanical keyboard.
One is that the Cherry KC200 MX mechanical keyboard provides four additional media button designs in the upper right corner, namely the volume adjustment button, the mute button and the calculator button. It is more convenient and quick to adjust the volume and call the calculator. Prove the office positioning of the Cherry KC200 MX mechanical keyboard.
The second is that the Cherry KC200 MX mechanical keyboard finally adopts the PBT spherical keycap design, and the keycap looks more rounded. The advantages of the PBT keycap are comfortable touch, good wear resistance, and not easy to oil. It adopts the PBT spherical keycap design. Remind everyone again that the keycaps used in the black version of the Cherry KC200 MX mechanical keyboard are ABS laser engraved keycaps. The font of the keycap is enlarged and bold, and the visual perception is very comfortable.

The keycap adopts the mainstream cross-shaped opening design, and players can replace the same type of keycap by themselves.

The third is that the Cherry cherry tea switch is more suitable as an entry-level switch, or it is called a "killer switch" by some people. The feel is between the red switch and the green switch. There is no obvious step feeling of the blue axis when going straight down. The total stroke is 4mm, the trigger stroke is 2±0.6mm, the initial pressure is 30cN, and the trigger pressure is 45±20cN. The parameters are actually similar to the red axis.

Fourth, in the design of large keys such as Backspace, Shift, Enter, Space, +, etc., the Cherry KC200 MX mechanical keyboard adopts the mainstream and common satellite axis design, which can greatly improve the stability of the keys and the feel of the keys.

Fifth, the Cherry KC200 MX mechanical keyboard does not use a built-in metal panel design, but uses an aluminum alloy metal cover design, which improves wear resistance and scratch resistance while also improving the appearance. In addition, the floating keycap design is also more convenient for users to clean and maintain and replace keycaps daily.
Sixth, there is no independent indicator light design for CAPS LOCK and NUMLOCK, but the indicator light is designed at the bottom of the corresponding button, which is unique in design and the light is white.


In terms of the bottom design, the left and right sides of the Cherry KC200 MX mechanical keyboard are designed with a single foot support, and the bottom of the foot support is designed with a non-slip pad, so that there are two, three, and five anti-slip pads at the bottom to ensure the anti-slip effect.
The Cherry KC200 MX mechanical keyboard has no problem with its appearance. Next, let’s talk about the actual experience.
In terms of button experience, judging from the heavy use experience for several consecutive days, the experience of all the buttons on the Cherry KC200 MX mechanical keyboard is quite smooth. Hearing the wire sound, although it does not affect the use, but there is still room for optimization and improvement. Players with strong hands-on ability can oil it by themselves.
In terms of the corresponding official driver, the official CHERRY KEYS can be used with the Cherry KC200 MX mechanical keyboard, which allows users to freely set keys according to their own usage habits or preferences, and supports macro recording function, allowing users to open custom keyboards with one click. Web pages, applications, system functions (logout, lock, standby, etc.), open multiple applications with one click, and more. As an entry-level keyboard, the Cherry KC200 MX mechanical keyboard is still very advantageous.

In general, as the first cherry mechanical keyboard to enter the office field, the KC200 MX mechanical keyboard takes into account both appearance and feel. On the basis of retaining the Cherry axis, it changes the monotonous black design style of the traditional office keyboard. A huge improvement has been made, and at the same time, it has brought users a more comfortable PBT keycap. The design with a full keyboard and four multimedia keyboards is also more suitable for office scenarios, and the standard driver software also further assists in improving the office environment. experience.
Hope it can be improved is to provide a dust cover to avoid falling dust.
Shuangdan is approaching. Although I have been married to my wife for more than six years, I still think about what to give my wife during the festival. After all, life still needs a sense of ritual.
After thinking about it carefully, and considering the nature of my wife's work, coupled with the previous thoughts in my ears, I think it is most practical to buy a keyboard for my wife who is typing codes. After all, I can use it every day and watch it every day. Yes, maybe, it’s good to think about it when I see the keyboard I gave you every day, and you can save me a few words when you come back.
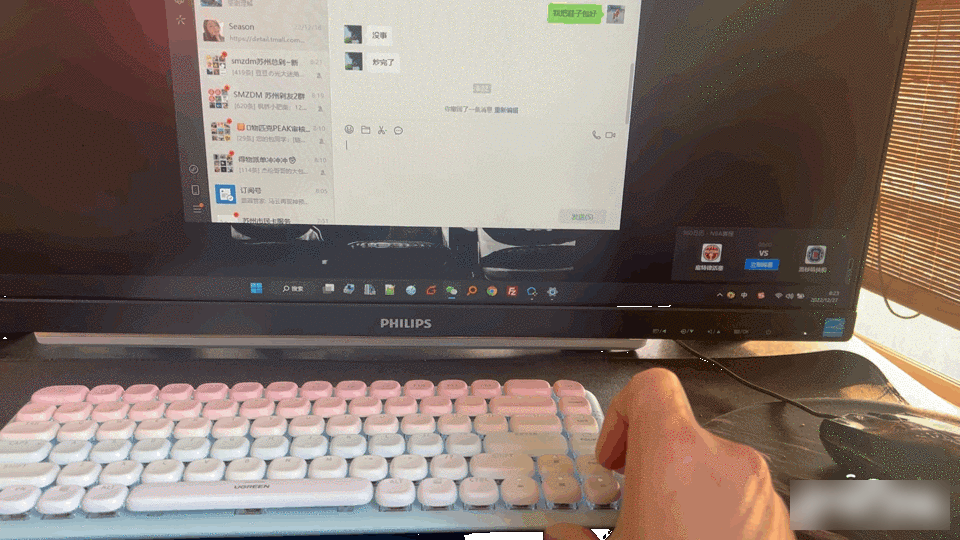
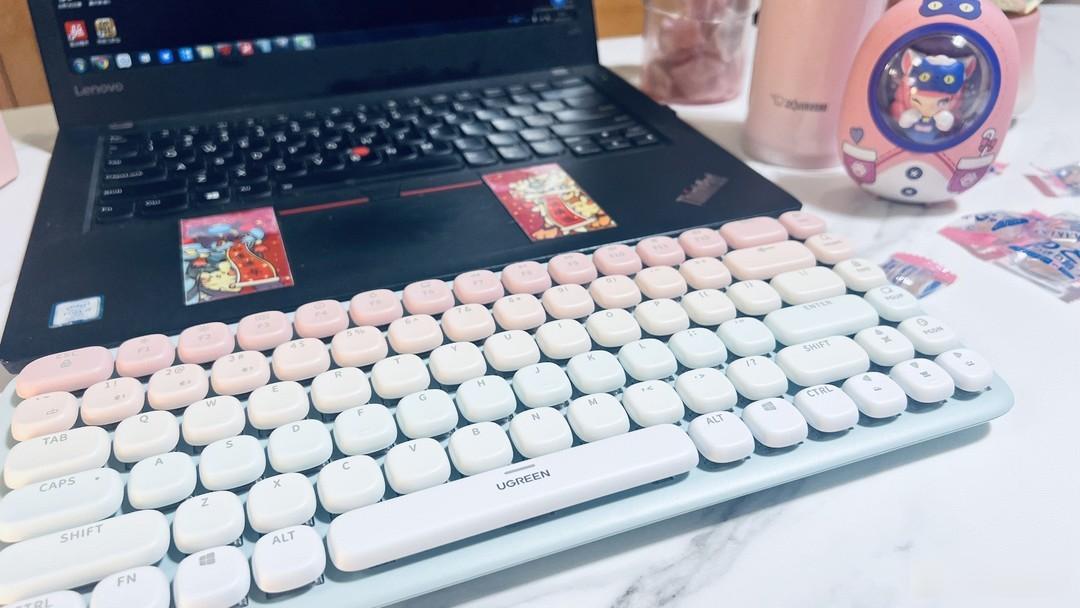
So it's shopping. In fact, through the day-to-day relationship with my wife, it is not difficult to find that my wife is actually a beauty controler. Therefore, good looks are the first thing I choose a keyboard for. Of course, because my wife is a programmer, it is also very important to be easy to use. After careful consideration, I chose this Green Union fun+ keyboard.
After all, I believe no girl can refuse the macaron-colored keycaps.
The outer packaging of the keyboard is extraordinarily pink. The moment the express delivery is opened, not to mention girls, even a rough old man like me can't put it down. I feel like I can handle my wife in an instant.
A very good tip, my world is colorful, just imagine, with this high-value keyboard, whether my wife’s boring code life can also add a touch of joy.

Open the package and enjoy it. The slogan of FUN and the macaron color of the cream cake above all bring a strong sense of joy to the unpackers.

Opening the true face of Lushan Mountain, the super-high appearance value instantly captures peace of mind, and the natural transition from milk powder to smog blue makes the mood seem to become much more comfortable in an instant.
This keyboard uses thin and light brown switches, but compared with traditional brown switches, the height is reduced, which can minimize the keystroke time and bring unprecedented responsiveness. In the process of typing and typing codes, there will be an illusion that the screen has been displayed before the fingertips fall.

Coupled with just a good 6° inclination, the perfect ergonomic design gives people an extremely light and thin feeling while taking comfort into consideration.
After actual use, I found that the hand rest I used before can be discarded, and there will be no wrist discomfort when typing on the keyboard for a long time. Really enjoy the thrill of fingertips flying on the keyboard.
At the same time, this keyboard supports almost all mainstream systems on the market, including WIN, MAC OS, LINUX, Android, and IOS.
Bluetooth connection is more convenient and fast, one-key direct connection
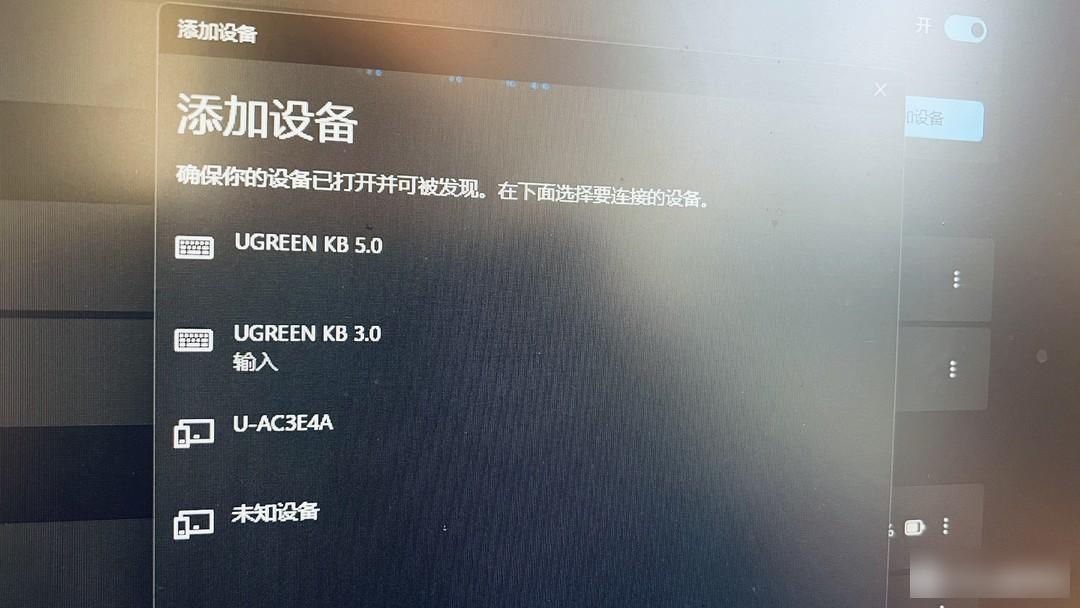
The Bluetooth protocols of 3.0 and 5.0 can basically adapt to all systems and hardware to achieve seamless connection.
At the same time, it can support the parallel operation of four devices, which greatly improves the work efficiency and brings unprecedented operating experience to friends who like to double or multi-open.
Interestingly, this keyboard also provides an interesting feature, pre-made exclusive emoticon buttons on the keyboard.
You only need to press it lightly, and the corresponding emoticon package will be displayed, which greatly improves the entertainment in the chat process.
At the same time, this keyboard also provides 15 kinds of lighting effects to switch freely. I believe that no girl can refuse this kind of milky and powdery, but also bright and bright things.
The last thing I want to talk about is actually the super high value of this keyboard. It is not an exaggeration to say that even I, a straight man of steel, was attracted by this fan. of.
Of course, in addition to the beautiful color of the keyboard itself, the shape of the keycaps is also very colorful, which is different from the square shape of traditional keycaps. Out of the circle, there is even a feeling of mint cube candy. It really shines.
At the same time, if you want to match your significant other with a couple keyboard, there are also dark colors to choose from.

The color scheme of black, white, blue and gray reveals the feeling of just being cold. If your desktop layout is all black, then this cool-colored and high-value Green Link FUN+ keyboard is also your best choice.
Well, having said so much, in fact, I have used and seen many keyboards, but among the dazzling array of keyboards, there are not many that can make people's eyes shine. And this Lvlian FUN+ keyboard did it.
If your lover has to deal with the computer every day and uses the keyboard frequently, then I think this Green Union FUN+ keyboard is indeed a good choice. After all, I can think of you every time I tap it, and my opinion is very happy. thing.
Well, I am full of Erchome, please pay attention if you like it.
Welcome keyboard enthusiasts! Are you ready to dive into the world of mechanical keyboards and unleash your customization skills? Look no further, as we unveil the ultimate guide on how to remove keycaps from your beloved keyboard. Whether you're a seasoned pro or just starting out, this article is here to equip you with the knowledge and techniques needed to upgrade, clean, or replace your keycaps hassle-free. Join us as we unravel the secrets behind this essential maneuver that will elevate your typing experience to new heights. So, grab your toolkit and get ready to embark on an exciting keyboard journey because this article will surely leave you craving for more!
Preparing for Keycap Removal: Gathering the necessary tools and equipment
In this comprehensive guide, we will delve into the intricate process of removing keycaps from your OEM mechanical keyboard. Whether you are an avid gamer, a professional typist, or simply someone who wants to clean their keyboard thoroughly, understanding the keycap removal process is essential. Properly removing keycaps not only enables you to clean your keyboard more effectively, but also allows you to customize your keyboard with different keycap sets. So, let's get started on gathering the necessary tools and equipment for this task!
1. Why Gather the Right Tools:
Before you embark on the keycap removal process, it is crucial to gather the right tools and equipment. Having the correct tools will make the process easier, prevent any damage to your keyboard, and allow you to reassemble your keyboard without any issues. Here are the essential tools you will need:
1.1 Keycap Puller:
The keycap puller is a specialized tool designed to safely and efficiently remove keycaps. It is crucial to choose a keycap puller that is compatible with your OEM mechanical keyboard. Keyceo Tech offers a range of high-quality keycap pullers that are specifically designed for various keyboard brands, ensuring a seamless removal process.
1.2 Compressed Air:
Compressed air is an indispensable tool when it comes to cleaning your keyboard. It helps remove dust and debris from hard-to-reach areas. Ensure that you use a non-damaging compressed air canister, preferably one with a narrow nozzle to ensure precision cleaning.
1.3 Cleaning Solution and Microfiber Cloth:
To clean your keycaps effectively, it is advisable to use a gentle cleaning solution. Avoid using harsh chemicals that may damage the keycaps or the keyboard itself. Keyceo Tech recommends using a mild cleaning solution and a microfiber cloth for optimal cleaning results.
2. The Keycap Removal Process:
Now that you have all the necessary tools, let's dive into the keycap removal process:
2.1 Start with Proper Preparation:
Before you start removing keycaps, power off your keyboard and unplug it from your computer. This step is essential for both your safety and to prevent accidental keystrokes during the removal process.
2.2 Assess the Keyboard Layout:
Take a moment to understand your keyboard layout and the different types of keycaps used. Most OEM mechanical keyboards have a standard layout, making keycap removal relatively straightforward. However, some keyboards may have non-standard or specialized keycaps that require extra care during removal.
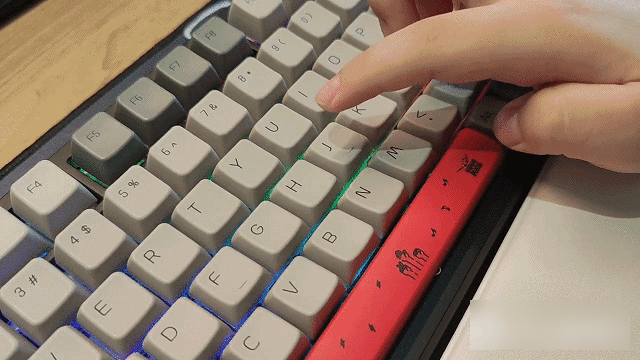
2.3 Use a Keycap Puller:
Insert the keycap puller carefully underneath the keycap you wish to remove. Apply gentle upward pressure and wiggle the puller from side to side if necessary. The keycap should pop off easily without any force. Repeat this step for all the keycaps you want to remove.
2.4 Cleaning and Maintenance:
Once you have successfully removed the keycaps, it's time to clean and maintain them. Gently wipe each keycap with a microfiber cloth dampened with a mild cleaning solution. For stubborn stains or debris, use a toothbrush to remove them gently. Also, take this opportunity to clean the exposed switches and the keyboard plate using compressed air.
Congratulations! You have now acquired the knowledge and tools necessary for safely removing keycaps from your OEM mechanical keyboard. With the right approach and Keyceo Tech's high-quality keycap pullers, cleaning, customizing, and maintaining your keyboard will become a breeze. Remember to always exercise caution and follow the manufacturer's instructions when disassembling or reassembling your keyboard. Enjoy your newly acquired skills and optimize your keyboard for a better typing or gaming experience!
Step-by-Step Guide: Removing Keycaps from a Mechanical Keyboard
Welcome to this comprehensive step-by-step guide on removing keycaps from an OEM mechanical keyboard. In this tutorial, we will walk you through the process, providing detailed instructions to ensure a hassle-free removal. Whether you are a gamer, programmer, or simply a computer enthusiast, understanding how to remove keycaps safely can come in handy for cleaning, customizing, or replacing keys on your beloved mechanical keyboard. So, let's dive right in!
Step 1: Gather the Required Tools:
Before we begin, it is important to have the necessary tools at hand. To safely remove keycaps from your OEM mechanical keyboard, you will need: a keycap puller, a flathead screwdriver (optional), and a soft microfiber cloth. Keyceo Tech provides high-quality keycap pullers and other accessories that can help you complete this process efficiently.
Step 2: Preparation and Safety Measures:
Make sure your computer is turned off, and unplug the keyboard from the USB port to avoid any accidental key presses or electrical issues. Place the keyboard on a clean, flat surface with ample lighting to ensure you can clearly see the components.
Step 3: Identify the Keycap Mounting Style:
Mechanical keyboards come in various mounting styles, such as Cherry MX, Topre, or Buckling Spring. For OEM mechanical keyboards, keycaps are typically mounted using Cherry MX-style switches. Understanding the mounting style is important, as it determines the appropriate method of keycap removal.
Step 4: Using the Keycap Puller:
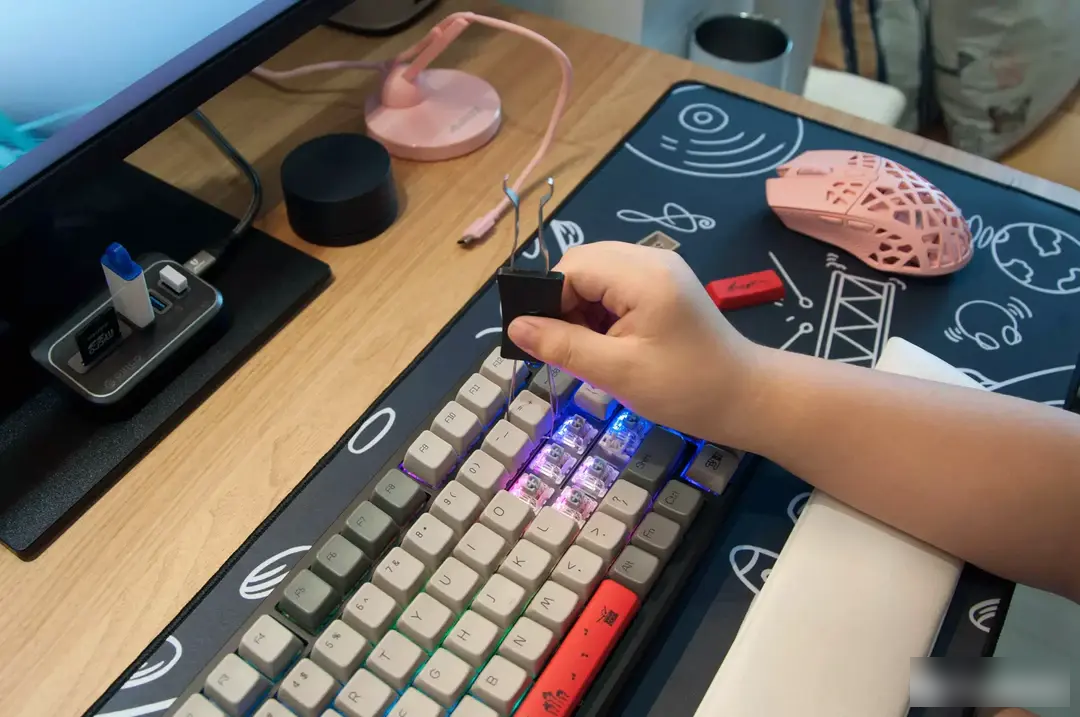
If your OEM mechanical keyboard is equipped with a detachable cable, remove it carefully. Insert the keycap puller's wire loop beneath the keycap you wish to remove and gently wiggle it to hook onto the keycap from two sides. Apply even pressure and pull upward, gradually releasing the keycap from the switch. Repeat this process for each keycap you want to remove.
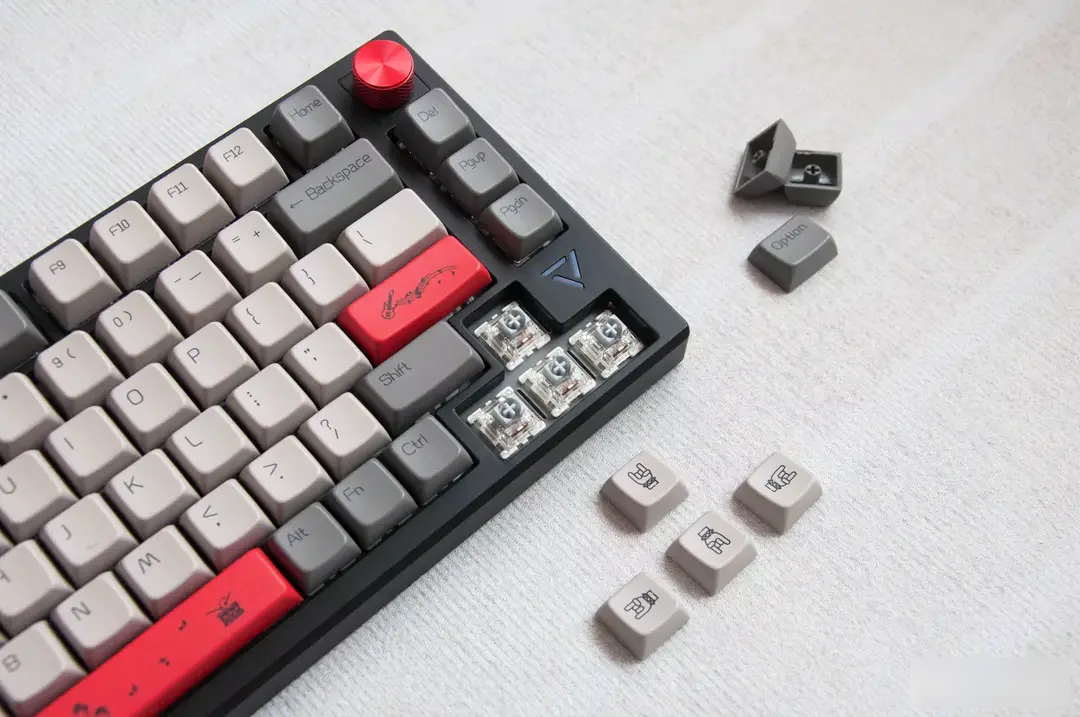
Step 5: Removing Stabilizer-supported Keycaps:
Certain keys, such as the spacebar, Enter key, or Shift keys, may have additional stabilizer bars beneath them. To remove these keycaps, you will need to gently unhook the stabilizer wires from the keycap before using the keycap puller. Pay attention to the orientation of the stabilizer bars to ensure they are properly reattached if you plan to reassemble the keyboard.
Step 6: Cleaning the Keycaps:
Once you have successfully removed the keycaps, it's time to clean them. Dip the keycaps in warm, soapy water and use a microfiber cloth or a soft brush to gently scrub away any dirt or debris. Ensure that the keycaps are completely dry before reinstalling them onto the keyboard.
Step 7: Reinstalling Keycaps:
With the keycaps cleaned and dried, align each keycap with its corresponding switch and press it down until you hear a satisfying click. Start with the bottom row and work your way up to ensure optimal alignment.
Congratulations! You have successfully learned how to remove keycaps from your OEM mechanical keyboard. By following this step-by-step guide, you can easily clean, customize, or replace keycaps, enhancing both the performance and aesthetics of your keyboard. Remember, Keyceo Tech offers a wide range of premium keycap pullers and accessories to facilitate this process. Enjoy your new-found knowledge, and get ready to elevate your typing or gaming experience to a whole new level!
Tips for a Safe and Effective Keycap Removal Process
Tips for a Safe and Effective Keycap Removal Process: How to Remove Keycaps from OEM Mechanical Keyboards
OEM mechanical keyboards have gained immense popularity among gamers, programmers, and professionals for their durability, tactile feedback, and customizable features. One important aspect of maintaining these keyboards is the proper removal and cleaning of keycaps. In this article, we will provide you with a detailed guide on how to safely and effectively remove keycaps from your OEM mechanical keyboard, ensuring a long-lasting and efficient typing experience.
Understanding OEM Mechanical Keyboards:
OEM mechanical keyboards, often referred to as original equipment manufacturer keyboards, are built by third-party companies who design and manufacture keyboards for other companies to brand as their own. These keyboards come with a wide range of switch options, keycap materials, and customization features, making them a popular choice for keyboard enthusiasts.
Why Remove Keycaps?
While it may not be necessary to remove keycaps on a regular basis, there are a few reasons why you might want to undertake this process. Firstly, removing keycaps allows for deep cleaning, especially if dirt, grime, or debris has accumulated over time. Additionally, many keyboard enthusiasts enjoy customizing their keyboards with unique keycap sets, requiring the removal of the stock keycaps.
Tools Required:
Before we delve into the keycap removal process, let's gather the necessary tools:
1. Keycap Puller: A keycap puller is essential for removing keycaps without causing any damage. It ensures a firm grip and prevents accidental key switch damage.
2. Cleaning Solution and Microfiber Cloth: To effectively clean keycaps, it is advisable to use a gentle cleaning solution and a microfiber cloth to remove any dirt or residue.
3. Compressed Air Can: A can of compressed air will come in handy to remove dust or debris trapped inside the keyboard switches.
4. Tweezers or Brush: For cleaning hard-to-reach areas, tweezers or a small brush can be used to dislodge and remove dirt.
Step-by-Step Keycap Removal Process:
1. Power Off and Disconnect: Before starting the keycap removal process, power off your computer and disconnect the keyboard from the USB port to avoid any accidental key activations.
2. Identify Stabilizer Bars: Most OEM mechanical keyboards feature stabilizer bars for larger keys like the spacebar, Enter key, or Shift keys. These bars may require additional steps for removal, such as pressing down or sliding them out.
3. Attach the Keycap Puller: Insert the keycap puller into the keycap's sides, ensuring a secure grip. Make sure to position the keycap puller evenly to avoid any damage to the key switch.
4. Gently Pull Keycaps: Apply even pressure to the keycap puller and gently pull upwards to remove the keycap. Avoid using excessive force as it can damage the key switch or stabilizer.
5. Remove Stabilizer Bar (if applicable): For keys with stabilizer bars, carefully detach the bars by either pressing down on the bar and lifting it out or by sliding it sideways.
6. Clean Keycaps: Once the keycaps are removed, prepare a cleaning solution by diluting a small amount of mild soap or keyboard cleaner in warm water. Dip the keycaps in the solution and scrub gently with a microfiber cloth to remove any dirt or stains. Rinse the keycaps with clean water and allow them to dry thoroughly.
7. Clean the Keyboard Base: While the keycaps are drying, use a can of compressed air to blow away any dust or debris from the keyboard base. You can also use tweezers or a brush to gently remove any stubborn dirt trapped between the switches.
8. Reassemble the Keycaps: Once the keycaps are completely dry, reattach them to the keyboard by aligning the switches with the keycap stems. Gently press down until you hear a click, indicating a secure fit.
With the help of this comprehensive guide, you can confidently remove keycaps from your OEM mechanical keyboard, ensuring a safe and effective cleaning process. Remember to exercise caution, use the appropriate tools, and avoid applying excessive force. By regularly cleaning your keycaps and keyboard base, you can maintain a hygienic and efficient typing experience while preserving the longevity of your mechanical keyboard.
Cleaning and Maintaining Keycaps: Recommended practices for maintenance
Cleaning and maintaining keycaps is an essential part of maintaining an OEM mechanical keyboard. Keyceo, a reputed brand in the tech industry, understands the importance of regular maintenance to ensure optimum performance and longevity of their keyboards. In this article, we will provide detailed instructions and recommended practices on how to safely remove keycaps from an OEM mechanical keyboard and effectively clean and maintain them.
Keycaps, being the most frequently used part of a keyboard, can accumulate dust, dirt, and grime over time. Regular cleaning not only enhances the aesthetic appeal of the keyboard but also improves typing experience and longevity. Therefore, it is crucial to follow the right techniques and recommended practices to ensure the cleanliness and maintenance of your keycaps.
To begin with, before attempting to remove the keycaps, make sure to disconnect the keyboard from the computer. This prevents any accidental key presses or unintentional actions while removing the keycaps. Once disconnected, start by identifying the type of keycaps on your OEM mechanical keyboard. Keycaps can come in different profiles, such as OEM, Cherry, DSA, and more.
For OEM mechanical keyboards, which are the most common type, the keycaps are typically mounted on a scissor or wire stabilizers. Gently lift the keycap from one side using a keycap puller or a small flathead screwdriver, being careful not to exert too much force and potentially damage the keycap or the keyboard itself. Gradually work your way around the keycap, lifting it until it pops off.
Once you have successfully removed the keycap, you will notice a stem underneath it. This stem connects the keycap to the switch on the keyboard. Take a moment to inspect the stem for any signs of damage or wear. If you notice any issues, it is recommended to replace the keycap or seek professional assistance for further evaluation.
Now that the keycap is removed, there are several methods to clean it effectively. One common practice is to use a keycap cleaning solution, which can be easily purchased online or from reputable electronics stores. Simply apply a small amount of the cleaning solution onto a microfiber cloth or a cotton swab and gently clean the keycap, ensuring that all surfaces are thoroughly cleaned. However, be cautious not to saturate the cloth or swab excessively, as moisture can damage the keycap or the underlying components.
Alternatively, you can also use a mild soap solution or warm water to clean the keycap. Submerge the keycap in the solution for a few minutes, gently agitate it, and then rinse it thoroughly. Allow the keycap to air dry completely before reattaching it to the keyboard.
In addition to cleaning the individual keycaps, it is also important to clean the keyboard itself. Using a can of compressed air, blow out any debris or dust that might have accumulated between the keys and in hard-to-reach areas. Ensure that the keyboard is completely dry before reconnecting it to the computer.
In conclusion, regular cleaning and maintenance of keycaps are essential for an OEM mechanical keyboard like those produced by Keyceo. By following the recommended practices discussed in this article, users can ensure the cleanliness and longevity of their keycaps. Remember to disconnect the keyboard, remove the keycaps gently, clean them using appropriate solutions, and also clean the keyboard itself. By incorporating these practices into your keyboard maintenance routine, you can enjoy an enhanced typing experience and prolong the lifespan of your OEM mechanical keyboard.
Reinstalling Keycaps: Ensuring proper alignment and functionality
Keyceo Tech presents a comprehensive guide on removing keycaps from your OEM mechanical keyboard, ensuring seamless alignment and optimal functionality. Whether you are a professional gamer, a passionate typist, or simply an individual looking to enhance their typing experience, understanding the process of removing and reinstalling keycaps is essential. This article will walk you through the steps required to safely remove keycaps and provide detailed instructions on ensuring their proper alignment and functionality upon reinstallation.
Section 1: Understanding the Importance of Properly Aligned Keycaps
The alignment of keycaps greatly impacts the overall typing experience and can significantly affect productivity. Misaligned keycaps may result in typing errors, discomfort, and reduced typing speed. Therefore, it is crucial to follow the correct approach when removing and reinstalling keycaps.
Section 2: Preparing Your Workspace and Tools
Before you begin, create a clean and well-lit workspace. Ensure that you have the necessary tools at hand, such as a keycap puller, a soft cloth, and some compressed air. This will help prevent any accidental damage to the keyboard or keycaps during the process.
Section 3: Safely Removing Keycaps
To remove keycaps from your OEM mechanical keyboard, gently insert the keycap puller beneath each keycap and apply an upward force. Start from one corner of the keyboard and work your way across, removing one keycap at a time. Avoid using excessive force to prevent any damage.
Section 4: Cleaning the Keyboard and Keycaps
Once the keycaps have been removed, take the opportunity to clean the keyboard and keycaps thoroughly. Use a soft cloth or a cotton swab dabbed in mild soapy water to wipe away any dirt or grime from both the keycaps and the exposed switches. Ensure all components are completely dry before proceeding.
Section 5: Reinstalling Keycaps: Ensuring Proper Alignment
Before reinstalling the keycaps, verify the correct position and orientation of each keycap. Keyceo Tech recommends referring to your keyboard's user manual for specific keycap positioning. Begin by aligning the bottom hooks of each keycap with the corresponding switch, ensuring the keycap is level and straight before applying gentle downward pressure until it clicks into place. Repeat this process for each keycap.
Section 6: Testing Key Functionality
After reinstalling all the keycaps, it is essential to test the functionality of each key. Type on each key to ensure proper registration and responsiveness. If any keys are not working correctly, repeat the keycap installation process for those specific keys, ensuring they are firmly attached.
By following the steps outlined above, you can confidently remove keycaps from your OEM mechanical keyboard, clean them thoroughly, and reinstall them correctly, while ensuring optimal alignment and functionality. Remember, maintaining proper alignment and functionality of your keycaps will enhance your typing experience and contribute to increased productivity. Enjoy a seamless typing experience with Keyceo Tech's guide on keycap removal and reinstallation!
Conclusion
In conclusion, our company's 7 years of experience in the industry has equipped us with valuable knowledge and expertise, particularly in the art of removing keycaps from mechanical keyboards. Throughout this blog post, we have provided step-by-step instructions and insightful tips on how to successfully navigate this process. Our commitment to delivering high-quality content stems from the understanding that a well-functioning keyboard is essential for optimized performance and comfort. As the demand for mechanical keyboards continues to rise, we strive to remain at the forefront of innovation, ensuring that our readers have access to the latest techniques and best practices. We invite you to explore our other articles to further enhance your keyboarding experience. Thank you for choosing our brand as your go-to resource for all things mechanical keyboard-related.
Factory Adress: No.11,FengpingRoad