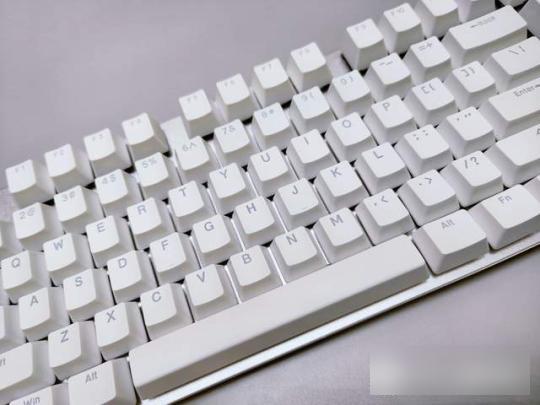
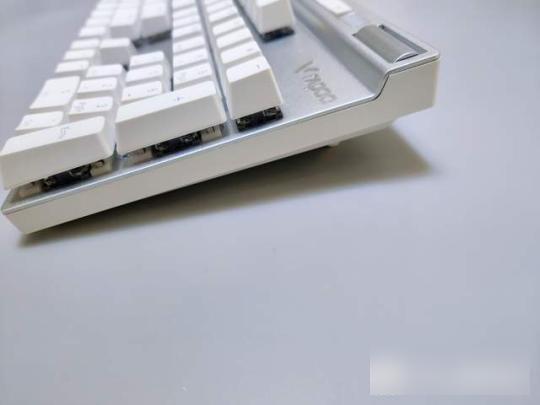
Keyceo Tech's Membrane Keyboard Wireless
membrane keyboard wireless stands out in the market, which is beneficial to the development of Keyceo Tech Co., LTD. It is produced abiding by the principle of 'Quality First'. We carefully choose the materials to guarantee the quality from the source. By adopting advanced equipment and techniques, we make the stability and durability of the product happen. During each process, the product is manufactured adhering to the international standard.
'Thinking differently' is the key ingredients our team uses to create and curate inspiring Keyceo brand experiences. It's also one of our strategy of brand promotion. For product development under this brand, we see what the majority don’t see and innovate products so our consumers find more possibilities in our brand.
At Keyceo, we know each application of membrane keyboard wireless is different because every customer is unique. Our customized services address customers' specific needs to ensure continuous reliability, efficiency and cost-effective operations.
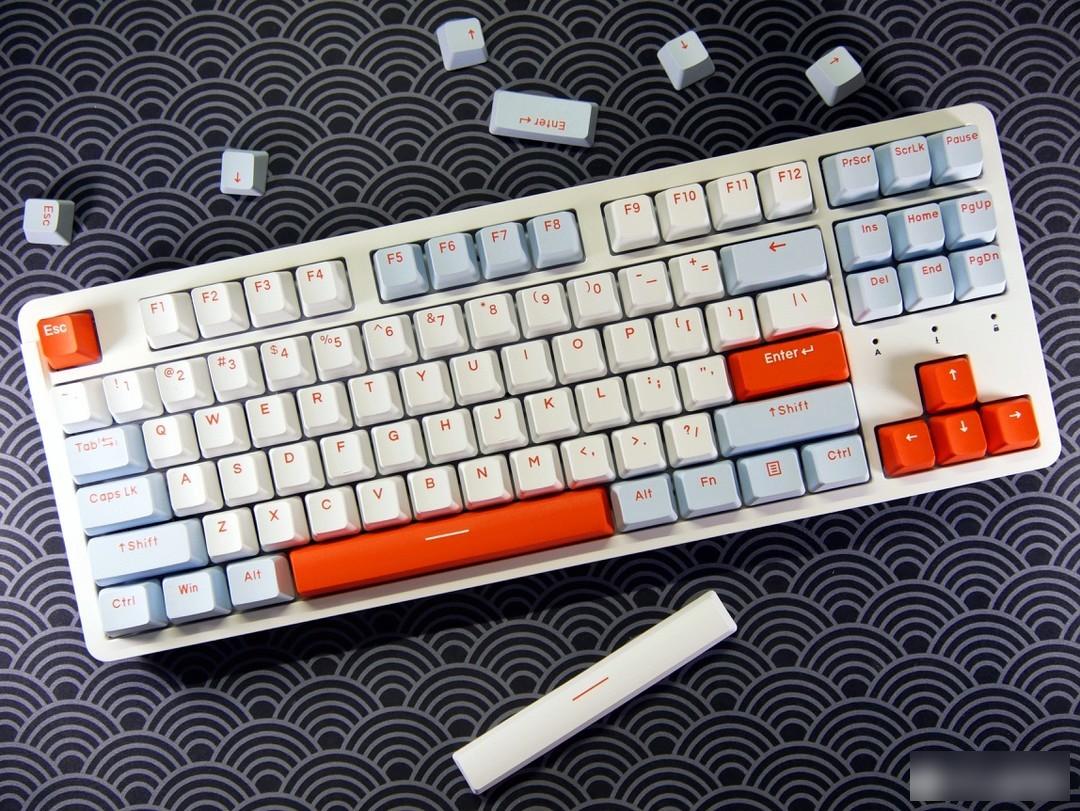
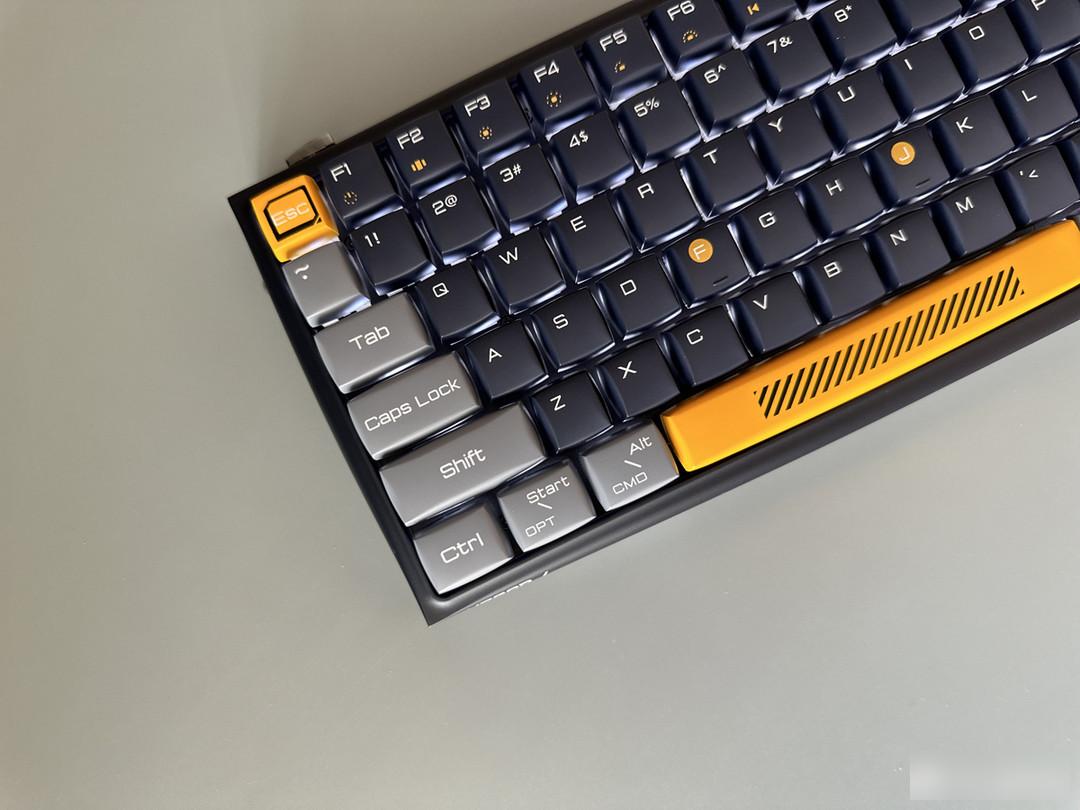
Dareu’s A+ series has always been its high-end product line, and it hopes to bring more fun and trendy products to players. The recently well-received A98 and A87 Pro are this series of products. Recently, the A87 Pro A new Twilight Gray color scheme has been brought, so follow me to see how the new color scheme performs.
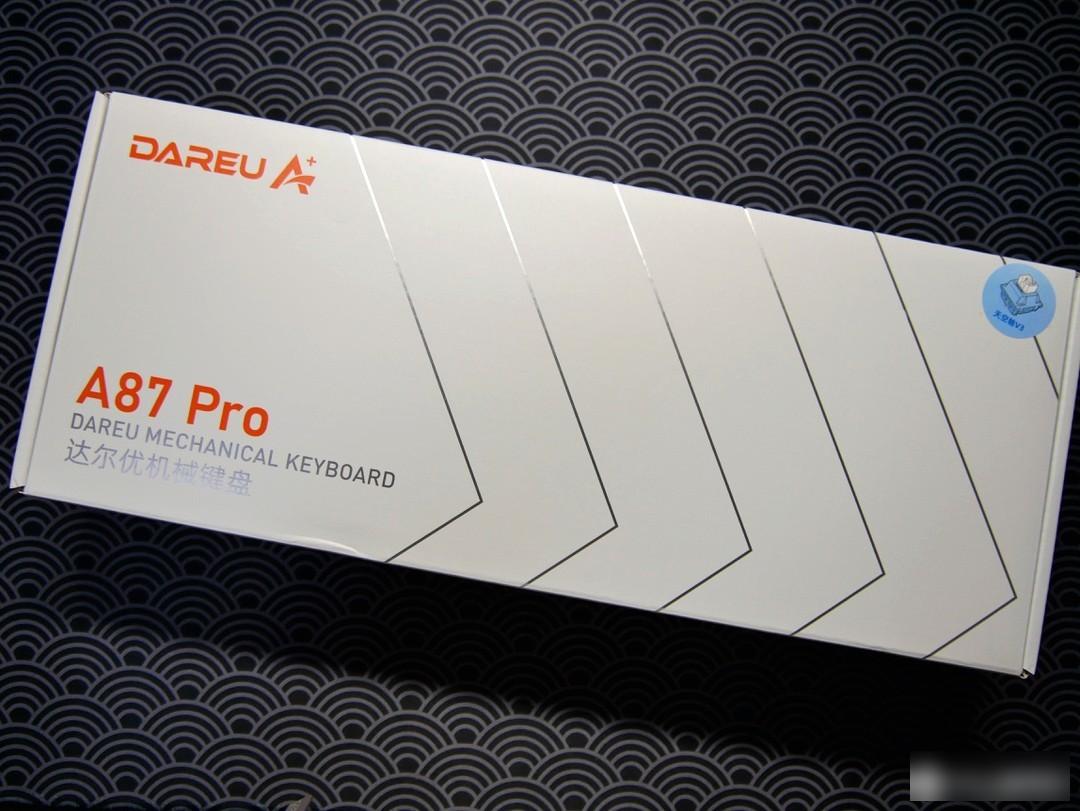
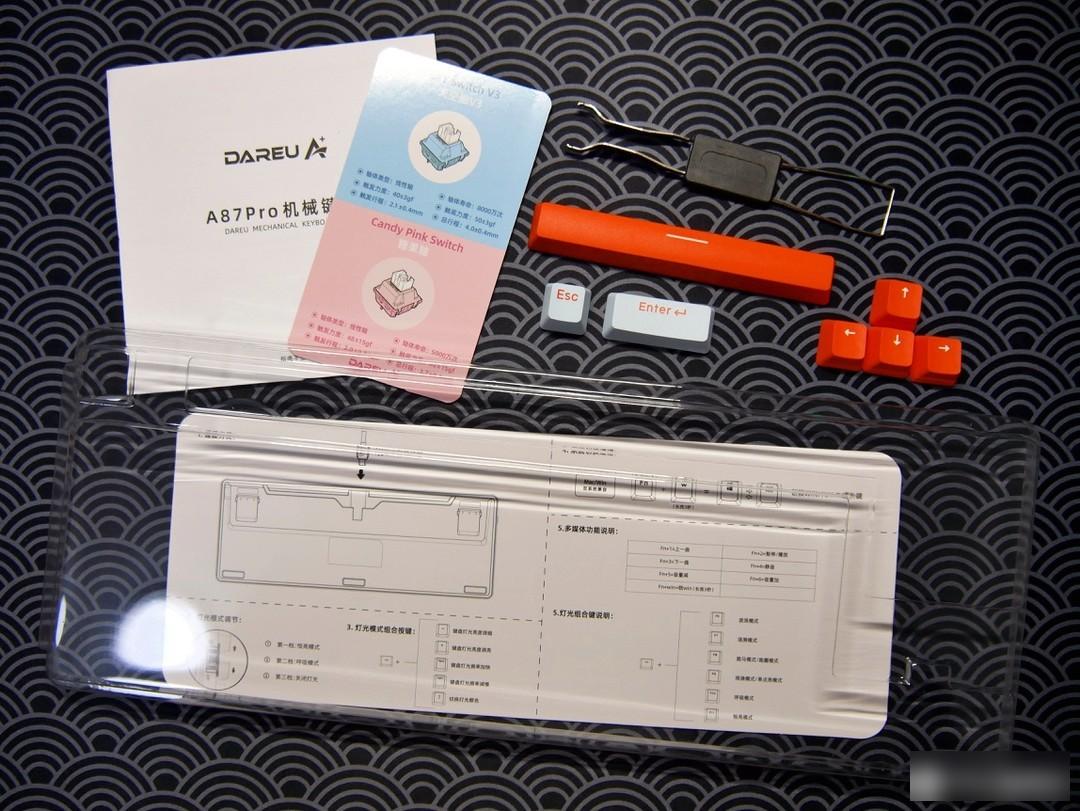
The packing box of Dareu A87 Pro is quite design. In addition to the data cable of type-c interface, there are also two-in-one puller, shaft puller, dust cover, and several supplementary color keycaps. As well as manuals, shaft promotion cards and so on.
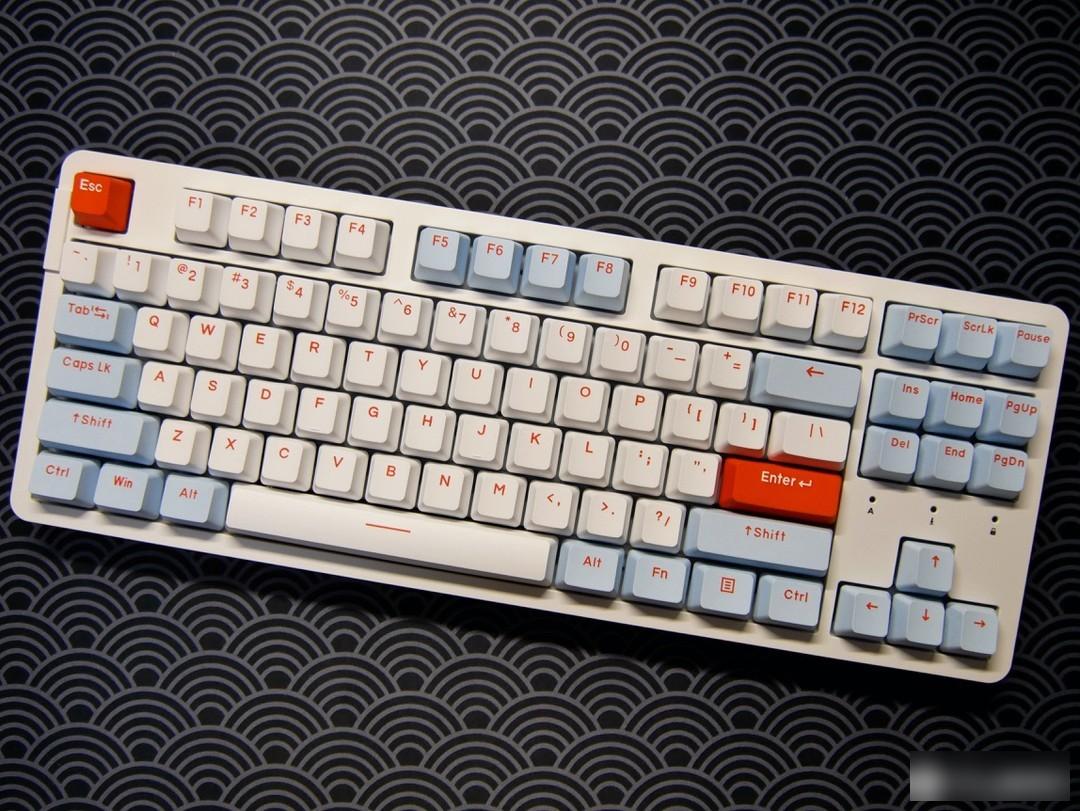
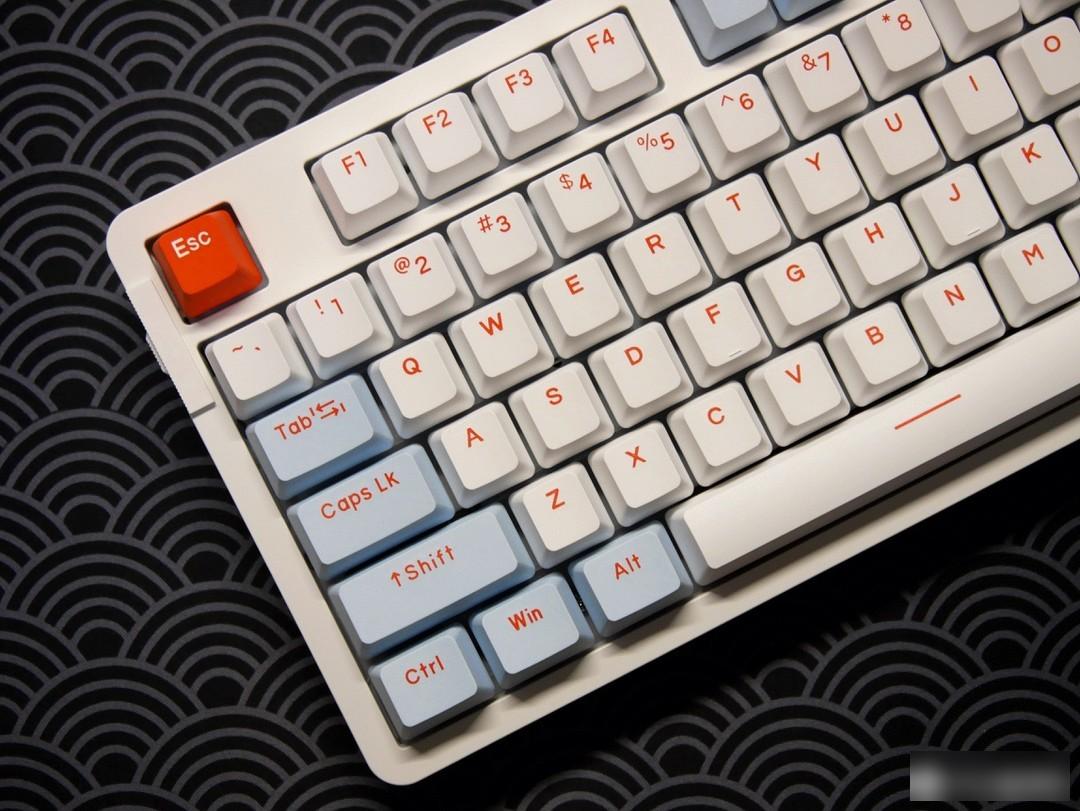
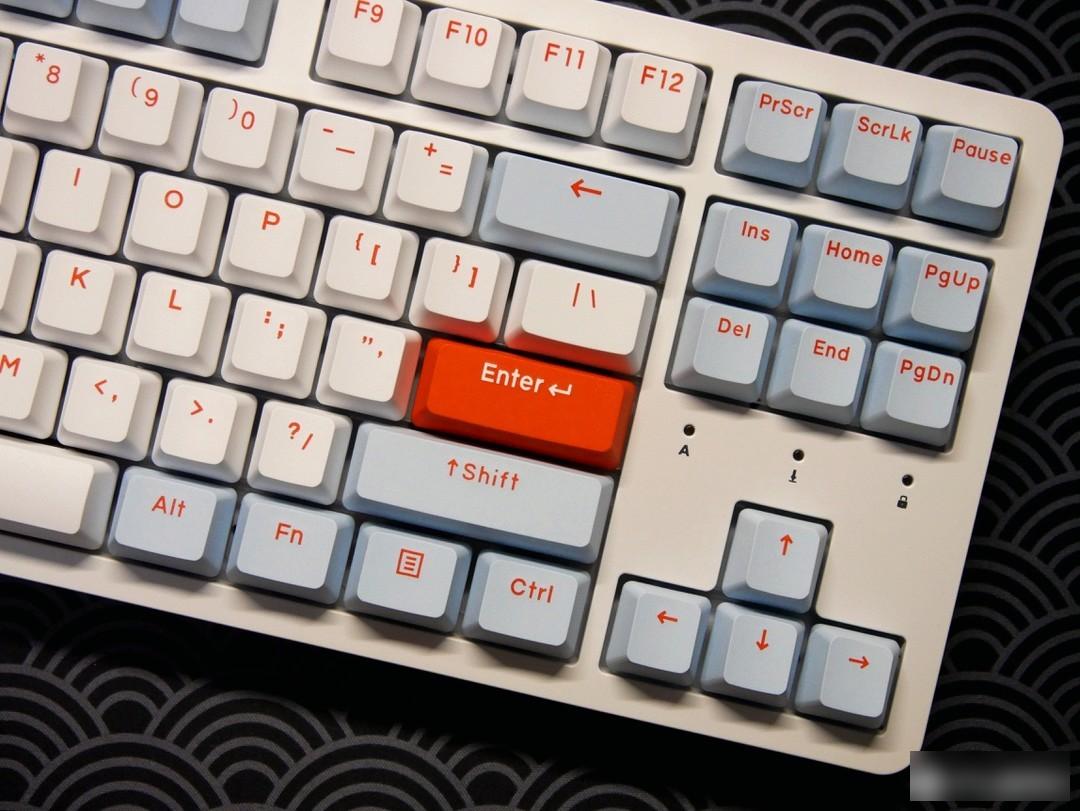
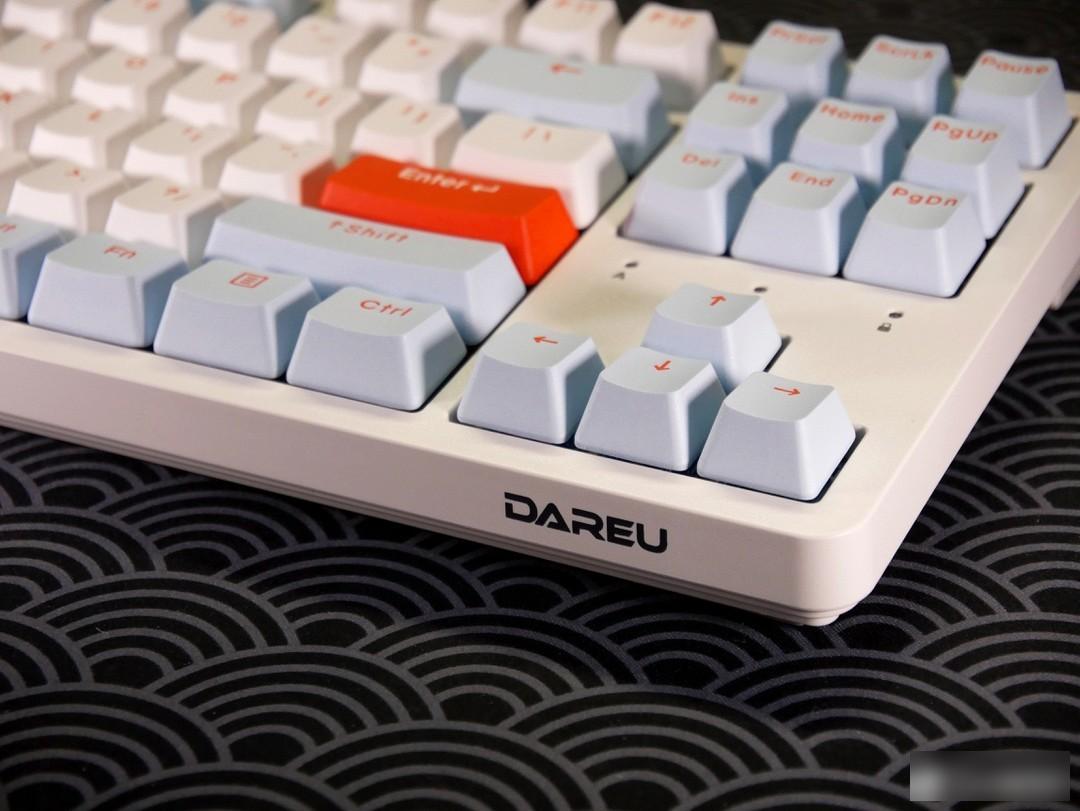
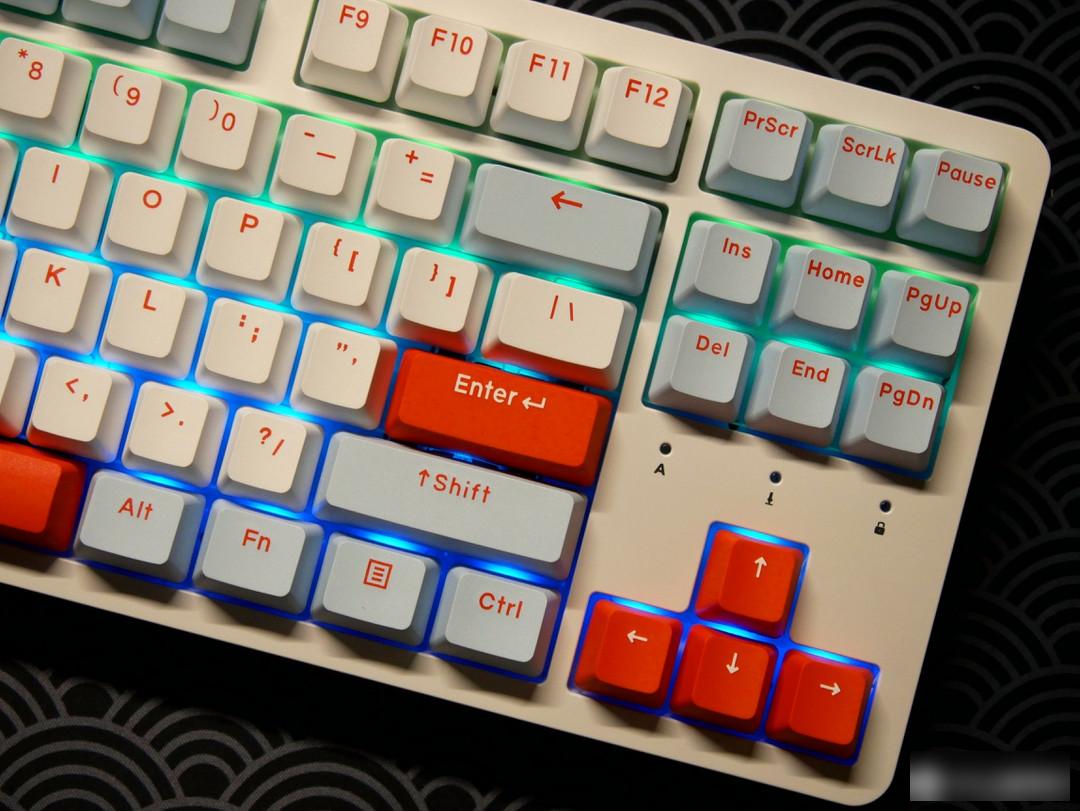
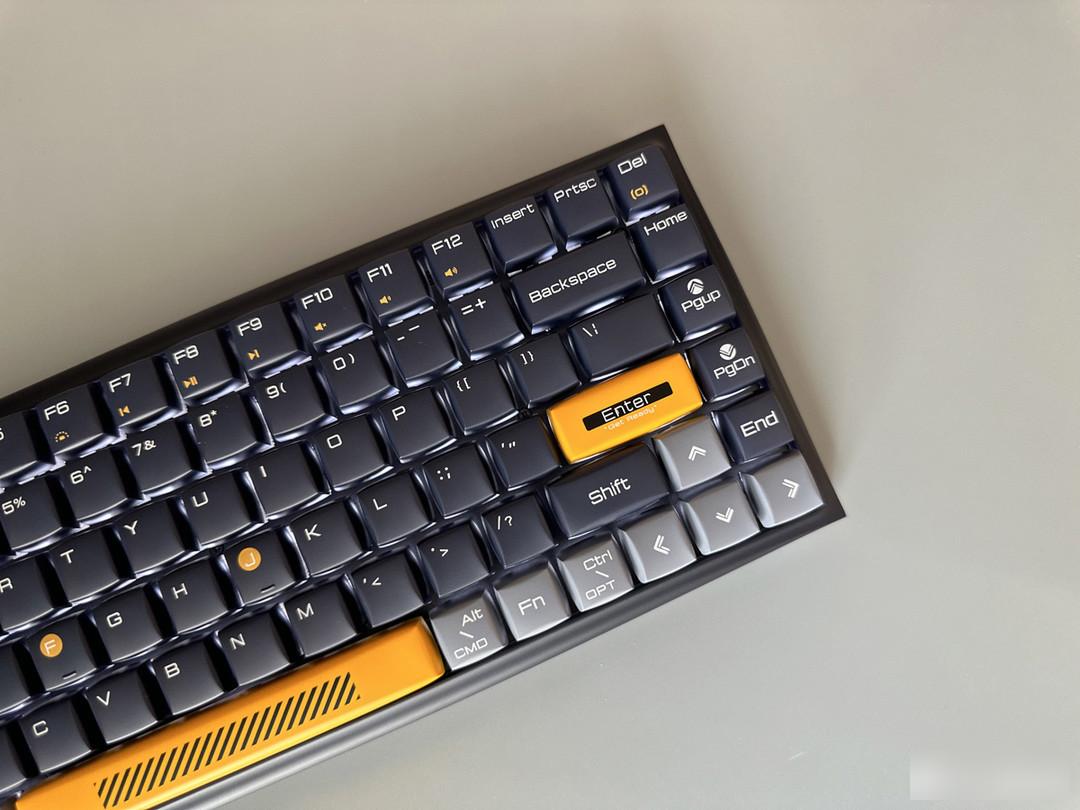
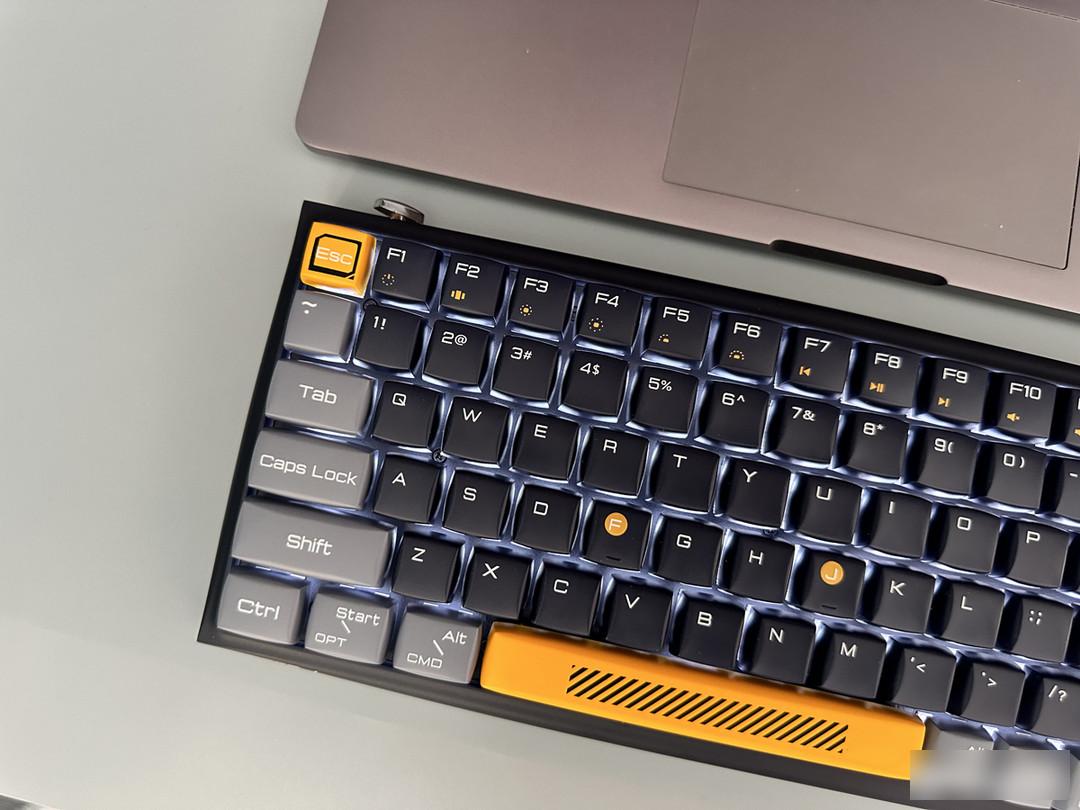
The A87 Pro adopts the standard 87 configuration, and the cloud gray color scheme adopts a three-color design. At the same time, the bright orange keycaps are used on the ESC and ENTER buttons to bring a good-looking color contrast. The indicator light part of the keyboard is also placed above the arrow keys.
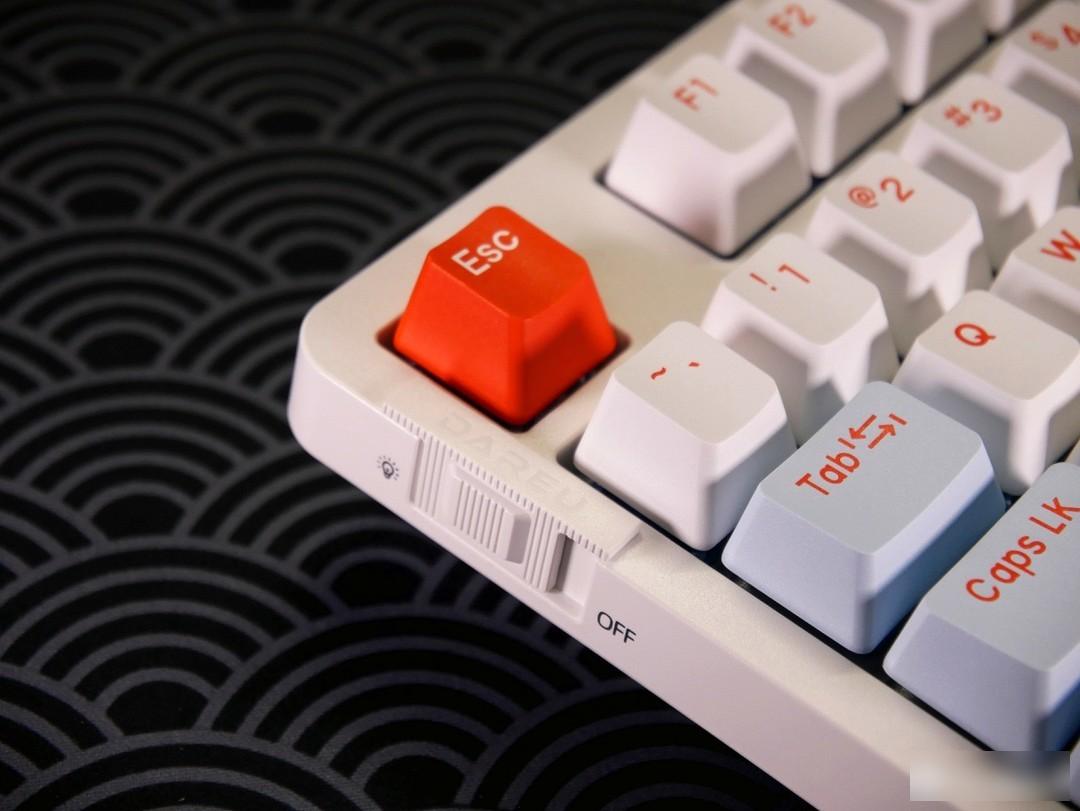
The switch of the keyboard is placed in the upper left corner of the same model of the A98 series, with the same wave switch structure. The evening cloud gray color scheme is a wired version, so this switch provides a quick two-level configuration of the light, and the light is turned off.
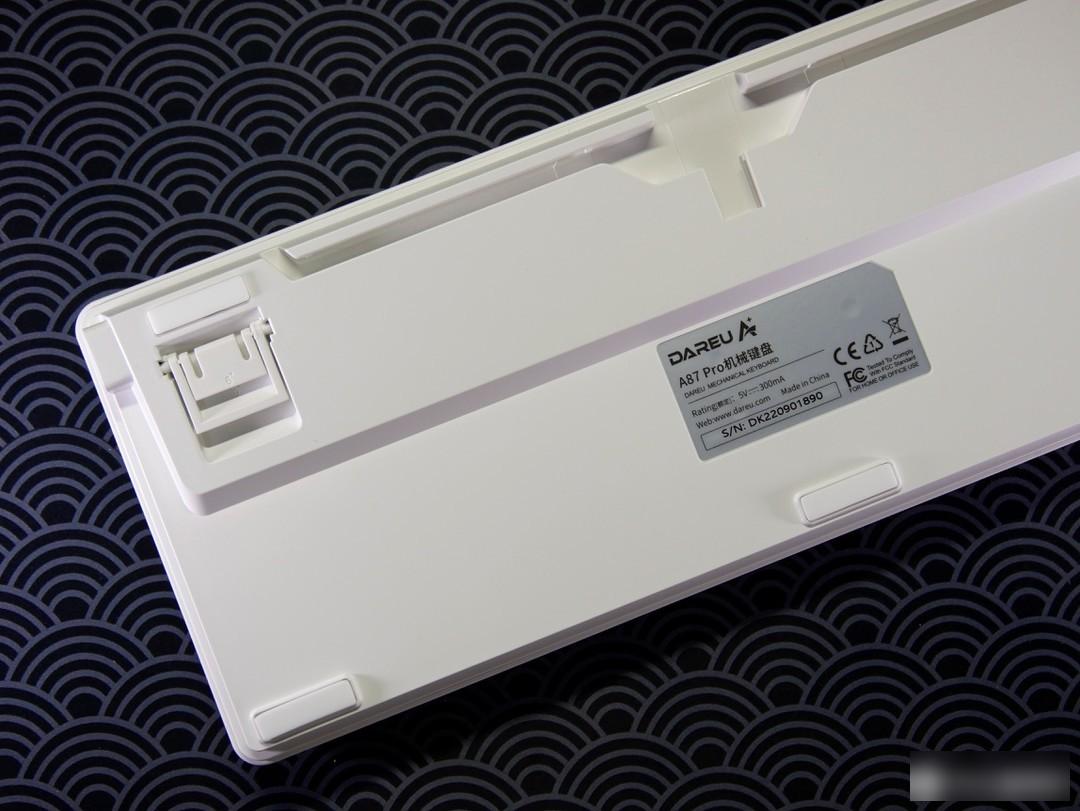
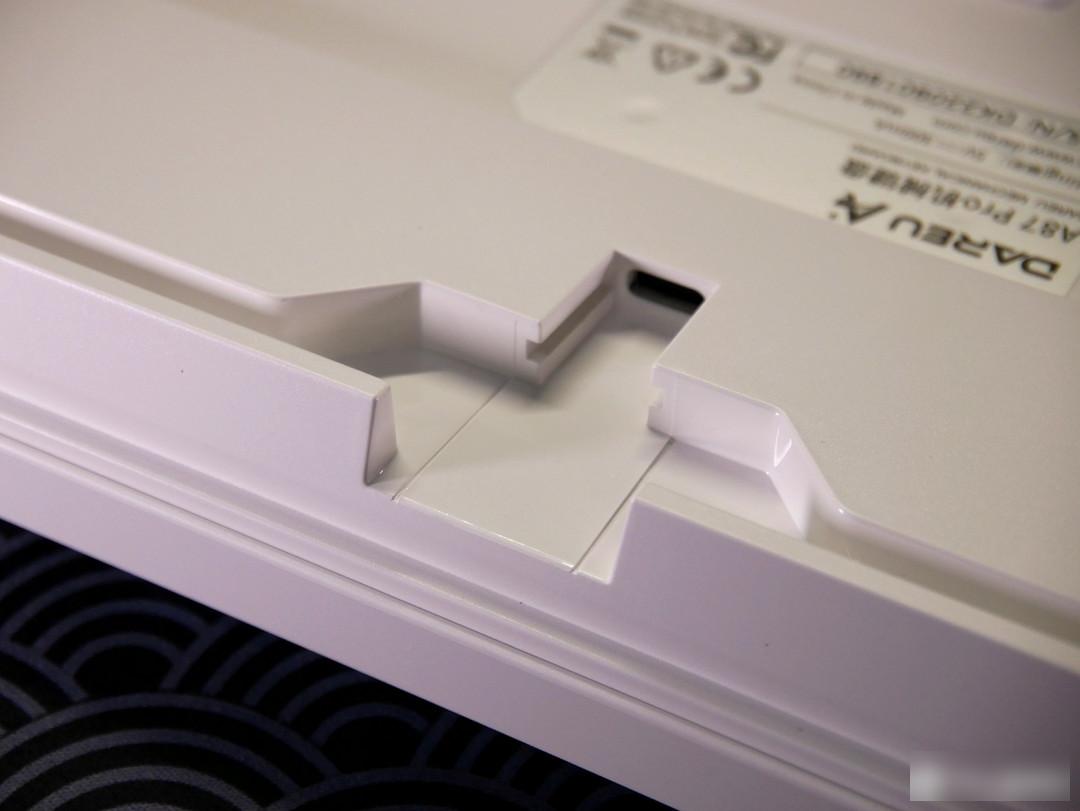

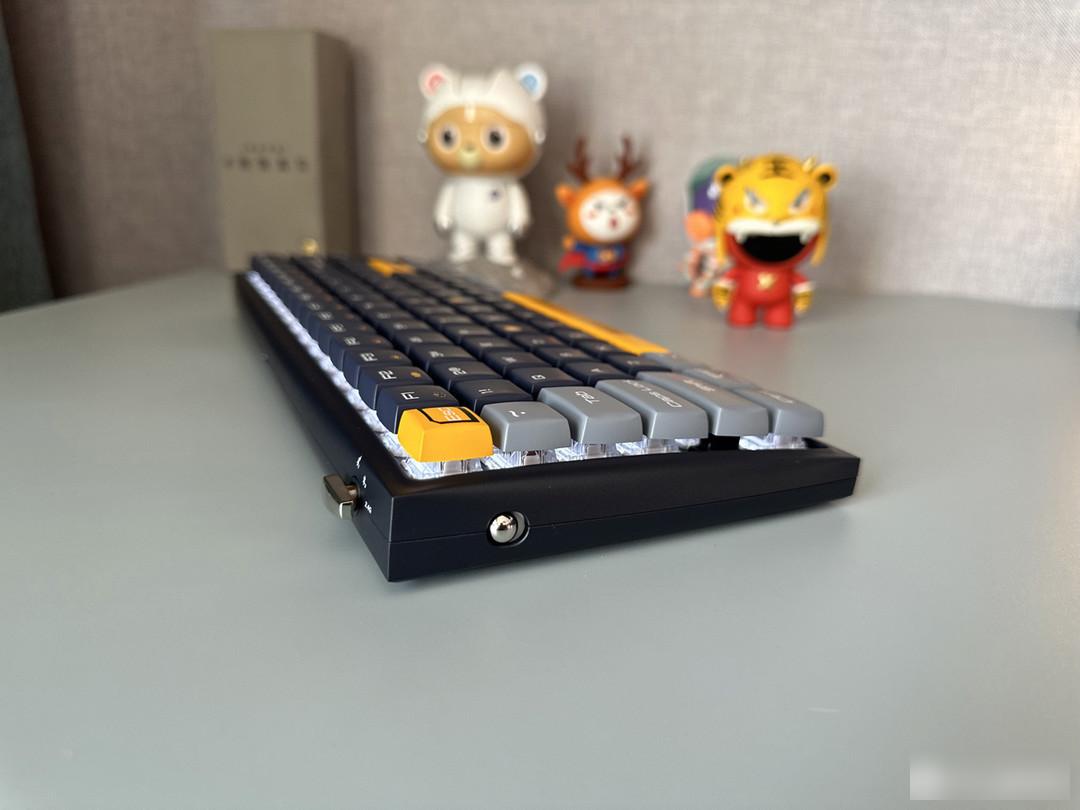
The back design of the A87 Pro is also relatively simple. It provides a three-way outlet structure and a two-stage foot support, and the input angle that the foot support can provide is marked. The height design of the third gear can basically meet everyone's needs. The interface design of the type-c data cable is quite special, and the compatibility with the data cable is not high. Friends who want to replace the data cable may need to pay attention.
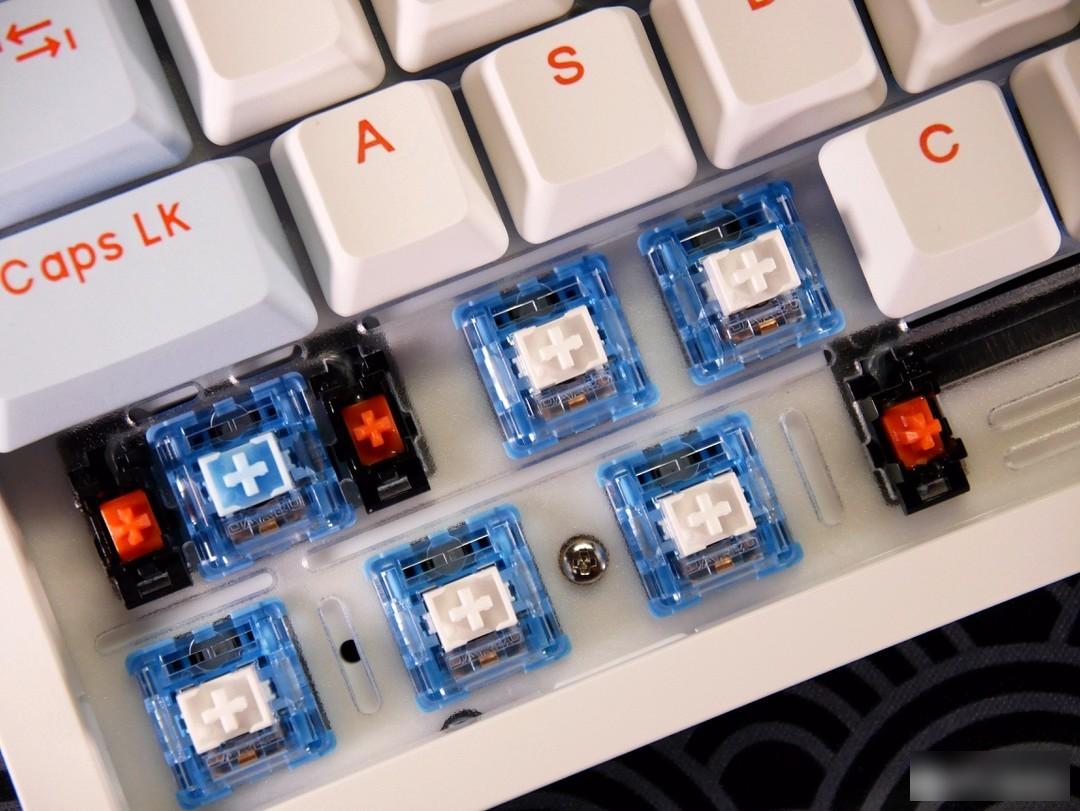
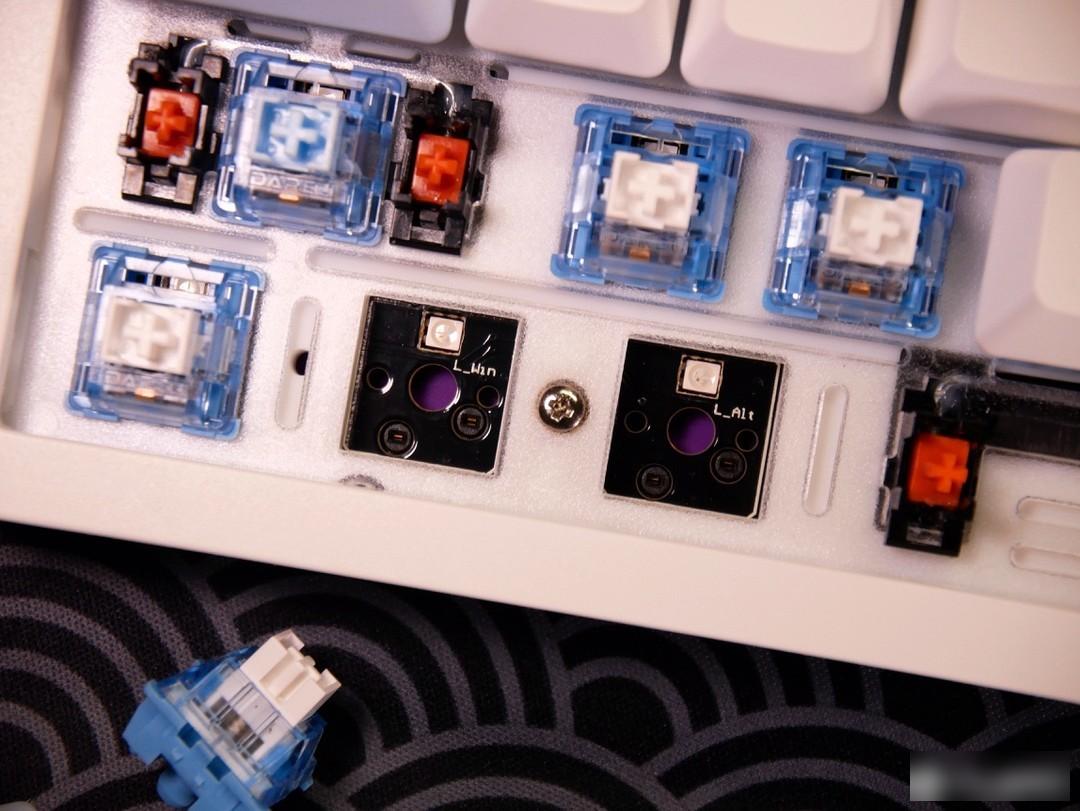
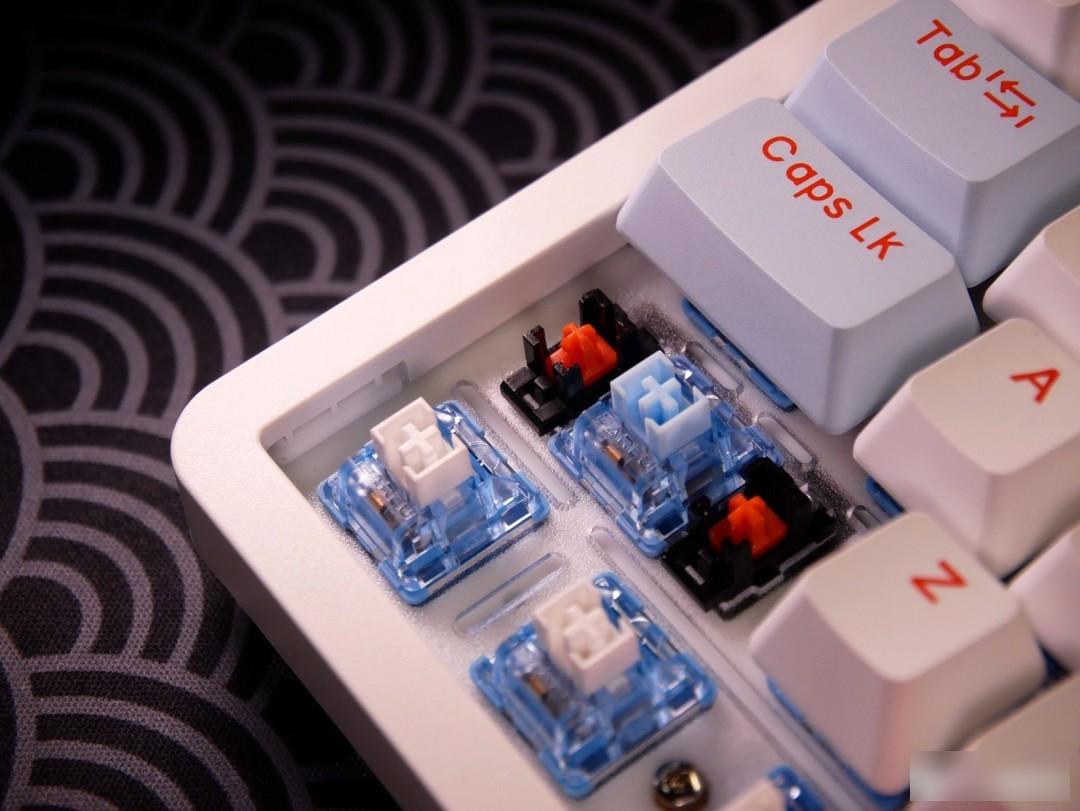
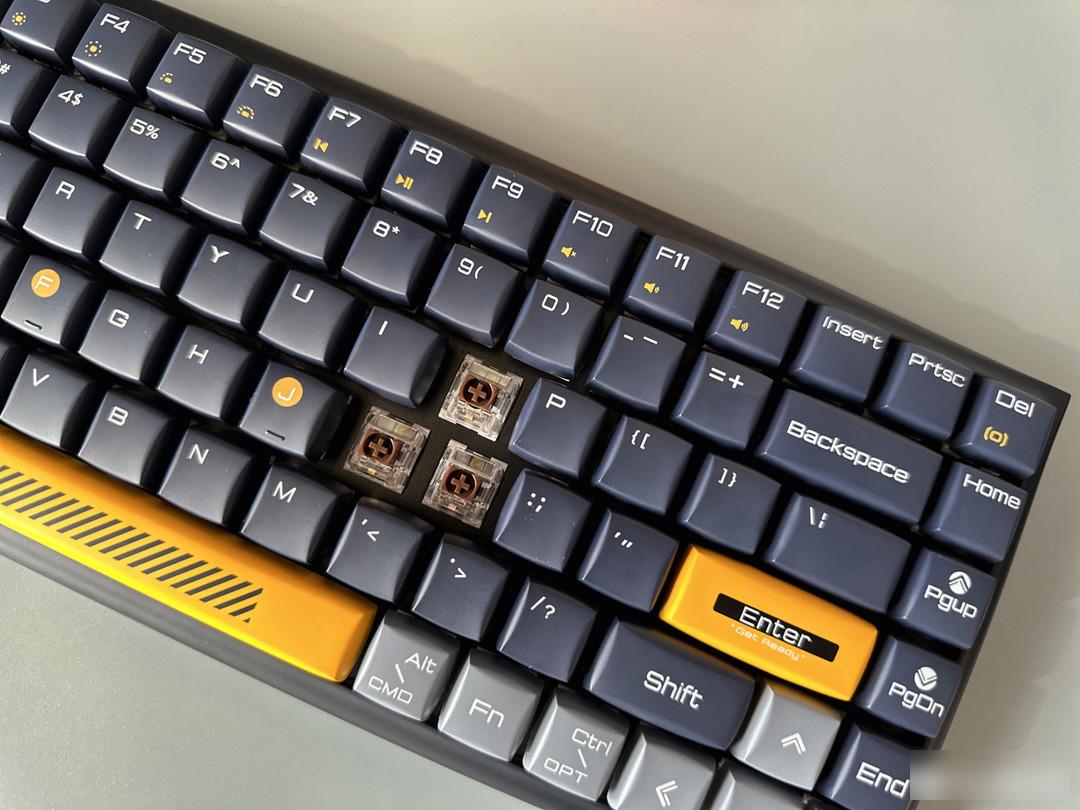
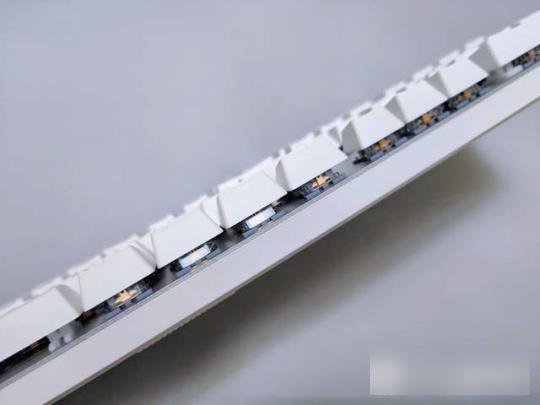
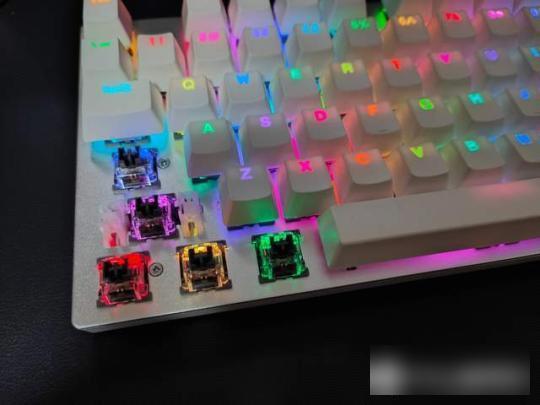
After looking at the exterior part, do you feel that the A87 Pro is mediocre, so let's take a look at its inner part. The A87 Pro adopts a full-key hot-swappable design, supports tripod axes and pentagon axes, and is basically compatible with about 99% of the mechanical switches on the market. In addition to the built-in Dareu sky axis V3, it is also very simple to change the axis by yourself. At the same time, after removing the keycaps, you can see that the A87 Pro uses a slotted PC positioning plate, and at the same time, it is filled with thick sound-absorbing silicone between the PCB, which can effectively reduce the impact of the keyboard during typing. The vibration noise ensures the consistency of the feel. It can be seen through the PCB that a layer of purple silicone is filled under the PCB to reduce the cavity sound from the keyboard bottom case, and at the same time it can bring the HIFI sound effect that many friends like.
On the side, you can also see the sound-absorbing silicone filled with the positioning plate just mentioned by the keyboard. This layer of silicone adopts the structural design of the fence interlayer, and the layer of silicone can be well fixed by the buckle of the upper and lower shells, so it brings a better use feeling.
You can see that at the position of the big key, Dareu adopts the version of the sky axis with the blue axis. What is the difference between it and the ordinary sky axis? You may understand it when you see the above picture. Lanxin’s sky switch adopts 45gf pressure spring, which brings better feedback strength of the switch body compared to the original version of 40gf, so that the rebound performance of the large key position can be better, and the satellite switch is also fixed when it leaves the factory. After tuning, the consistency in use is very good, and the rebound force feedback is also very comfortable.
The keycap part adopts two-color keycaps made of PBT material. The characters adopt a closed design, and the surface is also very delicate in matte texture. The overall typing oil resistance and comfort are very good. It is convenient to match the color scheme you like. For example, if you like plain, you can remove the contrast color supplement.
Thanks to the standard 87 key positions, in addition to the supplied keycaps, it is also very convenient to replace the keycaps by yourself.
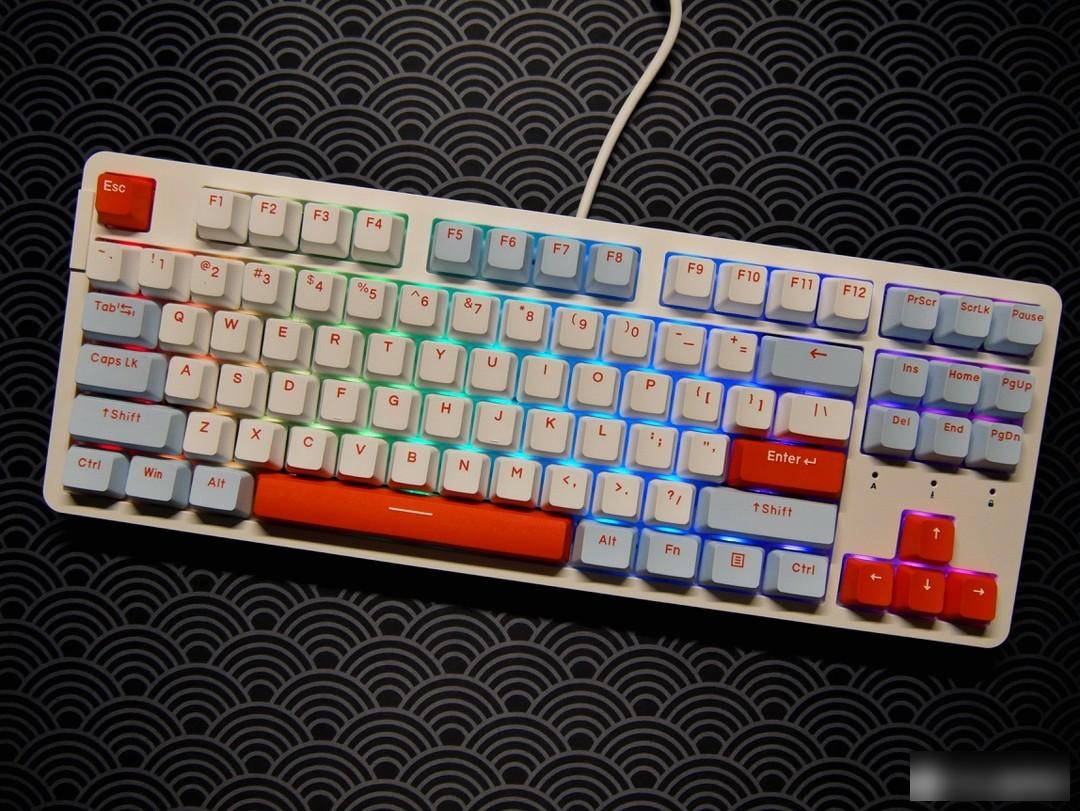
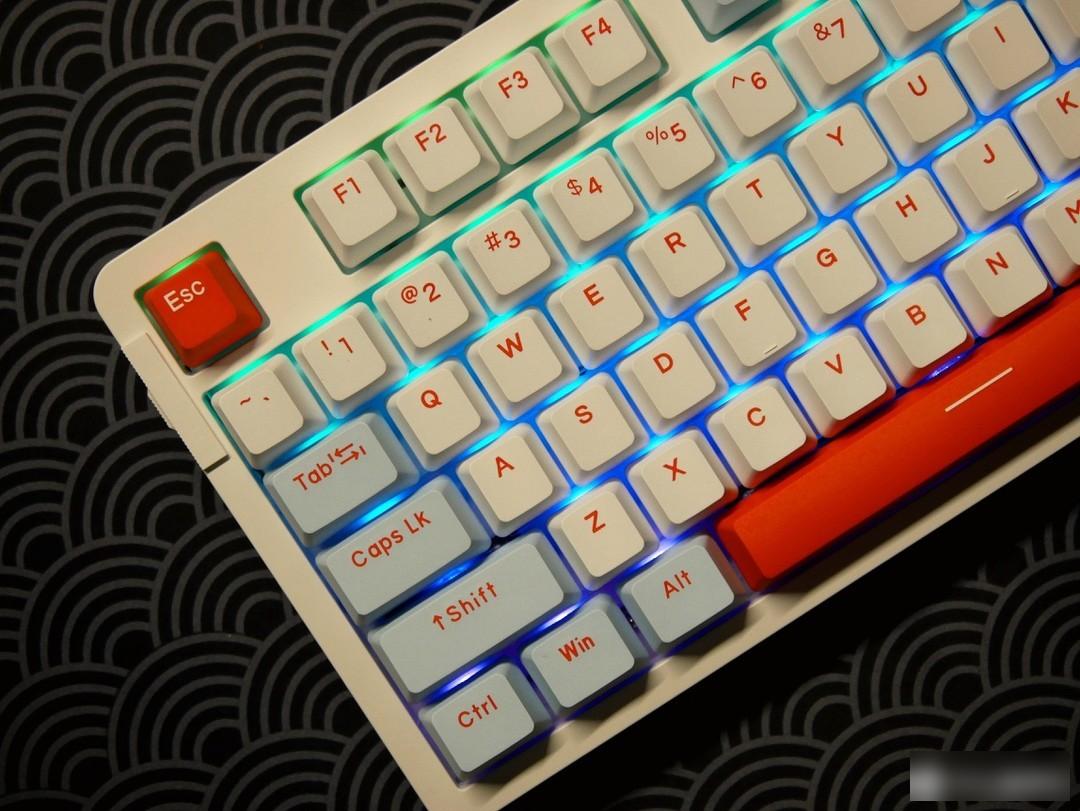
The A87 Pro provides good RGB lighting effects. In the drive-free mode, you can switch between various lighting effects through the FN+F6~F11 keys. However, for the opaque PBT keycaps, the lighting may be more of an embellishment effect. If you like lighting effects, you may wish to replace some transparent keycaps or transparent keycaps for better performance.
All keys are hot-swappable, the sky axis with a good feel, the fence-style Gasket structure, the "hand-feel sound package" with full configuration, and RGB lighting with various gameplays. Dareu has brought you a very good keyboard at the price of 400 yuan. One of the choices, if you want to experience a different feel, Dareu A87 Pro is worth experiencing.
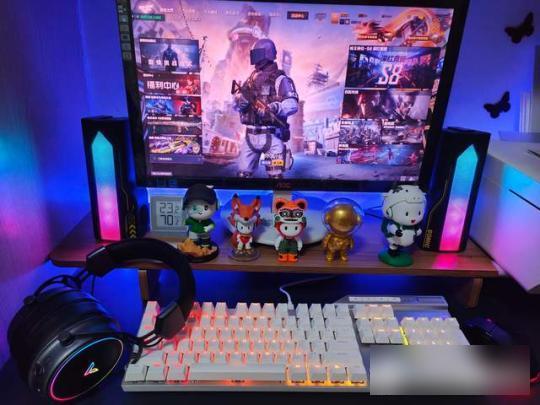
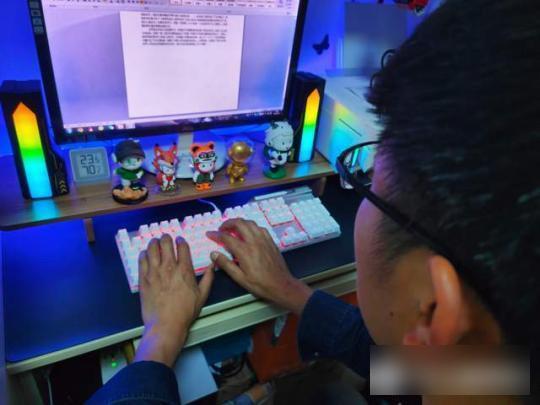
In the eyes of many people, text input is a very boring and tiresome job. For me, who has been engaged in writing work for more than 20 years, the mood of typing is the same as going to the grave. However, using Durga Hi After using the Keys mechanical keyboard for a while, I found that typing can also be a joy.
the
The crisp knocking sound, multi-color ambient lights, more comfortable hand feeling, and pleasing appearance, let me slowly start to enjoy the happiness brought by typing. Without further ado, let's go directly to the experience sharing session.
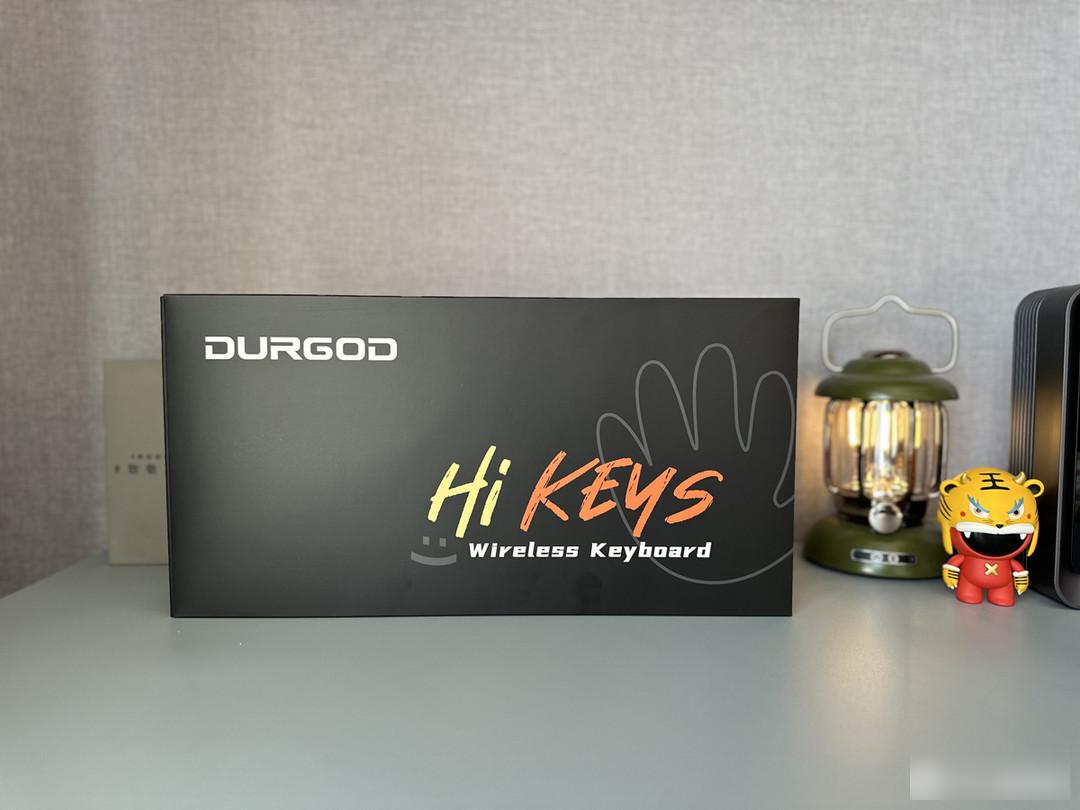
Since graduating from university to the present, I have to use the computer to type every day, and I have used countless keyboards. In recent years, mechanical keyboards have been used, and there are no satisfactory products. Get Durga Hi When I was looking for a Keys mechanical keyboard, the small and fresh outer packaging attracted me.
the
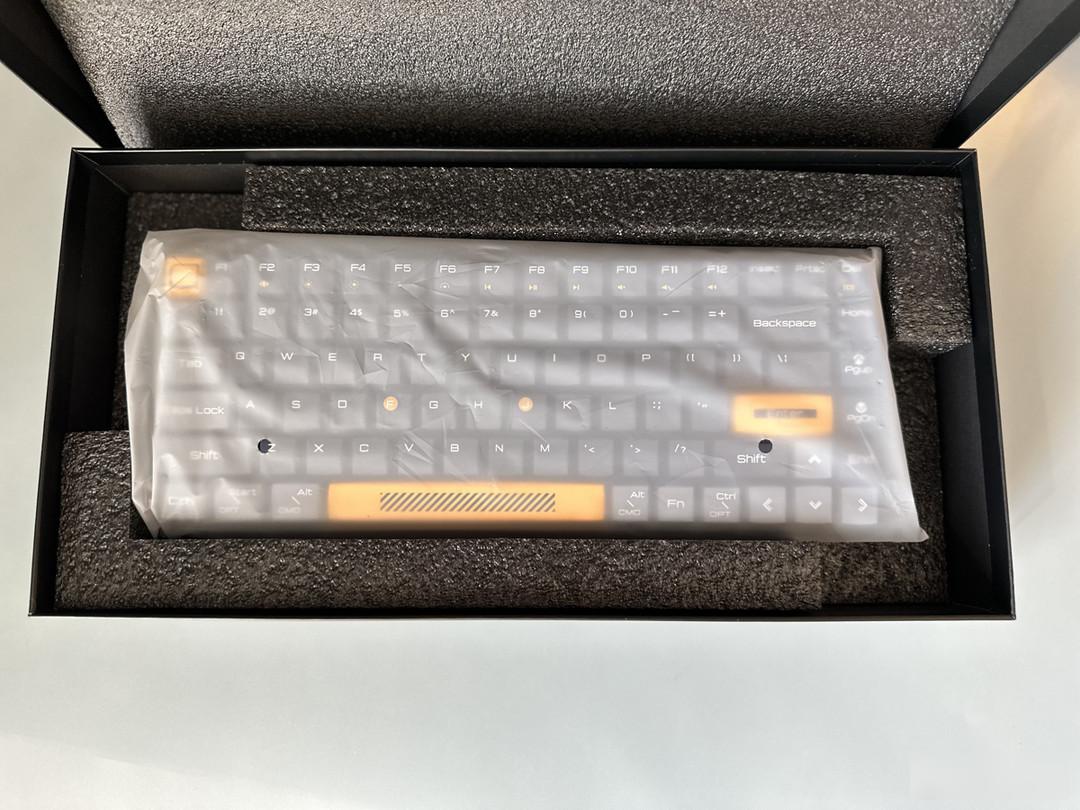
When you open the box, you can see the main body of the keyboard, which is surrounded by black foam material to prevent the keyboard from being squeezed during transportation. Through the white transparent packaging bag, the main body of the keyboard can be vaguely seen.
the
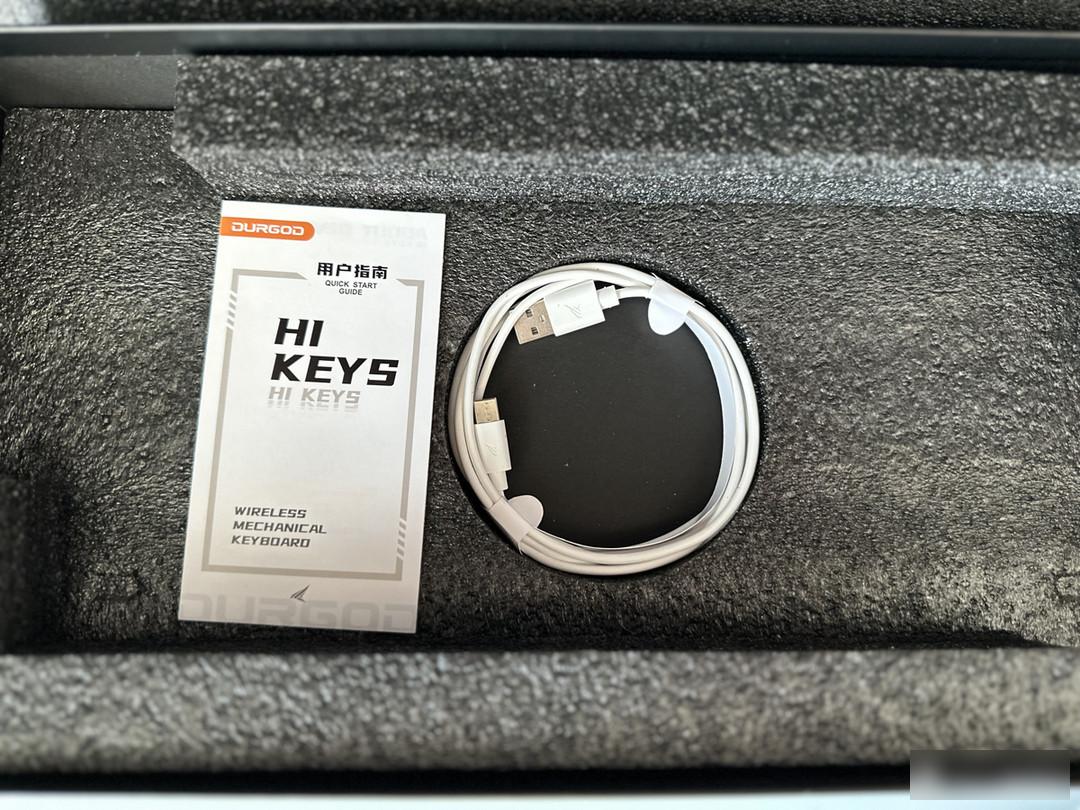
After taking out the keyboard, you can see a user guide and a charging cable.
the
The keycaps of the Durga Hi Keys keyboard have three colors, namely yellow, blue and gray. The seemingly simple color scheme actually creates a refreshing and calm atmosphere, which can make typing more peaceful.
the
There is a silver circular button on the left side of the keyboard, which can be toggled up and down. This is the power button. After turning on, the white background light will flash automatically.
the
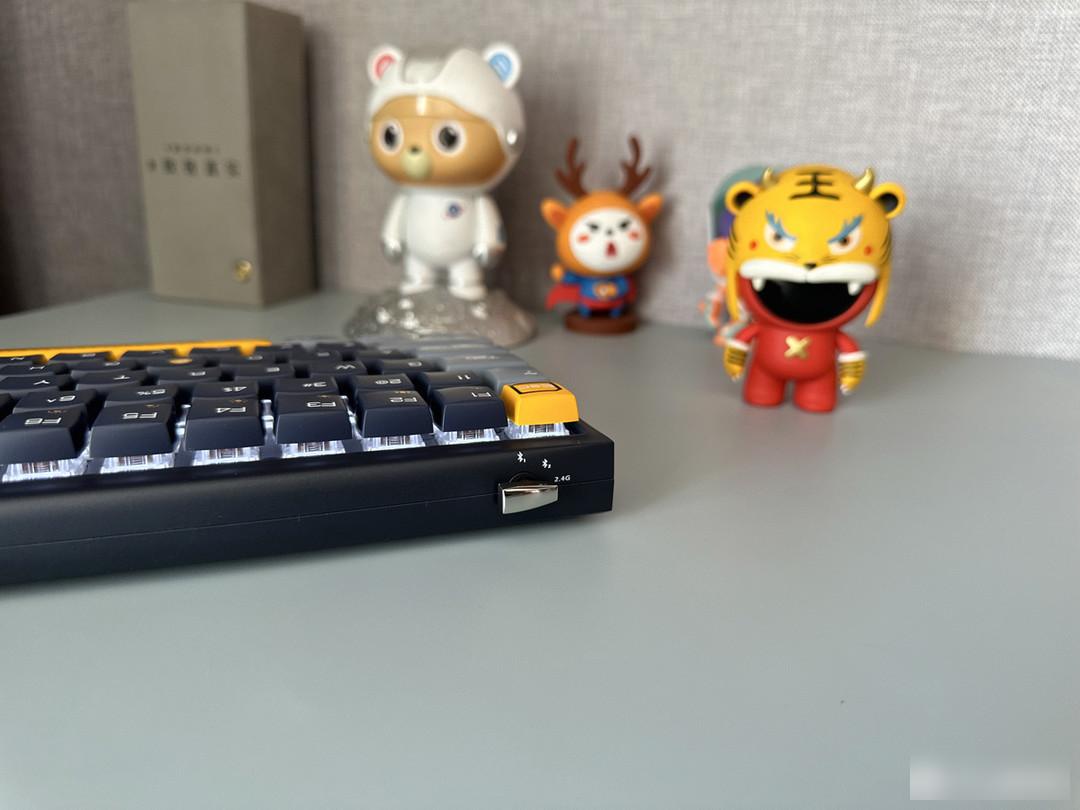
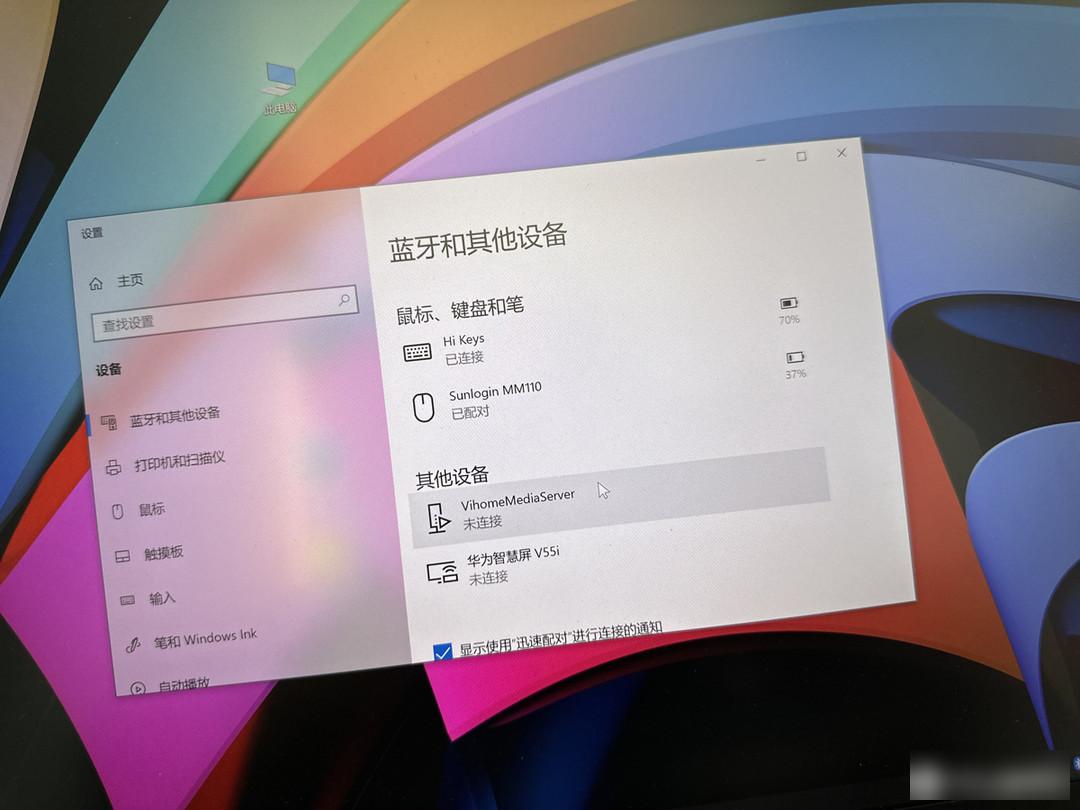
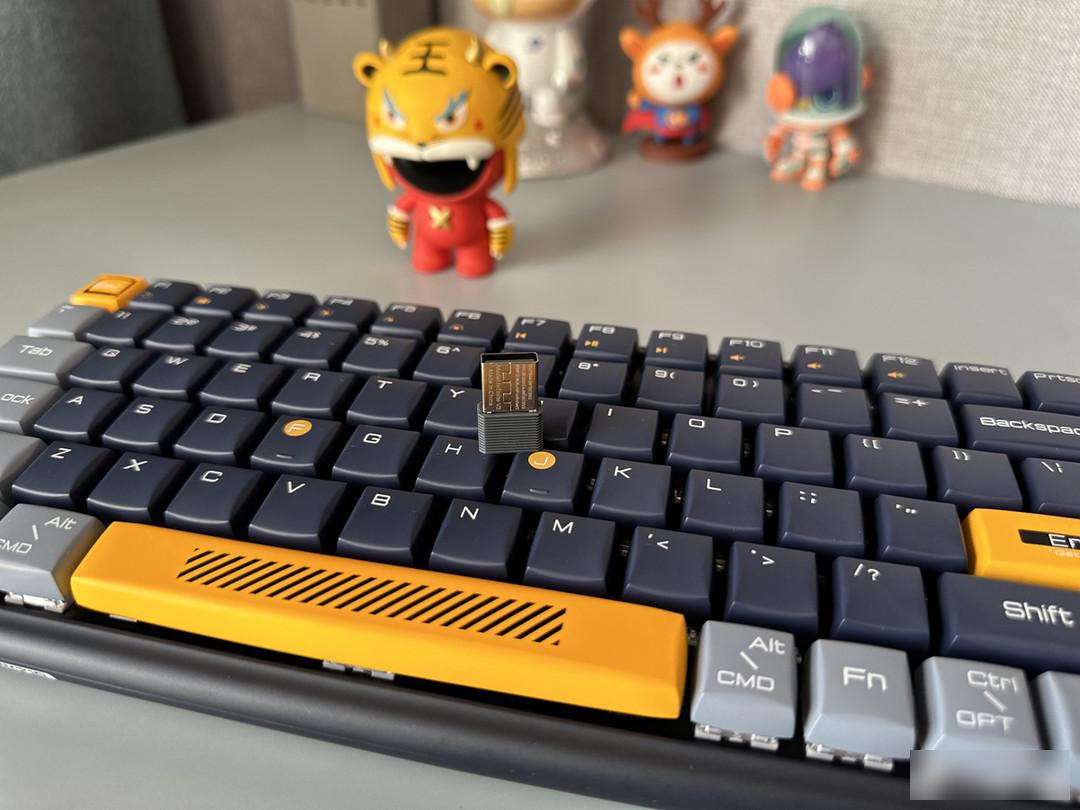
There is also a silver rotation at the rear on the left side of the back, which can be switched to different working modes. There are two Bluetooth connection modes and one 2.4G connection mode.
the
There is a support at the bottom, and users can adjust it to a suitable height according to their needs. However, there is only this adjustment mode, but it is completely sufficient.
the
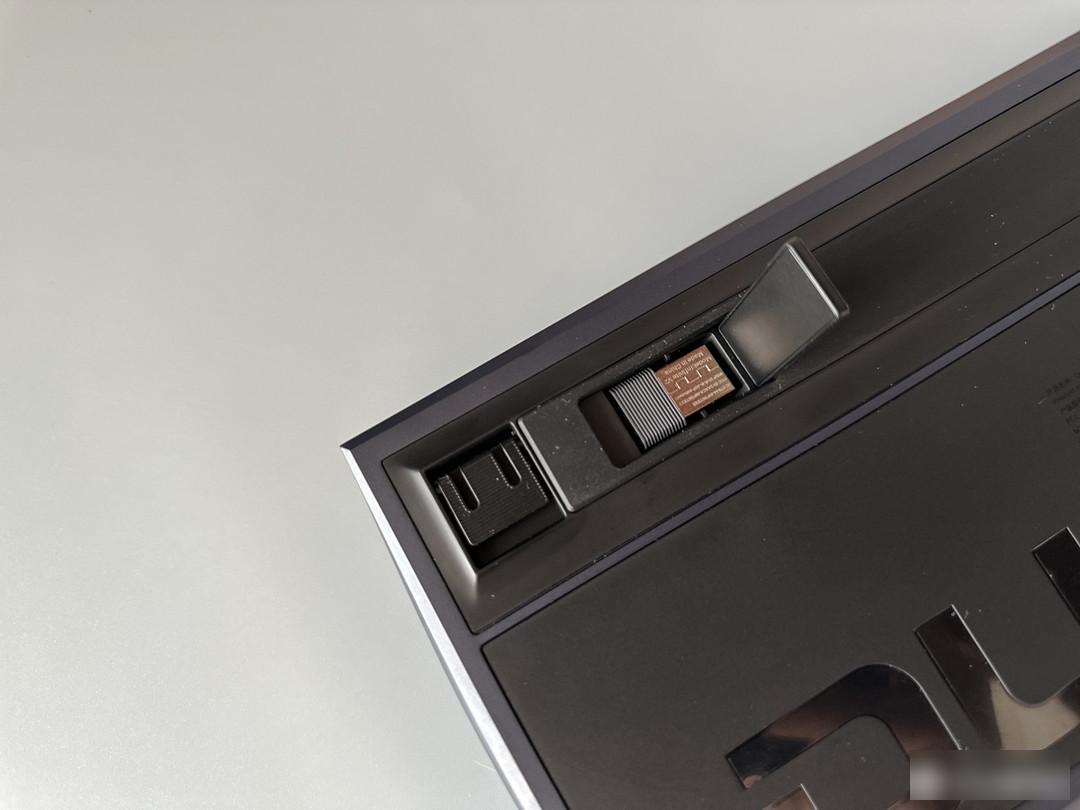
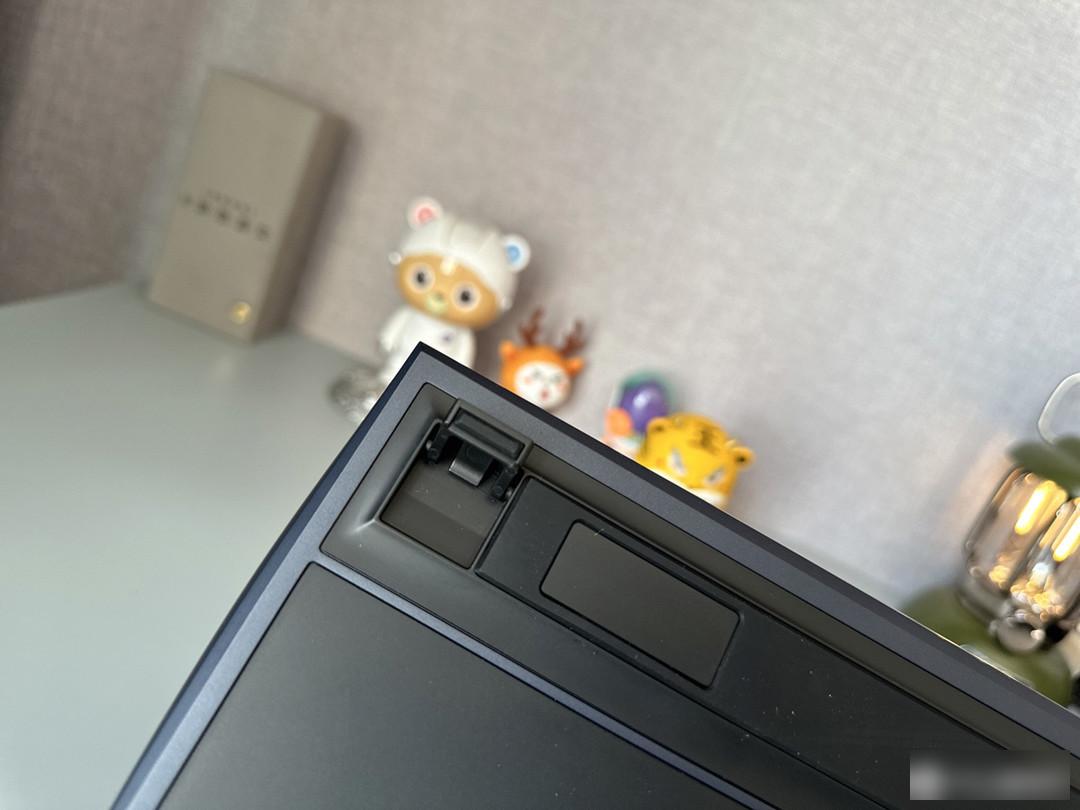
In addition, there is a 2.4G wireless receiver storage compartment at the bottom of the keyboard, which is designed with a magnetic cover, and can be popped up by pressing the right side lightly.
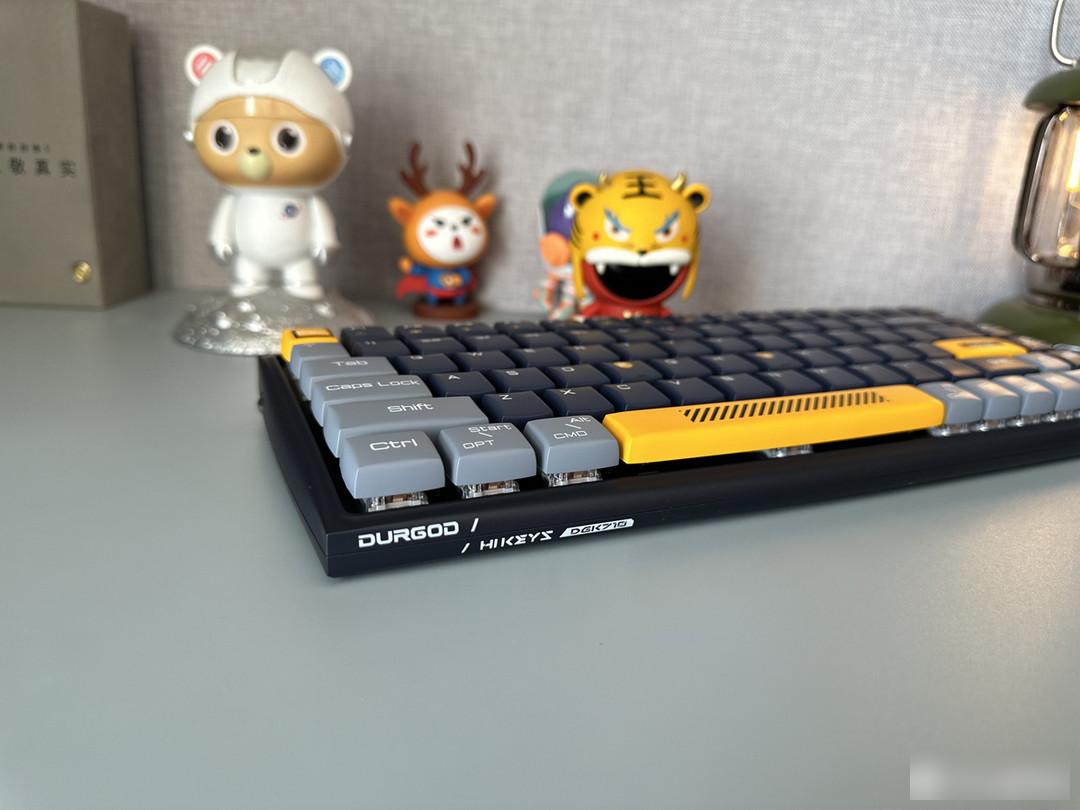
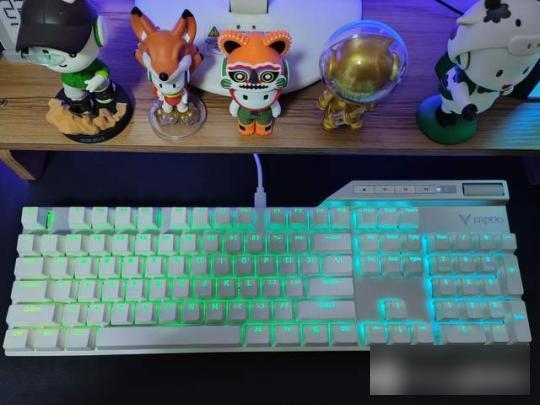
Durga Hi The Keys mechanical keyboard adopts an 84-key layout, but retains the commonly used text editing keys such as Del, Pgup, and PgDn, which is very friendly to text workers like me. Moreover, this saves 25% of the space compared with traditional keyboards, and is more practical.
the
In order to improve typing comfort, Durga Hi The Keys mechanical keyboard adopts a newly designed square and round keycap, which is designed with an ergonomic key position curve, which is slightly curved upwards, so you will not feel tired when typing for a long time. Moreover, the square and round keycaps also have a special feel.
the
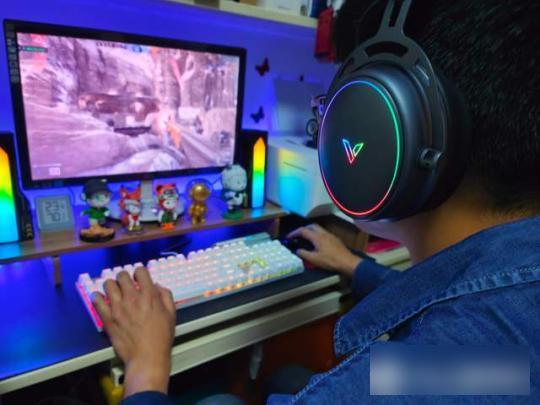
Like other mechanical keyboards, Durga Hi Keys You can also choose the switch body for the keyboard. The mute red switch is quieter, and the brown switch has a stronger sense of paragraph, which is more suitable for codewords. I usually prefer the sound of keyboard tapping, and I need code words every day, so I chose the tea shaft, and typing is more rhythmic.
the
A more considerate point is that the enter key and the space key are designed with satellite switches, and the keycaps are also relatively large, making them more comfortable to use. Moreover, there will be no broken sound when struck.
the
The connection method is very simple. If it is a desktop computer, you can choose the 2.4G connection method. If it is a laptop or mobile phone, you can choose Bluetooth connection.
Let's talk about battery life. This is an experience that many users value very much. Durga Hi The Keys machine has a built-in rechargeable lithium battery, which can be charged by plugging the cable into a computer or a charging head. In the actual test, there is no problem in using it for 200 days without turning on the ambient light.
the
Specifically, the Fn+F1 combination can turn on or off the ambient light, the Fn+F2 combination can cycle through 8 ambient light modes, and the Fn+F3/F4 combination can be used to adjust the dimming and brightening of the light.
the
Of course, if the ambient light is usually turned off, under normal use frequency, it can be used for more than 300 days with a single charge. This battery life is still very good.
the Summarize: Judging from the experience of more than 20 days, Durga Hi The Keys mechanical keyboard is not only beautiful in appearance, but also has a better typing experience. The feel and keyboard layout are very friendly to text editors. Of course, if you like the sound of keyboard tapping, you can choose the brown switch. If you like to be silent, the red switch is more suitable for office use.
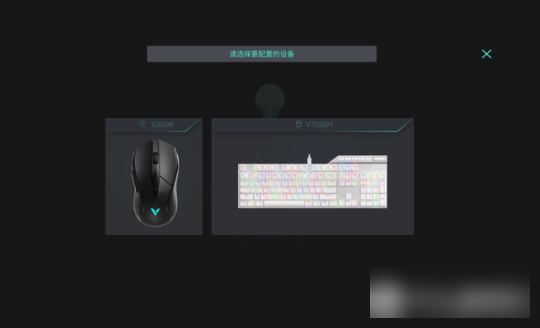
As a digital blogger and amateur game expert, after buying Rapoo’s gaming headsets, gaming mice, and game controllers, I finally bought the Rapoo V700DIY mechanical keyboard, which is a full-featured, e-sports keyboard. Feel full of customized mechanical keyboard. It adopts a detachable keycap shaft and a modular design, which supports users to freely replace, upgrade and DIY personalized customization.
In terms of product packaging, this Rapoo V700DIY mechanical keyboard still follows the simple and elegant appearance design elements of Rapoo. The Rapoo brand LOGO, keyboard model, and keyboard main picture constitute the classic "three elements" of Rapoo.
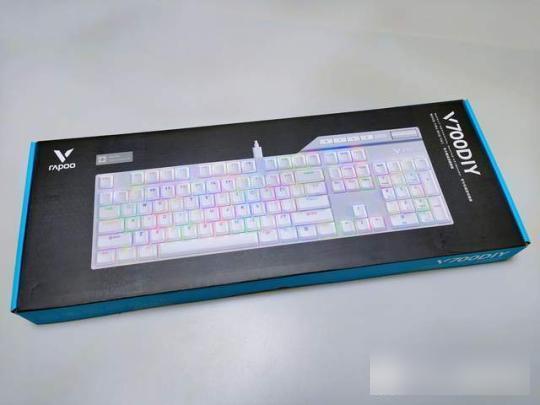
The main features of this Rapoo V700 DIY mechanical keyboard are listed on the back of the package, such as full keyboard no punch design, full key hot-swappable design, full keyboard programming, RG backlight system, etc., which are very powerful in terms of performance.

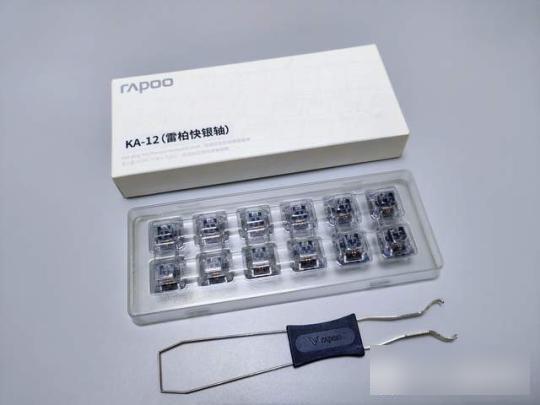
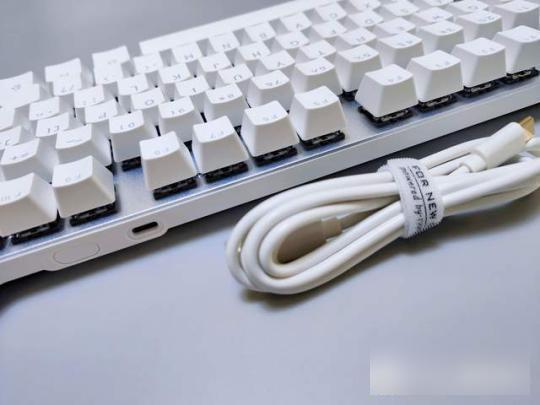
Open the package, the packing list includes Rapoo V700DIY mechanical keyboard, key puller, Type-C power cord, manual, and a box of spare quick silver switches.
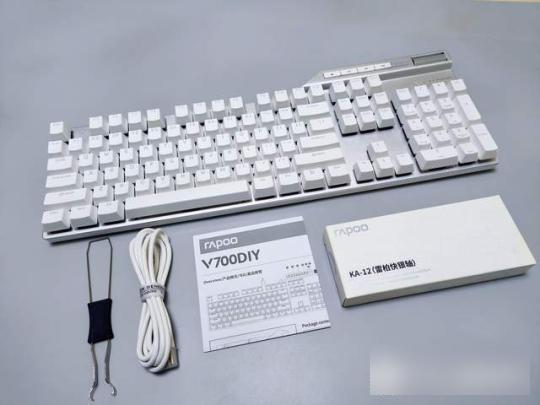
This box of Kuaiyin switch contains 12 switch bodies, and also comes standard with a key puller and shaft puller, which can be said to be very thoughtful.
Rapoo V700DIY is a mechanical keyboard with a 104-key full-size conflict-free design in the key layout. The product size is 435*149*48mm and the weight is about 835g. It is a light and small-sized keyboard. The upper cover of the keyboard is made of silver aluminum alloy, and the keycap is pure white. The two complement each other, and the appearance is online. The upper right corner of the keyboard is shaped like a dorsal fin, and there are additional function keys, which enhance the recognition of the keyboard.
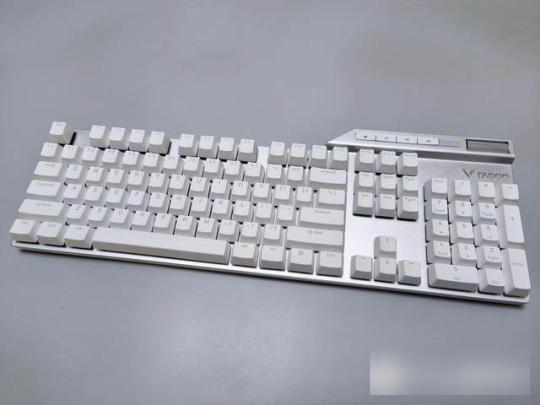
The white keycap of the keyboard adopts PBT two-color injection molding process. The material is relatively solid, the surface particles are obvious to the touch, and the light transmission is uniform. It is wear-resistant and oil-resistant when used, and it will not turn yellow over time after long-term use.
Simple and narrow frame design, floating ergonomic keycap design, the touch is more comfortable in daily use, and the response is more accurate and fast, especially when playing games, the experience is smoother.
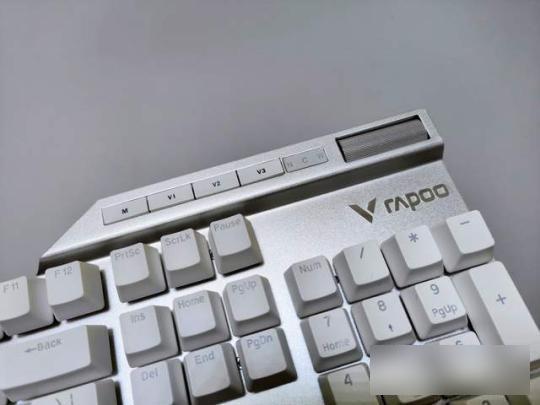
In the dorsal fin shape area on the upper right corner of the keyboard, there are 5 special function multimedia keys, among which the M key is the mode switching key, which can switch between office and game modes; the V1 key is the light switching key, which can quickly switch the keyboard lighting mode; the V2 key is the scroll wheel The mode switching key can quickly switch between the light brightness and volume control functions; V3 is the mute key, which can turn on/off the mute with one key; the scroll wheel is the light brightness and volume adjustment key, which can be quickly adjusted by scrolling up and down during use. These function keys greatly improve the DIY playability of this keyboard.
The power supply mode of the Rapoo V700DIY mechanical keyboard is wired mode, and it adopts a separate key line design, which is easy to store and carry. The length of the power cord is more than 1.5m, and it is completely unfettered during use, enjoying the same convenience as wireless. The USB interface of the power cord is also gold-plated, which greatly improves the anti-oxidation and corrosion resistance, and ensures the stability of signal transmission and the service life of the wire.
Whether the mechanical keyboard is good or not, the key point is how is the shaft body? This Rapoo V700DIY mechanical keyboard is equipped with Rapoo's independent hot-swappable linear fast silver switch, which can be adapted to most pentagonal hot-swappable switches on the market, allowing you to DIY as much as you want. Rapoo’s independent hot-swappable linear fast silver axis has a total stroke of 4mm, trigger stroke of 1.3±0.5mm, trigger pressure of 45±10gf, sensitive trigger, strong and fast rebound, strong hand feeling, relatively quiet sound, and long service life of the single-axis body 50 million times, fully meet the needs of daily office games.
Use the key puller to remove the linear fast silver shaft according to the steps. This shaft body is composed of the shaft center + transparent upper cover + spring + metal copper sheet + base. The shaft center comes with lubricated PVC material, which not only feels smooth, There are also double-sided dust-proof walls to prevent dust and debris from falling into the gap; the hot-swappable metal shaft seat is anti-oxidation and strain-resistant, and has a service life of 10,000 plugs and unplugs, so you can rest assured to replace your favorite shaft body.
Slipping when using the keyboard should be relatively common and annoying. The back panel of the Pennefather V700DIY mechanical keyboard is equipped with 5 large-size silicone anti-slip stickers, which greatly improves the friction. No need to worry during intense gaming sessions.
In addition to the large-size silicone anti-slip stickers, there are also two silicone feet on the back of the keyboard, which can not only flexibly adjust the angle of use of the keyboard, but also improve the anti-slip performance of the keyboard.
After opening the silicone stand, the keyboard presents a more ergonomic angle, which will make the hand feel more comfortable during use, and you will not feel wrist fatigue when typing or playing games for a long time.
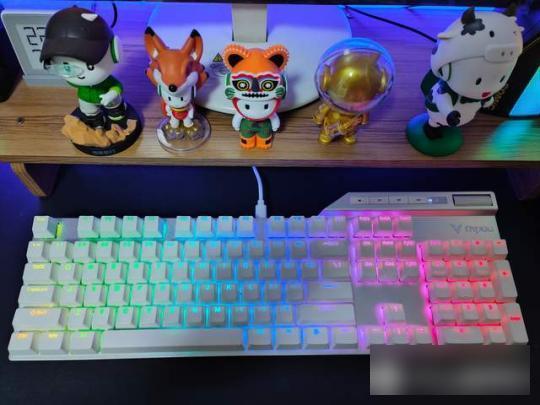
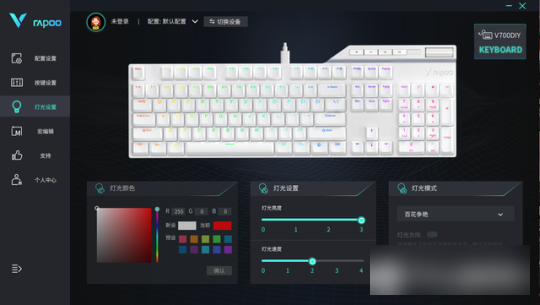
The Rapoo V700DIY mechanical keyboard is an RGB backlit keyboard, which is one of the important reasons why I like it more. In the office mode, 18 lighting modes can be switched through the V1 key; in the game mode, 19 lighting modes can be switched through the V1 key or the driver software, and it can also support single-key independent setting of the illusion light color and custom personalized light .
Click the multimedia button M in the upper right corner of the keyboard, and the white light of the keyboard will flash 3 times to enter the office mode. Use the V1 button to select your favorite backlight mode. I prefer the refreshing light mode as shown in the picture.
Click the multimedia button M in the upper right corner of the keyboard, and the blue light on the keyboard will flash 3 times to enter the game mode. Use the V1 button to select your favorite backlight mode. Playing games is of course a colorful color with a stronger sense of e-sports.
Recently, I have been tossing about RGB computer desk products. The Rapoo V700DIY mechanical keyboard is really suitable, taking into account the use and table function. It is matched with the Rapoo V800H gaming headset and the Rapoo V300W gaming mouse I bought before, creating an e-sports atmosphere. Feeling full, just perfect.
The performance of the game mechanical keyboard still depends on the specific use experience during the game. I chose classic shooting games to experience. In the game mode, the keys of the Rapoo V700DIY mechanical keyboard are very smooth, the trigger of the quick silver switch with short key travel is also fast, the signal response is sensitive, the rebound is strong and has a hand feel, which I prefer, which can enhance the immersive gaming experience.
In the office mode, the performance of the Pennefather V700DIY mechanical keyboard is even better. The 104-key full-size non-conflict design is no different from the ordinary keyboard we use every day. . In addition, you can quickly switch between functions such as multimedia playback, volume adjustment, and mail through the combination of Fn+F1~F12, which greatly improves office efficiency.
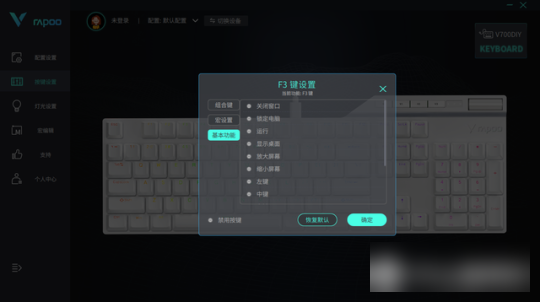
The Rapoo V700DIY mechanical keyboard is also a programmable keyboard, download the matching driver software from the Rapoo official website, and select this keyboard to connect.
In the button setting, you can set combination keys, basic functions, disable button functions; customize macro button functions, and set 104-key button functions except 5 multi-function buttons.
In the light setting, you can independently set the light color, light brightness, light speed, light mode, and you can also switch the direction of the light and turn on the monochrome mode.
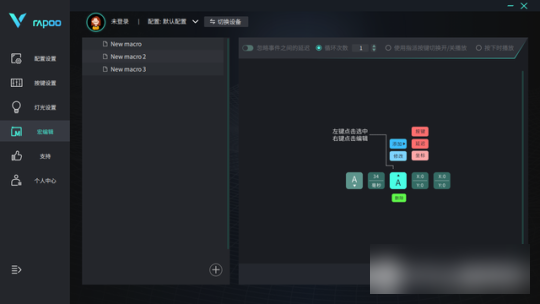
In macro editing, you can freely record macro commands and trigger a series of commands with one button. This function is more suitable for playing games. You can release combos with one button, and you don’t have to worry about not being able to send out combos because your hand speed is not fast enough. .
To sum up, Rapoo V700DIY 104-key RGB mechanical keyboard is a mechanical keyboard with online appearance, comprehensive functions and high cost performance. Its customizable and modular design is very attractive, and the keycaps and lighting effects are also very good, and it also performs well in terms of input and response. If you are a gamer or someone who knows about mechanical keyboards, then you must not miss this good product.
Welcome to our comprehensive guide on how to replace a key on a mechanical keyboard! Are you a passionate typist or avid gamer who relies on your trusty mechanical keyboard every day? We've all experienced that sinking feeling when a key suddenly stops functioning or becomes loose, disrupting our workflow or gaming session. Fear not! In this article, we will walk you through step-by-step instructions on how to seamlessly replace a key on your beloved mechanical keyboard. Whether you are a beginner or a seasoned enthusiast, our expert tips and tricks will ensure that you can restore your keyboard's functionality in no time. So, if you're ready to dive into the world of keyboard repair, let's embark on this enlightening journey together!
Understanding the Anatomy of a Mechanical Keyboard
In this article, we will delve into the intricacies of an OEM mechanical keyboard and provide a detailed guide on how to replace a key. Mechanical keyboards have gained immense popularity among gamers and professionals alike due to their durability, high-quality construction, and improved typing experience. Keyceo Tech is a renowned brand in the industry, known for producing top-notch mechanical keyboards, and we will be using one of their keyboards as a reference throughout this article.
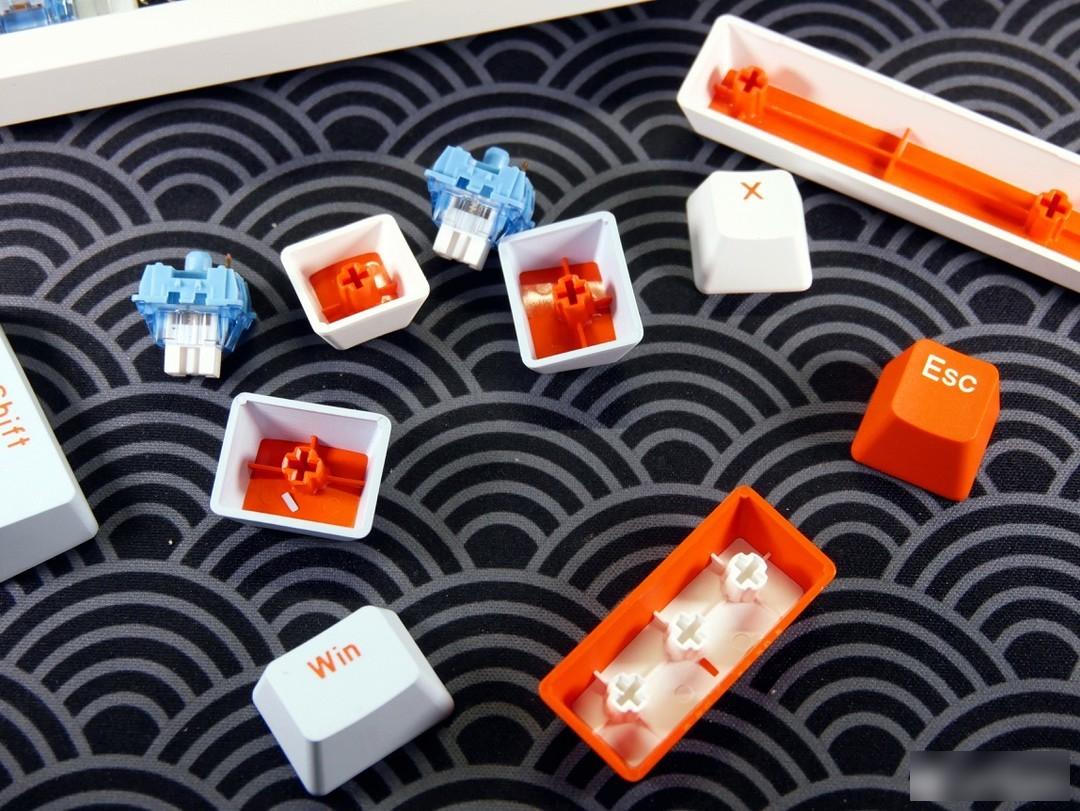
1. Keycap:
Starting with the keycap, this is the visible part of the keyboard that you press down to input a character. Keyceo Tech takes great pride in designing and manufacturing keycaps that are both functional and visually appealing. These keycaps are typically made from high-quality ABS plastic or, in some cases, PBT plastic, offering durability and resistance to wear and tear. They come in various shapes, sizes, and profiles, catering to different preferences.
2. Stem:
Beneath the keycap lies the stem, which connects the keycap to the switch. The stem determines the stability of the keycap and ensures smooth keystrokes. Keyceo Tech employs a standardized stem design, ensuring compatibility across their range of keyboards.
3. Switch:
The switch is the heart of any mechanical keyboard, providing tactile feedback and registering keystrokes. In an OEM mechanical keyboard, Keyceo Tech uses a variety of switches, including the popular Cherry MX series. These switches are known for their smooth operation, durability, and distinct feedback, enhancing the typing experience. Keyceo Tech also offers different switch options to cater to individual preferences, such as linear, tactile, or clicky switches.
4. Plate:
The plate, usually made of metal or plastic, provides stability to the switches and prevents them from wobbling. In Keyceo Tech's OEM mechanical keyboards, a sturdy plate is specially designed to enhance typing accuracy and prevent keystrokes from being unintentionally registered. The plate also serves as a mounting surface for the switches, ensuring a tight fit.
5. PCB (Printed Circuit Board):
The PCB is the backbone of the keyboard, housing all the electronic components necessary for the keyboard to function. It connects the switches to the computer, transmitting the keystrokes. Keyceo Tech's OEM mechanical keyboards are equipped with high-quality PCBs that offer excellent responsiveness and durability. These PCBs are designed to withstand intensive usage and prevent key ghosting, ensuring accurate and reliable input.
6. Stabilizers:
Stabilizers are essential components in larger keys, such as the spacebar, shift, or enter key. They ensure uniform key travel and prevent the key from tilting when pressed on one side. Keyceo Tech pays great attention to stabilizer design and utilizes high-quality stabilizers in their keyboards, resulting in smooth and consistent key actuation.
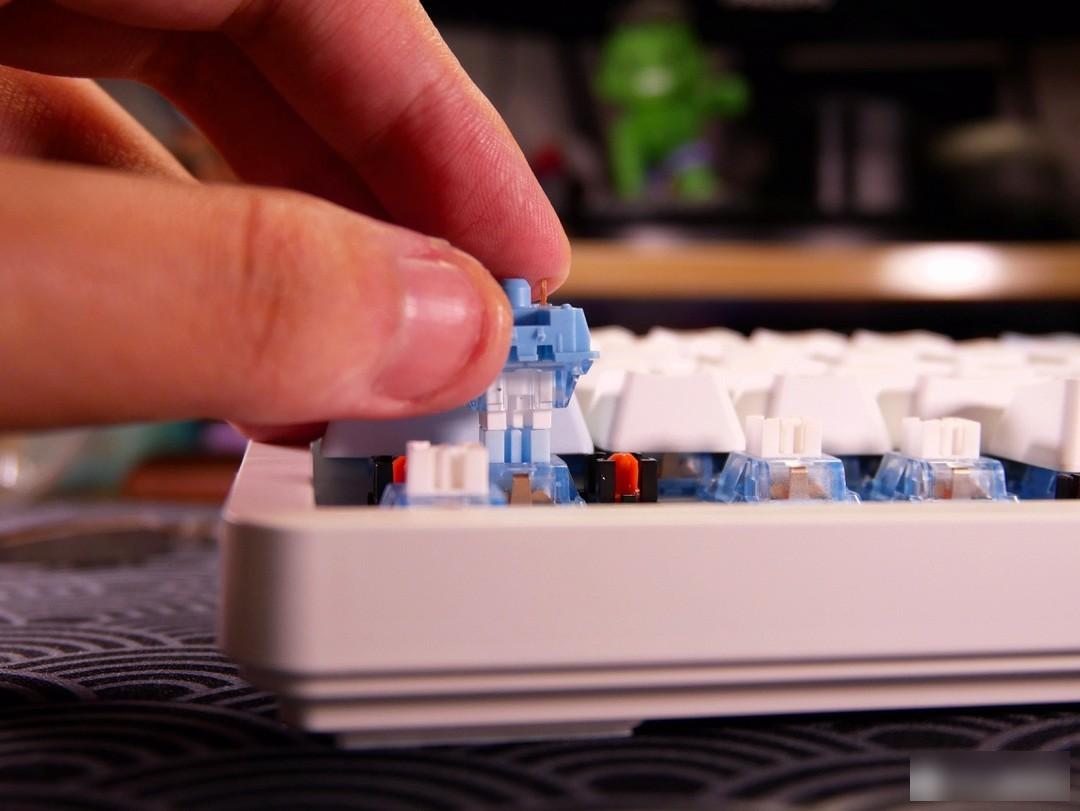
7. Key Removal:
To replace a key on an OEM mechanical keyboard by Keyceo Tech, follow these steps:
- Gently pry off the keycap using a keycap puller or a small flat tool.
- Once the keycap is removed, you will have access to the stem and switch.
- Carefully detach the stem from the switch, ensuring gentle handling.
- Align the replacement keycap with the stem and press it down firmly until it clicks into place.
- Test the key to ensure it registers keystrokes correctly.
Understanding the anatomy of a mechanical keyboard is essential for proper maintenance and customization. Keyceo Tech's OEM mechanical keyboards are built using high-quality components to ensure an exceptional typing experience. By following the provided steps, you can easily replace a key and continue enjoying the reliability and superior performance of Keyceo Tech's mechanical keyboards.
Step-by-Step Guide to Removing a Key from a Mechanical Keyboard
Mechanical keyboards have gained popularity among users due to their durability, tactile feedback, and customizable features. However, over time, it is not uncommon for a key on these keyboards to become stuck, worn out, or broken. In this step-by-step guide, we will explore how to remove a key from an OEM mechanical keyboard, providing you with the necessary knowledge to replace or clean individual keys. So, whether you are a gaming enthusiast, a professional typist, or simply someone seeking to maintain their mechanical keyboard, Keyceo Tech is here to assist you.
Step 1: Gather the Required Tools
Before you embark on the process, ensure you have the appropriate tools. It is recommended to have a keycap puller, a flathead screwdriver, tweezers, and a small bowl or container to hold the keys and screws during disassembly. Keyceo Tech provides high-quality keycap pullers and other keyboard accessories designed specifically for OEM mechanical keyboards.
Step 2: Turn Off Your PC and Disconnect the Keyboard
To avoid accidental keystrokes or system interruptions, turn off your computer and disconnect the OEM mechanical keyboard from any USB ports.
Step 3: Carefully Remove the Keycap
Start by positioning the tip of the keycap puller beneath the keycap you wish to remove. Gently lift the keycap, ensuring even pressure is applied to avoid damaging the key or the switch underneath. Keyceo's keycap puller is ergonomically designed and provides a secure grip, preventing slippage when removing keycaps.
Step 4: Disconnect the Keycap from the Switch
Once the keycap is lifted, you will notice a stabilizer bar connecting it to the switch. Using a pair of tweezers or your fingertips, detach the stabilizer bar from the keycap. Take caution not to apply excessive force to prevent any accidental breakages.
Step 5: Remove Any Additional Stabilizer Wires (if applicable)
Some OEM mechanical keyboards may have additional stabilizer wires that need to be detached. If present, remove these wires carefully by gently lifting them with tweezers or your fingers.
Step 6: Unscrew the Keyboard Plate (if necessary)
Certain mechanical keyboards may require you to unscrew the keyboard plate to access the switch underneath. In this case, use a small flathead screwdriver to remove the screws that secure the plate. Place the screws in a container to avoid losing them during the process.
Step 7: Gently Detach the Mechanical Switch
With the keycap and stabilizer removed, you can now access the mechanical switch. Use the small flathead screwdriver to push the plastic tabs and release the switch from its position. Be cautious and apply gentle pressure to prevent damaging any of the delicate parts.
Step 8: Clean or Replace the Key Switch (as needed)
If your intention is to replace a key switch, remove it completely from the keyboard. However, if you simply need to clean the switch, use a can of compressed air or a keyboard-safe cleaning solution to remove any debris or dust that may be causing the issue. Keyceo Tech offers high-quality cleaning kits specifically formulated for mechanical keyboards.
Step 9: Reassemble the Keyboard
Once you have cleaned or replaced the key switch, it's time to reassemble the keyboard. Start by carefully reinserting the switch back into its position. If you removed the keyboard plate, reattach it securely using the screws. Reconnect any additional stabilizer wires if necessary.
Step 10: Attach the Keycap and Test
Finally, align the keycap with the switch stem and press down firmly until it snaps into place. Repeat this process for any other keys you may need to remove. Once all the keys are reattached, reconnect the OEM mechanical keyboard to your computer, turn it on, and test the functionality of the replaced or cleaned key.
Removing a key from an OEM mechanical keyboard may seem daunting at first, but with the right tools and our step-by-step guide, it can be a straightforward process. Whether you need to replace a worn-out key or simply want to clean your keyboard, Keyceo Tech provides the necessary accessories and expertise to assist you. By following our detailed instructions, you can maintain the performance and longevity of your mechanical keyboard, ensuring an enhanced typing or gaming experience for years to come.
Choosing the Right Replacement Key for Your Mechanical Keyboard
In today's digital era, mechanical keyboards have become a popular choice for computer enthusiasts and gamers alike. With their tactile feedback and durability, it's no wonder why they have gained so much attention. However, even the most well-made mechanical keyboards may encounter an occasional issue, such as a keycap becoming worn or damaged. When faced with this situation, it is essential to choose the right replacement keycap to ensure the longevity and functionality of your keyboard. In this article, we will explore the different aspects to consider when selecting a replacement keycap for your OEM mechanical keyboard.
Keyceo Tech, a leading brand in the world of mechanical keyboards, understands the importance of providing high-quality replacement keycaps to its customers. With a wide range of options available, Keyceo Tech aims to meet the diverse needs of keyboard enthusiasts. Whether you are a professional typist, a casual gamer, or a dedicated programmer, finding the perfect replacement keycap is crucial to maintaining an optimal typing experience.
The first factor to consider when selecting a replacement keycap is the compatibility with your OEM mechanical keyboard. Keyceo Tech offers an extensive range of keycap sets specifically designed for their keyboards. These sets are manufactured to match the layout and profile of the original keycaps, ensuring a seamless integration into your keyboard. Furthermore, Keyceo Tech provides compatibility information on their website, allowing you to confidently select the right replacement keycap for your keyboard model.
Another aspect to consider is the material of the replacement keycap. Keyceo Tech recognizes the importance of using high-quality materials to ensure durability and comfort. The most common materials used for keycaps include ABS and PBT plastics. ABS keycaps are known for their smooth texture and vibrant colors, while PBT keycaps offer a more textured and robust feel. Keyceo Tech provides both ABS and PBT keycaps, allowing you to choose based on your personal preferences.
Furthermore, Keyceo Tech offers a variety of keycap profiles to cater to different typing styles. The most popular keycap profiles include OEM, Cherry, and DSA. OEM keycaps provide a comfortable typing experience with their slightly concave shape and cylindrical top. Cherry keycaps, on the other hand, have a more pronounced curve and a flat top, offering a different tactile feel. DSA keycaps feature a uniform spherical shape, providing a unique typing experience. Keyceo Tech understands that each individual has their own preference when it comes to keycap profiles and offers a range of options to choose from.
Additionally, Keyceo Tech acknowledges the aesthetic aspect of keycaps. While some users might prioritize functionality, others may be more interested in personalizing their keyboard. Keyceo Tech offers a variety of colors and designs for their keycaps, allowing you to express your individuality and make your keyboard stand out. Whether you prefer a sleek all-black look or a bold and colorful design, Keyceo Tech has options to suit various style preferences.
In conclusion, choosing the right replacement keycap for your OEM mechanical keyboard is essential for maintaining optimal performance and ensuring a pleasant typing experience. Keyceo Tech, a prominent brand in the mechanical keyboard industry, offers a wide range of high-quality replacement keycaps to meet the needs of every keyboard enthusiast. From ensuring compatibility with your keyboard model to considering the material, profile, and aesthetics of the keycap, Keyceo Tech provides options and information to help you make an informed decision. With their commitment to quality and customer satisfaction, you can trust Keyceo Tech to deliver the perfect replacement keycap for your mechanical keyboard.
Simple Techniques for Installing a New Key on Your Mechanical Keyboard
Mechanical keyboards have gained immense popularity among gaming enthusiasts, programmers, and professionals due to their durability, precision, and tactile feedback. However, over time, individual keys may become worn out or damaged, warranting a replacement. In this article, we will delve into the step-by-step process of installing a new key on your OEM mechanical keyboard, brought to you by Keyceo Tech.
Step 1: Gathering the Necessary Tools:
Before initiating the replacement process, it is essential to gather the required tools. The tools generally needed for key installation include a keycap puller, which safely removes the existing keycap from the keyboard, and a new keycap that matches the layout and design of your existing mechanical keyboard.
Step 2: Removing the Old Keycap:
To remove the old keycap, begin by gently inserting the keycap puller under one corner of the keycap. Apply balanced pressure until the keycap slightly pops out. Repeat this step for the other corners until the keycap is loosened. Then, carefully pull up the keycap to fully remove it from the stem.
Step 3: Inspecting and Cleaning:
After removing the old keycap, take a moment to inspect the stem underneath for any residue or debris. Use a soft cloth or compressed air to clean the stem thoroughly, ensuring its pristine condition. This step guarantees easy installation of the new keycap and smooth functionality.
Step 4: Aligning the New Keycap:
Now that the stem is clean, place the new keycap over the stem, ensuring it is aligned correctly. The keycap should fit snugly and evenly without any obstruction. Take a moment to examine the orientation and alignment before proceeding further.
Step 5: Pressing the Keycap into Place:
Apply gentle but firm pressure on the center of the new keycap, pushing it firmly onto the stem until it clicks into place. Ensure that all edges sit flush with the keyboard surface for an optimal and visually appealing installation. Test the key by pressing it a few times to confirm its stability and functionality.
Step 6: Repeat the Process:
If multiple keys need replacement, repeat Steps 2 to 5 with each keycap until all the desired keys are successfully installed. Take this opportunity to examine the overall appearance and functionality of your mechanical keyboard, ensuring a consistent and hassle-free typing experience.
Installing a new keycap on your OEM mechanical keyboard is a simple process that can enhance your overall typing or gaming experience. With the help of Keyceo Tech's detailed guide, you can effortlessly replace worn-out or damaged keys, ensuring the longevity and performance of your mechanical keyboard. Remember to gather the necessary tools, remove the old keycap, clean the stem, align the new keycap, and pressing it into place firmly. By following these steps, you can maintain the aesthetics and functionality of your mechanical keyboard and enjoy a seamless typing or gaming experience for years to come.
Disclaimer: Keyceo Tech does not take responsibility for any damage or injury sustained during the key installation process. Please proceed with caution and consult the manufacturer's manual or seek professional assistance if unsure.
Tips for Maintaining and Extending the Lifespan of Key Switches in Mechanical Keyboards
Mechanical keyboards have gained immense popularity among gamers and typists due to their superior durability, tactile feedback, and customization options. However, over time, the keys on these keyboards may start to wear out or become unresponsive, requiring replacement. In this article, we will delve into the essential tips for maintaining and extending the lifespan of key switches in OEM mechanical keyboards, with a focus on our brand Keyceo Tech.
Understanding OEM Mechanical Keyboards:
OEM mechanical keyboards, such as those manufactured by Keyceo Tech, are renowned for their high-quality components and excellent performance. These keyboards utilize key switches, which are responsible for registering key presses. Key switches are available in various types, including the popular Cherry MX, Kailh, and Gateron switches, each offering different characteristics and key feel.
1. Cleaning and Dust Prevention:
Regular cleaning is crucial to maintaining the longevity of key switches. Dust particles and debris can accumulate within the switches, leading to the keys becoming sticky or unresponsive. To clean the keyboard, turn it off, unplug it, and gently remove the keycaps using a keycap puller or by carefully prying them off with your fingers. Use compressed air or a soft brush to clean the switch housing, removing any dirt or dust. Avoid using liquids or excessive force during the cleaning process.
2. Keycap Maintenance:
Proper maintenance of keycaps is equally important to ensure the longevity of key switches. Avoid exposing the keycaps to direct sunlight or extreme temperatures, as this can cause discoloration or warping. Additionally, using abrasive materials or harsh cleaning agents can damage the keycaps' surface, compromising their appearance and functionality. Instead, gently wipe the keycaps with a soft cloth and mildly soapy water for effective cleaning.
3. Switch Replacement:
Despite careful maintenance, it may occasionally be necessary to replace a key switch in your OEM mechanical keyboard. Keyceo Tech offers conveniently replaceable key switches, allowing users to easily replace a single faulty switch instead of the entire keyboard. To replace a key switch, follow these steps:
i. Identify the faulty key switch by observing its unresponsiveness, stickiness, or irregular keypress behavior.
ii. Obtain a replacement key switch compatible with your Keyceo keyboard model.
iii. Turn off the keyboard, unplug it, and remove the keycap of the malfunctioning key.
iv. Using a suitable tool, such as a switch puller or tweezers, gently remove the faulty key switch.
v. Insert the replacement key switch into the respective switch socket, ensuring it is aligned correctly.
vi. Reattach the keycap and test the functionality of the newly replaced key switch.
4. Proper Keyboard Usage:
Adopting appropriate typing techniques and gaming practices can significantly contribute to the extended life of key switches. Avoid excessive force while pressing keys and consider using a wrist rest to maintain a comfortable typing position. Additionally, refrain from eating or drinking near the keyboard to minimize the risk of spills.
Maintaining and extending the lifespan of key switches in OEM mechanical keyboards is essential to preserve their performance and functionality. By following the tips provided in this article, including regular cleaning, keycap maintenance, and proper keyboard usage techniques, users can enjoy a superb typing or gaming experience for an extended period. With Keyceo Tech's commitment to crafting high-quality mechanical keyboards, incorporating these practices will undoubtedly enhance the longevity of your OEM mechanical keyboard.
Conclusion
In conclusion, replacing a key on a mechanical keyboard may seem daunting at first, but with our company's 7 years of experience in the industry, it becomes a simple and rewarding task. By following the step-by-step guide provided in this blog post, you can easily restore the functionality and aesthetics of your keyboard. Whether it's a stuck key, a worn-out cap, or a broken switch, our knowledge and expertise allow us to offer comprehensive solutions for all your keyboard-related issues. Trust our experience, and you'll soon be typing away comfortably and efficiently on a fully functional keyboard that feels brand new. So, don't be intimidated by the idea of replacing a key; embrace it as an opportunity for improvement and personalization. Join the countless satisfied customers who have relied on us for their keyboard needs, and let us help you unlock your keyboard's full potential.
Factory Adress: No.11,FengpingRoad